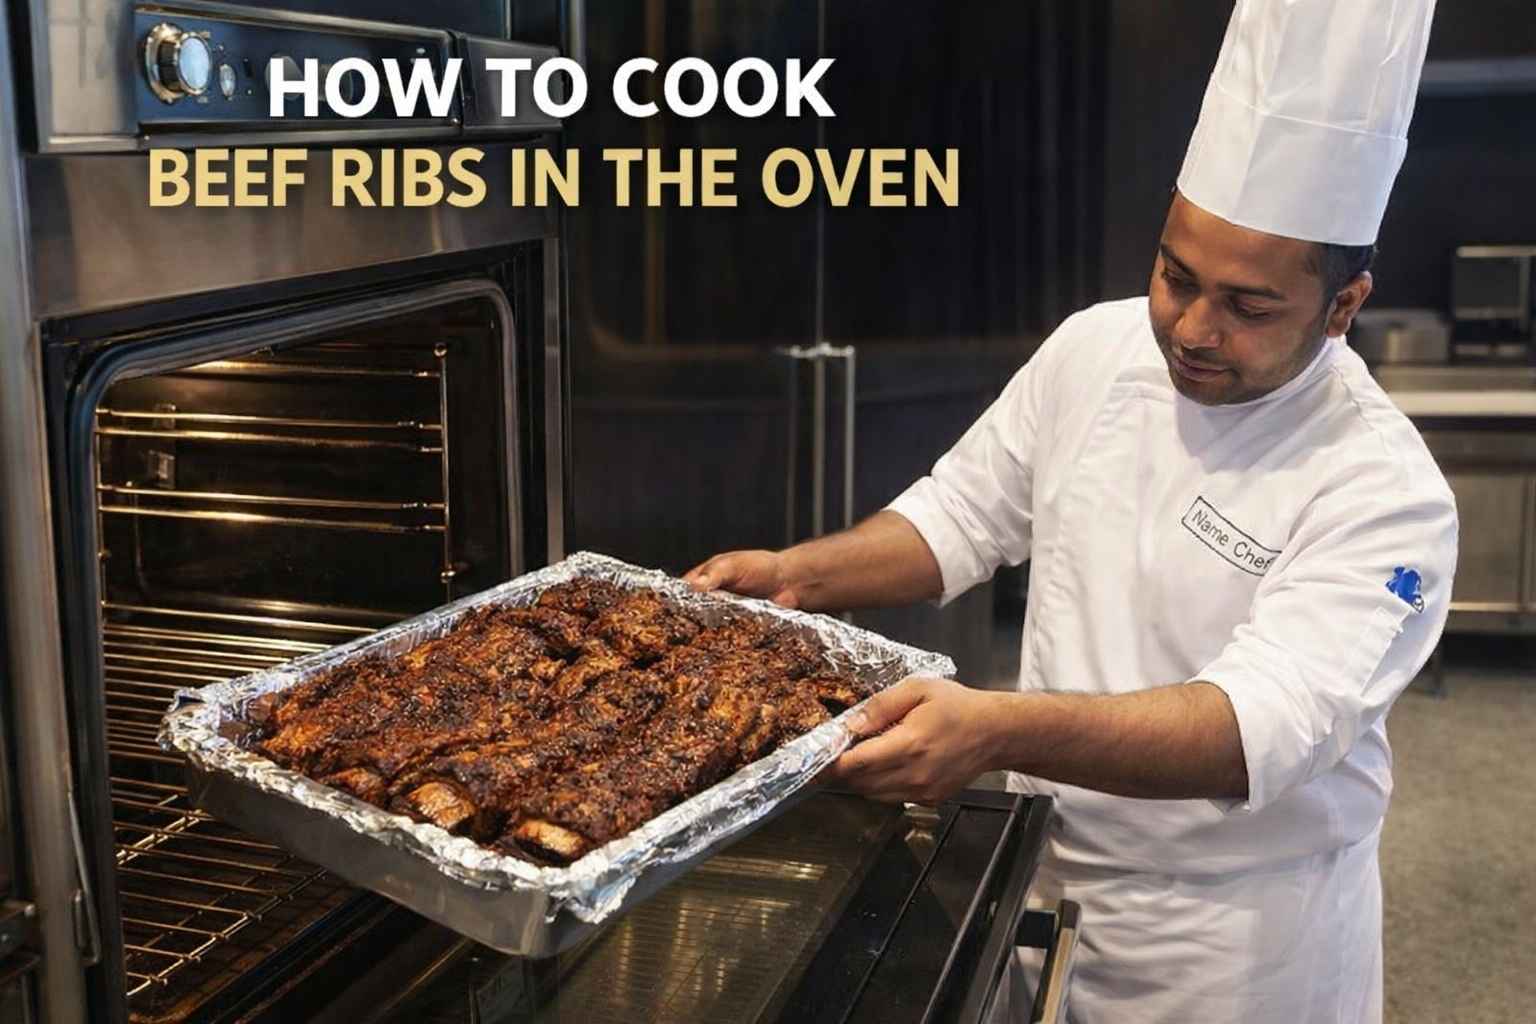
Hey, I’m Mossaraof — a professional cook and food blogger.
There is nothing like the smell of slow-roasted meat to make a house feel like a home. I want to show you how to cook beef ribs in the oven like I do for a meal your family will love. My years in busy kitchens taught me that low heat is the true secret to melt-in-your-mouth joy. You can use my Ultimate Guide to Master Your Oven to get the settings just right for this dish. Let’s head to the kitchen and start this tasty journey together!

If you’re new to roasting or just want to improve your oven skills, I also recommend checking out The Complete Guide to Using an Oven at Home. It covers all the essentials, from rack placement to preheating tricks.
Let’s get into it—because great ribs don’t need smoke and fire. Just a solid oven and a little know-how.
To interlink these URLs naturally into your blog post, I have woven them into the descriptions of the rib types and the shopping advice.
Here is the updated text with the internal links integrated:
What Cut Are You Working With? Know Your Beef Ribs First
Before you even think about turning on the oven, take a minute to figure out what ribs you’re holding. Not all beef ribs are created equal. I learned that lesson the hard way when I once tried to cook flanken-style ribs like back ribs and ended up with something closer to jerky.
Each cut behaves differently in the oven, and knowing how long to cook beef ribs in the oven depends entirely on which variety you choose. Trust me, it matters.
Types of Beef Ribs I’ve Cooked
- Back Ribs: These are the ones you’ll often find next to the steaks. Less meat, but good bone structure. They brown faster and can dry out if you’re not careful, so I recommend following a specific guide on how to cook beef back ribs in the oven to keep them tender.
- Short Ribs (English Cut): Thick, juicy, and a bit fatty. Perfect for slow roasting or braising. These are my go-to for cold weather days, and learning how to cook beef short ribs in the oven is a game-changer for Sunday dinners.
- Flanken-Style Ribs: Thin, cross-cut ribs with a quick cook time. Great for when I don’t want to run the oven for hours.
I usually go for short ribs when I want that rich, fall-off-the-bone experience. But if it’s a weekday and I’m low on time, flanken-style under high heat gets the job done. If I’m really in a rush and ribs aren’t on the menu, I’ll pivot to quicker oven proteins like chicken burgers or chicken meatballs.
What to Look For at the Store
When shopping, I always check:
- Marbling: Good fat distribution is your friend.
- Color: Bright red, not dull or gray.
- Thickness: Even thickness means even cooking.
- Packaging Date: Fresher the better, especially for oven cooking.
In Florida, I once grabbed ribs from a local market and they looked fine, but by the time I got them home (in 90°F heat, with A/C on low), they already smelled off. Lesson learned: Always plan your meat run last if you’re out in hot weather.
Essential Prep Steps (Don’t Skip These)
Look, I used to think I could just season and toss ribs into the oven. Wrong. Skipping prep is like skipping preheat—it comes back to bite you.
Here’s what I always do now:
1. Remove the Silver Skin
This membrane on the bone side? It turns rubbery when cooked. I slide a butter knife underneath, grip it with a paper towel, and peel it off. Some days it comes off clean. Other days, it tears like old duct tape. Either way, don’t skip it.
2. Pat the Ribs Dry
Water is the enemy of a good crust. I use paper towels to dry both sides. In my Arizona kitchen, it’s easy—the air’s so dry, it almost does the job for me. But in Florida, I had to go through three towels just to get them dry.
3. Trim Excess Fat
Some fat is good. Too much, and it puddles in the pan and smokes. I trim the thick caps but leave the marbled sections alone. That fat melts into magic.
4. Season Generously
My basic rub changes depending on my mood, but usually:
- 1 tbsp kosher salt
- 2 tsp smoked paprika
- 1 tsp garlic powder
- 1 tsp brown sugar
- Black pepper to taste
Sometimes I go spicy. Sometimes sweet. But I always let the rub sit on the ribs for at least 30 minutes—longer if I’m planning ahead.
How to Cook Beef Ribs in the Oven Slow (The Cozy Weekend Method)
This section is for the patient cooks. The ones like me who don’t mind a long Sunday cook with music playing, a messy apron, and a house that smells like barbecue dreams.
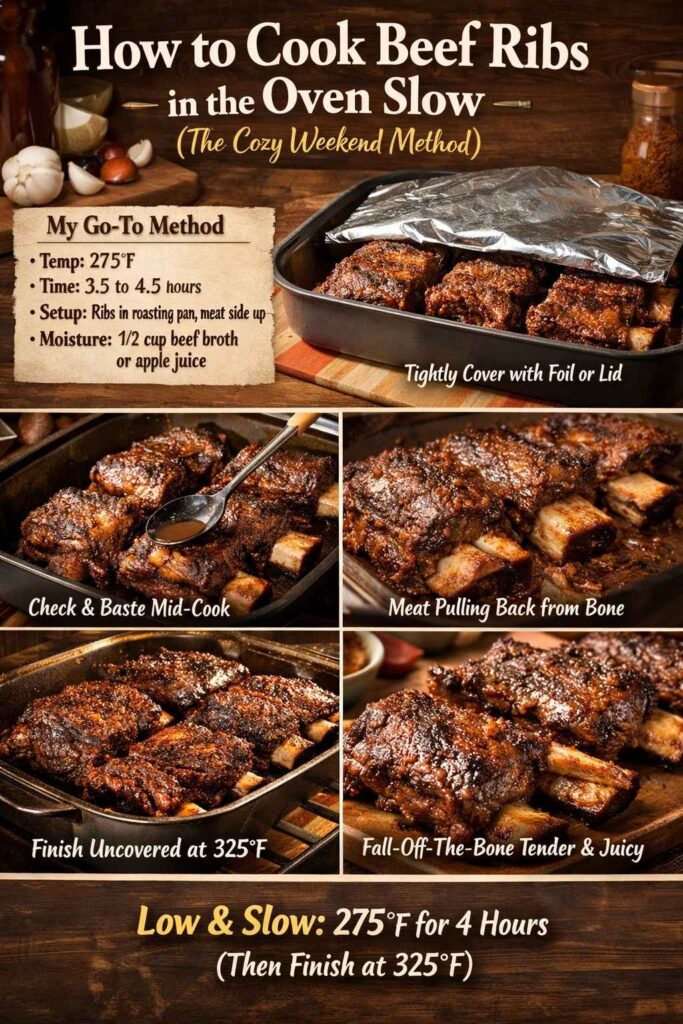
When I want tender beef ribs in the oven that practically fall off the bone, I go low and slow. No shortcuts.
Why I Prefer This for Short Ribs
Short ribs are fatty and thick. They need time. You rush it, and they stay tough. I’ve tried cooking them at 375°F to “speed things up.” That was a mistake. Dry outside, chewy inside. Never again.
My Go-To Method:
- Temp: 275°F
- Time: About 3.5 to 4.5 hours depending on cut
- Setup: Ribs go in a roasting pan or Dutch oven, meat side up
- Moisture: I add about 1/2 cup of beef broth or apple juice
Then I tightly seal the pan with foil or use a heavy lid if I’m using my Staub Dutch oven. In Florida, I even tossed in a splash of pineapple juice once—surprisingly good.
Mid-Cook Behavior
Sometimes I check at the 2-hour mark. Not always. Depends how distracted I get. If I do peek, I baste them with the pan juices. That’s optional, but it keeps the edges from crisping too early.
If I see the ribs shrinking off the bone and the meat jiggles when nudged, they’re almost there.
Finish Uncovered for Bark
The last 20–30 minutes, I take off the foil and crank the temp up to 325°F. That crisps the surface without drying the inside.
I’ve done this even in an uneven gas oven in Arizona. Had to rotate the pan once, but still nailed it.
How to Cook Beef Ribs in the Oven Quickly (Weeknight Hustle Style)
Sometimes, I just don’t have four hours to wait around. That’s when I grab back ribs or flanken-style ribs and turn up the heat.
But—quick doesn’t mean careless. Oven-roasted beef ribs can still turn out juicy and flavorful even on a tight schedule.
The Fast and Flavorful Approach
- Temp: 400°F (sometimes 425°F if I’m using thinner ribs)
- Time: Around 45–75 minutes depending on thickness
- Setup: Ribs on a wire rack over a sheet pan
- No foil this time—I want crust, not steam
What Works Best in This Style
- Back ribs: Thin and cook faster, perfect for this method
- Flanken-style: These are almost like thick bacon strips—done in 30–45 minutes
- Dry rub: Crucial here. Since there’s no low-and-slow time to develop flavor, I use a bold rub
Here’s one of my speed rubs:
- 1 tbsp brown sugar
- 1 tsp chili powder
- 1 tsp garlic salt
- 1/2 tsp cayenne
- 1 tsp cumin
Quick Broil Finish
If I want them sticky, I brush on a glaze (like honey BBQ or maple mustard) in the last 10 minutes and finish under the broiler for 2–3 minutes.
Be warned: broilers work fast. I’ve gone from caramelized to charred in under a minute. Learned that in my Chicago apartment with an electric oven that broiled unevenly.
How to Make Tender Beef Ribs in the Oven Every Time
Tenderness is the holy grail. You want to bite in and feel the ribs give—just enough resistance to pull clean, not fall apart like pot roast.
What I’ve Learned About Tenderness Over the Years
- Low temps help collagen break down slowly
- Moisture keeps things juicy
- Resting time matters as much as cooking time
I used to skip the rest. I’d be too hungry or too impatient. But once I started giving ribs even 10–15 minutes post-oven to sit under foil, the difference was night and day. Juices redistribute, and the texture becomes silky.
Moisture Techniques That Work:
- Wrap in foil or lid tightly
- Add a splash of:
- Apple juice
- Beef broth
- Beer (yes, even a lager does wonders)
- You can also toss in:
- Sliced onions
- Garlic cloves
- Rosemary sprigs
I once used leftover coffee. It made the ribs deeper, richer, almost smoky. That was a happy accident in a snowstorm when I ran out of broth.
Flavor Boosts: Rubs, Marinades, and Glazes That Actually Work
This is the fun part. Flavor.
I’ve tried dozens of combos over the years—some brilliant, some not so much. Once, I tried a mango-habanero glaze that sounded good on paper but ended up tasting like spicy jelly. Lesson: not everything needs fruit.
When I find a mix that hits, I write it down. These are the ones I trust.
My Favorite Dry Rubs for Beef Ribs in the Oven
Dry rubs are where I start 90% of the time. They let the beef shine but still bring big flavor. And they’re low effort, which is key when you’re juggling dinner and life.
1. Sweet and Smoky BBQ Rub
- 1 tbsp brown sugar
- 1 tsp smoked paprika
- 1 tsp garlic powder
- 1 tsp onion powder
- 1/2 tsp mustard powder
- 1 tsp kosher salt
- Black pepper to taste
This one’s my go-to. I use it for slow-cooked ribs, especially in the winter. Makes the house smell amazing—like you’ve been cooking all day even if you started late.
2. Southwest Spice Rub
- 2 tsp chili powder
- 1 tsp cumin
- 1 tsp oregano
- 1/2 tsp cayenne
- Salt and pepper
Tastes great with a honey glaze or served with lime. I use this when I want heat but not a full burn. Works especially well in dry climates like Arizona where I don’t want extra moisture in the oven.
3. Coffee + Cocoa Bold Rub
- 1 tbsp ground espresso or dark roast
- 1 tsp unsweetened cocoa
- 1 tsp chipotle powder
- 1 tsp brown sugar
- 1/2 tsp garlic salt
Sounds weird. Tastes incredible. Deep, earthy, slightly spicy. I use this when I want people to ask, “What’s in this?”
Wet Marinades That Actually Soak In
I’ll be honest—I don’t always have time to marinate. But when I do, and I let the ribs sit overnight? Total payoff.
1. Savory Umami Marinade
- 1/4 cup soy sauce
- 1 tbsp Worcestershire
- 1 tbsp Dijon mustard
- 2 cloves garlic, crushed
- Dash of balsamic vinegar
Great for back ribs. Adds a salty kick without masking the beef.
2. Sweet Heat Marinade
- 2 tbsp maple syrup
- 1 tbsp apple cider vinegar
- 1 tsp hot sauce
- Pinch of cinnamon
I tried this on a whim during a cold snap in Chicago. My pantry was running low, and this is what I had. It actually worked—especially with a spicy dry rub on top.
Glazes for That Final Shine
Sometimes, ribs just need a finish. These are the glazes I trust when I want sticky, finger-licking ribs.
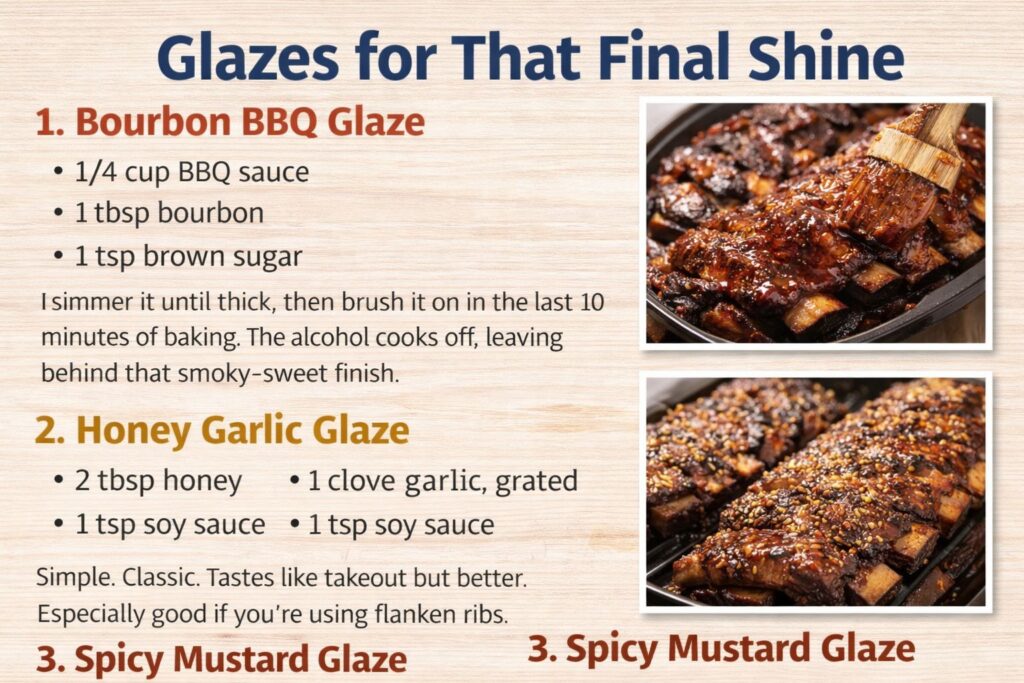
1. Bourbon BBQ Glaze
- 1/4 cup BBQ sauce
- 1 tbsp bourbon
- 1 tsp brown sugar
I simmer it until thick, then brush it on in the last 10 minutes of baking. The alcohol cooks off, leaving behind that smoky-sweet finish.
2. Honey Garlic Glaze
- 2 tbsp honey
- 1 clove garlic, grated
- 1 tsp soy sauce
Simple. Classic. Tastes like takeout but better. Especially good if you’re using flanken ribs.
3. Spicy Mustard Glaze
- 2 tbsp yellow mustard
- 1 tbsp brown sugar
- 1 tsp hot sauce
This one came out of a tailgate prep day. I didn’t have BBQ sauce, so I winged it with fridge leftovers. It hits that perfect tangy-sweet-spicy balance.
When to Add the Glaze
If I’m cooking low and slow, I brush on the glaze during the last 15–20 minutes—after I uncover the ribs.
If I’m going fast and hot, I add glaze in the final 10 minutes and broil for 1–2 minutes. Always watch closely. A minute too long, and sugar turns bitter fast. Been there.
Do I Ever Combine Rub + Marinade + Glaze?
Sometimes. But I keep it simple:
- Dry rub + glaze: most common combo
- Marinade + dry rub: only if I pat ribs dry before rubbing
- All three? Rare, but possible if the flavors don’t clash
Too many layers can muddle the beef. And I like beef to taste like beef—not a spice cabinet.
Oven Setup and Rack Positioning for Best Results
This is where so many people mess up. I’ve done it myself—beautifully seasoned ribs, perfect rub, hours of patience… only to burn one side or steam the bottom. Turns out, your oven setup can make or break beef ribs.
Middle Rack Is My Default
If I had to pick one spot, it’s always the middle rack. In most U.S. ovens—especially electric ones—it’s where the heat is most even.
I used to throw my ribs on the bottom rack, thinking “closer to the heat, faster cooking.” Nope. That’s how I ended up with crispy bones and raw centers during one unfortunate December dinner in my Chicago apartment.
So now:
- Middle rack for low and slow cooking
- Top rack for a broil finish
- Bottom rack only if you’re roasting over a water pan
Wire Rack + Sheet Pan = Game Changer
This one took me years to figure out. When I first started baking ribs, I just laid them flat in a glass dish. They cooked, sure—but the bottoms were soggy and the top didn’t get that rich color.
Here’s what works for me now:
- Wire rack (like USA Pan or Nordic Ware)
- Set inside a rimmed baking sheet
- Lined with foil for easier cleanup
The airflow under the ribs makes a huge difference. They roast evenly, no puddling juices, and the bark forms better. I use this for both slow and fast methods.
In my Arizona kitchen, the dry air makes things crisp faster. So the wire rack keeps the ribs from over-browning underneath.
Covering or Not? Depends on the Method
Here’s my personal rule:
- Slow cook = covered (tightly with foil or a Dutch oven lid)
- Quick roast = uncovered (for maximum browning)
- Combo = covered first, then uncovered the last 20–30 minutes
I’ve tested this dozens of times. Covering traps moisture and helps soften the meat. But if you don’t uncover at the end, the ribs come out a little pale and wet-looking.
During a rainy night in Tampa, I once forgot to uncover the ribs at the end. Tasted great but looked… sad. My guests still ate everything, but I learned to always finish with a blast of dry heat.
If You Have a Convection Oven
Convection changes the game. The fan moves hot air around, so things cook faster and more evenly—if you remember to reduce the temp.
Here’s what I do:
- Lower temp by 25°F
- Check doneness 20–30 minutes early
- Rotate the pan halfway if your oven runs hotter on one side
My convection oven in Arizona tends to brown the right side faster. So I rotate the ribs at the halfway point, just to keep things even.
And always preheat fully before putting ribs in. I once got impatient and tossed them in five minutes early… and got an uneven bark that looked like a zebra stripe.
Don’t Forget the Drip Tray
Especially important if you’re glazing or cooking uncovered. Sugar burns fast. So I always line the sheet pan with foil to catch drips.
In a pinch, I’ve used a second rack with a foil-lined tray underneath. Just don’t block airflow—you want heat to move freely.
Best Cookware and Tools I Trust (After Years in the Kitchen)
Good ribs start with good prep—but the tools you use? That’s what keeps the process sane. Over the years, I’ve burned, dried out, and straight-up dropped racks of beef ribs because I trusted the wrong pan, or didn’t use a thermometer. Let me save you from that mess.
I don’t believe in owning a hundred gadgets. I keep it tight—just what works, no fluff.
Dutch Ovens vs Roasting Pans: When I Use Each
I rotate between two main pans depending on the ribs and the day.
1. Dutch Oven (Lodge or Staub)
If I’m slow-cooking short ribs, this is my go-to.
- Keeps moisture locked in
- Heavy bottom distributes heat evenly
- Works great with beef broth, onions, or garlic in the bottom
Back in my Midwest apartment, I relied on my Lodge Dutch oven during the winter. The smell of ribs simmering all afternoon made the place feel like a BBQ joint.
2. Roasting Pan + Rack (USA Pan or Cuisinart)
For back ribs or flanken-style, I use a traditional roasting setup.
- Rack lifts ribs for airflow
- Pan catches drips and makes cleanup easier
- Lets the bark develop nicely
I started using this in Florida, where the humidity slowed down browning. With this setup, I finally got a proper crust.
Heavy-Duty Foil (Don’t Skimp Here)
Cheap foil rips. Rips mean leaks. Leaks mean smoke. And smoke means you’re opening windows at 8 AM while your neighbors think you lit something on fire.
I always use Reynolds Heavy Duty Foil. One solid wrap, crimped edges, and it holds tight.
When slow roasting, I double-layer it around the pan. In humid climates like Tampa, I’ve found steam builds up faster—this trick keeps everything contained.
Thermometers: My Safety Net
Even after years in the kitchen, I don’t trust oven dials. I don’t trust my “gut feel” either. I trust numbers.
1. Oven Thermometer (Taylor or ThermoPro)
I keep this inside my oven at all times. Found out my oven in Arizona ran 30°F hotter than what I set. Explains a lot of overcooked ribs from back then.
2. Meat Thermometer (ThermoWorks Dot or Meater)
For beef ribs, I check that internal temp hits at least 195°F, but I aim closer to 200–205°F for that buttery pull.
Insert into the thickest part—not touching bone. If I get 198°F and the ribs are pulling clean from the bone? They’re done.
Basting Brush + Small Saucepan
If I’m glazing ribs, I want:
- A silicone brush (holds sauce, doesn’t shed bristles)
- A small pan to warm the glaze—cold sauce on hot ribs ruins the bark
I learned this the hard way with a cold honey garlic glaze. Looked beautiful, then slid right off the ribs and pooled underneath like syrup. Now I warm everything before brushing.
Wire Cooling Rack + Sheet Pan Combo
Mentioned this earlier, but worth repeating. This setup:
- Cooks more evenly
- Prevents sogginess
- Cleans up easier
I use USA Pan’s non-stick rack. No rust. No sticking. And I can throw the whole thing in the dishwasher if needed.
Optional But Helpful
- Kitchen shears — For cutting ribs between bones
- Tongs with silicone tips — So I don’t tear the bark when turning
- Gloves — I use nitrile gloves for rubs and handling hot pans. Way better than washing spice off your hands fifty times.
I didn’t buy all this at once. Some were hand-me-downs. Some I bought after a disaster (shout-out to the cheap roasting pan that buckled mid-cook and dumped my ribs onto the oven door). But after testing in all kinds of kitchens, these are the tools that have stayed with me.
Finishing Strong: Resting, Slicing, and Serving Beef Ribs
This is the moment it all comes together.
After hours of waiting—whether slow-roasted all afternoon or fast-tracked after work—your beef ribs are done. Or at least, you think they are. But if you slice too soon, all that juicy goodness you worked so hard for… ends up on the cutting board instead of in your mouth.
I’ve done it. Multiple times. Now I treat finishing like its own step.
Let the Ribs Rest (Seriously, Don’t Skip This)
As tempting as it is to dig in the second they come out of the oven, don’t.
Here’s why: when beef ribs rest, the juices settle. Cut them too early, and those juices spill out like a busted dam.
What I Do:
- Remove ribs from oven
- Tent loosely with foil
- Let rest 10–15 minutes (20 if I cooked low and slow)
In my cold-weather kitchen in Chicago, I once rested them on top of the oven with a warm towel draped over. In summer, I let them sit near a breezy window. Either way, just give them that pause.
Slicing Beef Ribs the Right Way
I used to slice wherever it looked good. Sometimes that meant cutting through the bone. Not smart.
Beef ribs have thick bones, and the meat usually sits above them. The trick is finding the gap between bones and slicing clean.
How I Slice:
- Flip ribs bone-side up to see where to cut
- Use a sharp chef’s knife or kitchen shears
- Cut between each bone, angle slightly for larger portions
- Wipe the blade between cuts if it gets greasy
For flanken ribs, I just slice across—those are thin anyway. But for English-cut or back ribs, clean between bones is best.
Serving Beef Ribs Like a Pro (Or at Least Like You Meant It)
At home, you don’t need fancy plating. But there’s something about presenting ribs that look like a proper meal—not just meat tossed on a plate.
My Go-To Serving Styles:
- Rustic style: Ribs piled on a cutting board with butcher paper
- Dinner plate: 2–3 ribs served with mashed potatoes and roasted green beans
- Game day: Sliced ribs on a tray with small bowls of BBQ sauce, spicy mustard, or chimichurri
If I’m feeding a group, I slice everything, then drizzle pan juices or warmed glaze over the top. That’s what I did for a tailgate last fall—served ribs with potato rolls and coleslaw, and folks still talk about it.
What Pairs Well with Oven-Baked Beef Ribs?
I keep it simple but filling. These sides work every time:
- Creamy mashed potatoes
- Baked mac and cheese
- Roasted carrots or green beans
- Cornbread or warm dinner rolls
- Classic coleslaw or tangy vinegar slaw
In Arizona, I’ll sometimes serve ribs over cilantro rice with grilled corn. In colder climates, I go full comfort—ribs, gravy, and a baked sweet potato.
And always… always napkins.
How to Reheat Beef Ribs Without Drying Them Out
Leftover ribs can be a gift—or a disappointment. I’ve had both.
There’s nothing worse than reheating beautifully cooked ribs, only to end up with something tough, dry, and chewy. I used to just throw them in the microwave and hope for the best. But over time, I figured out better ways.
When I make a big batch, I always plan for leftovers. And now, I reheat them like they deserve to be respected.
Oven Reheat (Best Method for Tender Results)
If I’ve got time, this is my favorite way to bring ribs back to life. The oven keeps them moist, warms them evenly, and gives you a little crust at the end.
What I Do:
- Preheat oven to 300°F
- Place ribs in a baking dish or wrap in foil
- Add a splash of broth, water, or even leftover pan juice
- Cover tightly
- Heat for 20–25 minutes
If I want the surface to crisp up a bit, I uncover the foil for the last 5 minutes.
This works especially well in my electric oven, which holds heat steady. When I lived in Florida, though, I’d bump it to 325°F because my old oven there didn’t hold heat well—it always ran cool, especially when humid.
Microwave Hack (Quick but Gentle)
I only do this when I’m in a rush. It’s not perfect, but if you do it right, you can avoid turning the ribs into leather.
My Method:
- Wrap each rib in a damp paper towel
- Place on a microwave-safe plate
- Reheat in 30-second bursts, checking in between
- Total time: usually around 1–2 minutes
The damp paper towel trick? Game-changer. Keeps moisture in, softens the meat, and doesn’t wreck the texture as badly. I picked this up when I was meal-prepping for a busy catering week and needed to reheat test batches fast.
Air Fryer Finish (For Crispy Edges)
Sometimes I just want bark. Especially the day after a big meal when I’m craving a snack that feels a little indulgent.
How I Do It:
- Preheat air fryer to 350°F
- Add ribs in a single layer (don’t stack)
- Cook for 5–6 minutes, flipping halfway
- Check for desired crispness
This method works well with glazed ribs. I wouldn’t use it for heavily sauced ones unless I want a mess inside the basket. But for dry-rubbed ribs or lightly brushed ones? It’s fantastic.
Creative Ways to Use Leftover Ribs
If I’m feeling adventurous—or just don’t want to eat the same thing twice—I’ll repurpose the meat. It shreds easily once reheated.
Ideas I’ve Tried and Loved:
- Rib Tacos: Shredded meat, pickled onions, corn tortillas
- BBQ Grilled Cheese: Ribs + cheddar + sautéed onions
- Beef Rib Hash: Chopped ribs with potatoes, bell peppers, fried egg on top
- Loaded Baked Potatoes: Scoop of rib meat, drizzle of sauce, shredded cheese, green onion
Once, I even chopped up leftover ribs and used them as pizza topping—thin crust, BBQ base, mozzarella, red onion. Totally not traditional, but I’d do it again in a heartbeat.
Troubleshooting: When Oven Beef Ribs Go Wrong
Let’s be real. Not every rib cook goes according to plan. I’ve had more “oops” moments with beef ribs than I can count. Sometimes it’s the oven. Sometimes it’s me trying to rush. And sometimes? It’s just one of those days where everything sticks, burns, or dries out.
So here’s the fix-it guide I wish I had when I was starting out.
Ribs Came Out Tough?
Happened to me once when I tried to rush ribs on a 425°F blast. Looked great. Felt like biting into a steering wheel.
What Usually Went Wrong:
- Cooked at too high a temp
- Not enough moisture
- Not cooked long enough for connective tissue to break down
How I Fix It:
- Wrap ribs in foil with a bit of broth
- Return to oven at 275°F
- Cook for another 45 minutes to 1 hour
Even dry ribs can be rescued this way if they’re not burnt.
Ribs Too Dry?
This one’s usually from overcooking or forgetting to cover. I’ve done this in both electric and gas ovens, especially if I left them uncovered too long while glazing.
What to Do:
- Slice and serve with a warm sauce or pan juices
- If leftovers, reheat with added moisture
- Don’t toss them—just adjust how you serve them (tacos, hash, etc.)
I once saved a dry batch by chopping the ribs and tossing them in a skillet with butter and a splash of bourbon BBQ sauce. Came out like magic.
No Bark or Crust?
This one frustrated me the most when I was learning. I’d pull out ribs that were soft and tender… but the surface looked pale and steamed.
Why It Happens:
- Covered for too long
- Too much moisture
- No broil or finish time
Fix It Next Time:
- Uncover for the last 20–30 minutes
- Crank oven to 325°F or even 375°F
- Use convection mode if available
- Brush glaze and broil for 2–3 minutes at the end
I also make sure to pat the ribs dry before seasoning. Moisture on the surface prevents good browning.
Uneven Cooking?
I once baked ribs in a gas oven where the left side ran hotter. Half my rack was crispy, the other side was still pale.
How I Manage This Now:
- Rotate the pan halfway through
- Use an oven thermometer to find hot spots
- Avoid crowding the pan—let air circulate
- If broiling, move the pan side to side every minute or so
If you’re working with an older oven (like my rental in Florida), don’t trust the built-in temp. They lie. Every time.
Bottoms Burned, Tops Pale?
This used to happen in my Chicago oven, especially when I cooked directly on a metal baking sheet without a rack.
Tips That Help:
- Always use a wire rack for airflow
- Avoid placing ribs on the lowest oven rack unless you’re water-bathing
- Line the sheet pan with foil to reflect heat
- Try a double pan setup to buffer direct heat
It’s also worth checking your oven’s calibration. Mine once ran 50°F hotter than the dial. No wonder my ribs were toast.
Glaze Slid Off or Burned?
Glazes are tricky. If you put them on too early, the sugar burns. Too late, and they don’t stick.
How I Time It:
- Apply glaze in the last 15–20 minutes of cooking
- If broiling, glaze and broil for just 1–2 minutes
- Warm your glaze before brushing it on—cold glaze slides off
Burned glaze smells like campfire syrup. I’ve made that mistake more than once during late-night test runs.
My Personal Rib Disasters Hall of Fame
Just so you know I’m not perfect:
- Dropped a full tray of ribs onto the kitchen floor—on Christmas Eve.
- Glazed with honey, then forgot and broiled for 6 minutes. Burned sugar everywhere.
- Forgot to turn the oven on. Sat there for an hour wondering why it smelled like… nothing.
Each one taught me something. Mostly, don’t rush. And double-check your settings.
Regional Oven Tips: What I’ve Learned Across the U.S.
Here’s something most people don’t talk about when learning how to cook beef ribs in the oven: location changes everything.
I’ve cooked ribs in tiny apartments in Chicago winters, sweaty humid kitchens in Tampa, and bone-dry afternoons in the Arizona desert. Same cuts. Same rub. Same technique. Different results.
So if you’ve ever followed a beef rib recipe to the letter and still got weird results—yeah, your oven isn’t the only thing at play.
Florida Kitchens: Humidity and Stickiness
Cooking ribs in Florida taught me how much moisture affects oven performance.
In my Tampa rental, the oven took forever to brown ribs. I’d pull them out expecting crisp bark, and instead they looked steamed. Turns out, humid air inside the oven holds moisture against the meat.
What I Adjusted:
- Used convection mode more often
- Uncovered the ribs earlier during slow roasts
- Broiled at the end for extra crust
- Used dry rubs with less sugar (sugar doesn’t caramelize well when steamy)
And I learned to open the oven door briefly near the end to release built-up moisture. Just a quick 5-second vent helped things dry out a little.
Chicago Winters: Cold Air, Long Preheats
Cooking ribs in winter? Oh yeah. The oven warms the whole apartment—which is great when it’s 10°F outside and you’ve got snow boots by the door.
But I noticed my electric oven took longer to preheat during those cold spells. If I rushed and threw ribs in early, they’d sit in lukewarm air for too long, messing with cook times.
What I Did Differently:
- Always waited for full preheat (used an oven thermometer to confirm)
- Added 15–20 minutes to cooking times during really cold days
- Let ribs come to room temp before cooking
- Preheated my pan too—so ribs hit hot metal, not a cold surface
And I actually liked roasting with the lid off more in the winter. The dry air inside my apartment helped create that crispy bark I wanted.
Arizona Ovens: Dry Air and Faster Browning
Arizona ovens are a whole different animal. Dry air makes everything brown faster—but it also dries meat out if you’re not careful.
The first time I roasted beef ribs in Scottsdale, I followed my usual slow-cook routine. But halfway through, the edges started drying out. By the time they were done, the ribs had great color… but the tips were tough.
My Adjustments:
- Lowered oven temp by 15–25°F
- Added more liquid to the pan (sometimes even just water)
- Wrapped ribs in foil tighter than usual
- Checked doneness earlier
I also tent the ribs in foil longer during resting to keep that precious moisture in.
Tips for Any Region
Wherever you live, these tricks help you adapt:
- Use an oven thermometer — your dial lies, especially in extreme temps
- Rotate your pan halfway through cooking — especially if your oven has hot spots
- Watch for humidity — use a dehumidifier or vent the oven door for a few seconds if your kitchen feels wet
- Test the meat, not the clock — doneness is about feel and temp, not just time
Quick U.S. Climate Summary for Rib Cooking
| Region | Oven Behavior | Tips |
|---|---|---|
| Florida (Humid) | Steams ribs, slows browning | Use convection, broil to finish |
| Chicago (Cold) | Slower preheats, dry indoor air | Preheat fully, monitor oven temp |
| Arizona (Dry Heat) | Faster browning, risk of dryness | Lower heat, wrap tight, add moisture |
| Pacific Northwest | Mild humidity year-round | Cover longer, watch for steam buildup |
| Texas (Mixed) | Big oven swings from heat to cold | Adjust by season, calibrate oven often |
Wherever you’re roasting from, just know: beef ribs aren’t one-size-fits-all. Even the air you’re cooking in can change how they come out. Once I started tweaking based on my kitchen, everything got more consistent.
Oven vs Grill vs Slow Cooker: Why I Stick with the Oven
I’ve cooked beef ribs just about every way possible. Oven. Grill. Slow cooker. Even sous vide once—never again. And while each method has its place, I always come back to the oven.
It’s the one that lets me control every variable. And honestly, it’s the one I trust the most when I’m feeding people and don’t want to gamble.
Why the Oven Wins in My Kitchen
I’m not saying it’s the only way. But for me, the oven checks all the boxes.
1. Consistent Heat
- I know my oven quirks—like the right side running hot or how long it takes to stabilize at 275°F.
- With a grill, wind and weather mess everything up. Rain once turned a BBQ into a full panic.
2. All-Year Cooking
- I don’t need perfect weather.
- Whether it’s snowing in Chicago or hitting 110°F in Arizona, I can roast ribs indoors without sweating (well… depending on the A/C).
- In Florida, mosquitoes used to chase me back inside before I could flip anything.
3. Flavor Control
- Dry rubs develop better bark.
- Glazes stick and caramelize without open flames.
- I can finish under the broiler or leave the ribs covered longer—without babysitting coals.
When I Use the Grill Instead
Don’t get me wrong—I love a grilled rib now and then. But it’s a finisher, not the main method.
I grill when:
- I’ve already slow-cooked the ribs and want smoke and char
- It’s summer, and I’m feeling extra
- I’ve got time and patience to deal with flare-ups
I’ll slow roast in the oven, then glaze and finish on a hot grill for 2–3 minutes a side. That combo? Absolutely unbeatable when done right.
What About the Slow Cooker?
I’ve done it. It works. But it’s just not my thing for beef ribs.
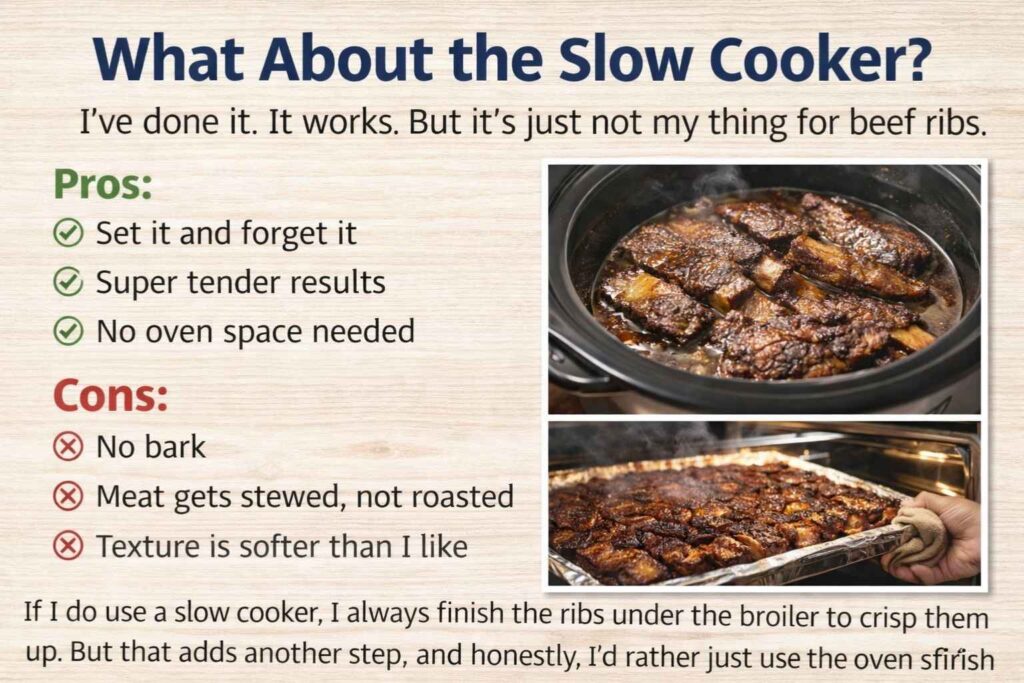
Pros:
- Set it and forget it
- Super tender results
- No oven space needed
Cons:
- No bark
- Meat gets stewed, not roasted
- Texture is softer than I like
If I do use a slow cooker, I always finish the ribs under the broiler to crisp them up. But that adds another step, and honestly, I’d rather just use the oven start to finish.
Final Thoughts from My (Sometimes Messy) Kitchens
I’ve dropped pans, forgotten timers, over-glazed, under-browned, and even smoked up the kitchen trying new techniques. But I’ve also nailed more oven-roasted beef ribs than any other method. And I keep coming back to it for one reason:
It works.
The oven gives me room to experiment, fix mistakes, and build flavor over time. Whether you’re cooking in a tiny NYC apartment or a Texas ranch house with double ovens, it’s the most accessible and forgiving way to cook beef ribs right.
FAQs : How to Cook Beef Ribs in the Oven
How long does it take to cook beef ribs in the oven at 275°F?
Beef ribs take about 3.5 to 4.5 hours at 275°F. This low and slow method helps break down fat and makes the meat tender and juicy.
Should I cover beef ribs when cooking in the oven?
Yes, cover beef ribs with foil or a lid to lock in moisture. Uncover during the last 30 minutes to build a nice crust or add glaze.
What temperature should beef ribs be cooked to?
Beef ribs are best at 200°F to 205°F internal temp. That’s when they turn tender and pull cleanly off the bone without drying out.
Can I cook beef ribs in the oven fast?
Yes, you can roast beef ribs at 400°F for 60–75 minutes. It works best for thinner cuts like back or flanken-style ribs with dry rubs.
What’s the best way to reheat beef ribs without drying them out?
Reheat ribs in the oven at 300°F, covered with foil and a splash of broth. Heat for 20–25 minutes for tender results that stay juicy.
I’m Mossaraof, a trained chef and the founder of OvenInsights.com. I spent years cooking at Larrupin’ Cafe and in kitchens across Chicago and Seattle. Now I test kitchen gear for a living. I moved to North Acton, London, and I test every tool I write about. I use real meals and real heat. No brand deals. No shortcuts. I cover 12 kitchen types and hundreds of recipes. I believe this: the right tools matter as much as the recipe.