Hey, I’m Mossaraof — a professional cook and food blogger.
Nothing beats the smell of slow-roasted meat filling your home on a lazy Sunday. If you want that fall-off-the-bone finish, I’ll show you how long to cook beef ribs in the oven perfectly without the stress. I’ve spent years in professional kitchens learning that patience is the secret ingredient for tender results. Check out my Ultimate Guide to Master Your Oven to ensure your heat is spot on today. Grab your roasting pan and let’s get these ribs started!
What Affects How Long to Cook Beef Ribs in the Oven?
It’s not just about setting a timer. Trust me—I’ve made that mistake. The exact cook time depends on things like meat thickness, oven quirks, and whether your ribs are slathered in sauce or dry rubbed to the bone.
Rib Thickness and Cut Type
Different ribs, different rules. That’s lesson one.
- Back ribs are smaller, cook faster, and need less fuss.
- Short ribs are chunkier and can take 3 to 4 hours to get truly tender.
- Plate ribs—those big, beefy ones you see in BBQ joints—take even longer.
Once, I tossed plate ribs in the oven thinking they’d be done in two hours like my usual back ribs. Nope. Dry edges, chewy centers. Learned the hard way.
When you’re not sure which cut you’ve got, measure the thickest part. If it’s over 1.5 inches, plan for at least 3.5 hours at 275°F.
Bone-In vs Boneless
I prefer bone-in ribs. Always have.
They cook a little slower, but they taste richer. The bone acts like insulation, holding heat and flavor. Plus, there’s something satisfying about watching that meat pull back and expose the tips.
When I cooked boneless ribs in Arizona last summer, they finished nearly 40 minutes faster than bone-in. That desert dryness didn’t help either—moisture escaped faster than I expected.
So yeah, bones add time. But they’re worth it.
Marination and Moisture Level
Here’s where things get a little steamy—literally.
If your ribs have been marinated overnight, they’ll retain more moisture and cook a bit slower. A dry rub, on the other hand, crisps up faster and can shorten cook time if you’re baking uncovered.
I remember trying a bourbon-soaked marinade in my old Tampa kitchen. The ribs were juicy, yes—but took forever to bake. I had to tent them with foil halfway through or they would’ve dried out before the center softened.
Tips I live by:
- Use foil if the ribs are super wet.
- Go low and slow for anything marinated more than 6 hours.
- Dry-rub ribs? Start uncovered and watch the bark form.
Oven Calibration and Temperature Accuracy
This is one of those things I didn’t care about until everything started burning.
My oven in Chicago ran hot—like, 50 degrees over hot. I thought I was baking at 275°F when I was actually at 325°F. No wonder my ribs turned out dry and tight.
Now I use a Taylor digital thermometer to double-check the temp every single time.
Common quirks I’ve run into across U.S. kitchens:
- Gas ovens (like the one in my Arizona home) heat unevenly, especially from the bottom.
- Electric ovens (like my sister’s in New York) hold heat longer and cycle less often.
- Rental units? Honestly, you never know. Always test the oven before big meals.
If your oven has hot spots, consider rotating the pan or using a cast iron to help stabilize heat.
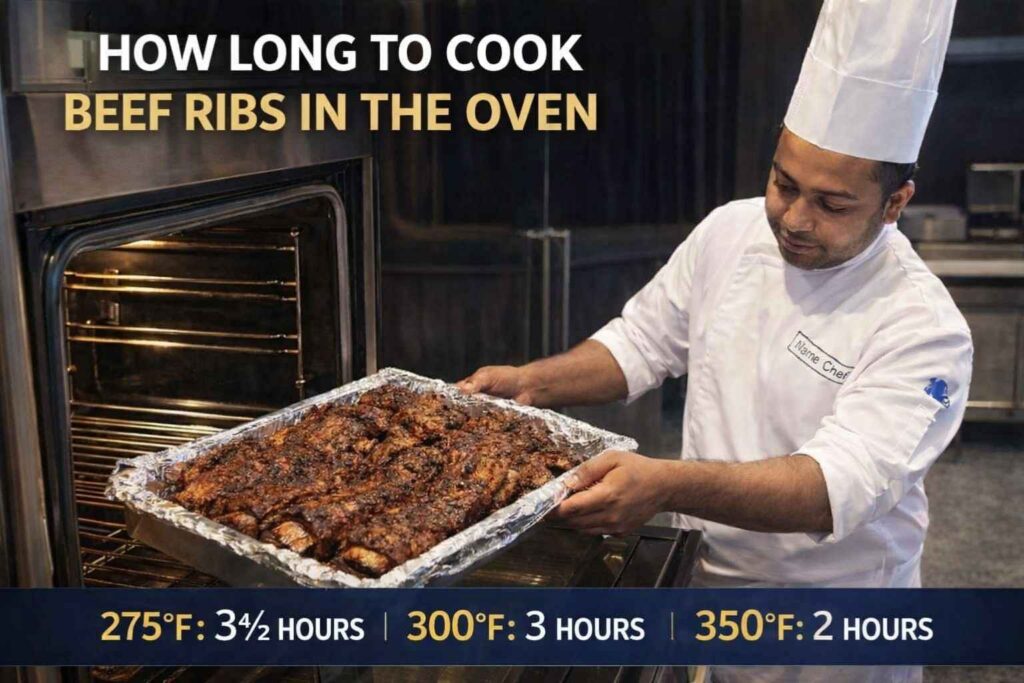
How Long to Cook Beef Ribs in Oven at 275°F
When I want tender, fall-off-the-bone ribs without rushing, I go with 275°F. That’s my sweet spot for deep flavor and that soft, juicy bite.
My Go-To Timeframe: 3.5 to 4.5 Hours
In most of my tests, bone-in beef ribs cooked at 275°F took between 3.5 and 4.5 hours. That range lets the collagen break down slowly while the fat bastes the meat from within. No dryness. No rush. Just rich, meaty goodness.
I once baked a batch of short ribs overnight in my Florida apartment. It was a rainy Saturday, and I’d wrapped them in foil, set the oven on low, and let them go while I tidied up. Around hour four, the smell was unreal—smoky, beefy, with a hint of pepper and garlic. That batch came out like butter.
Why I Love This Temp for Beef Ribs
- More forgiving — they won’t overcook quickly
- Perfect for thicker cuts like plate ribs
- Works well with marinades and moisture-heavy recipes
- Gives bark time to form if you remove the foil at the end
Tips for 275°F Success
- Cover ribs for the first 3 hours
- Finish uncovered for 30–45 minutes for that crust
- Rest the ribs 10–15 minutes after baking (important!)
If you’ve got time, this is the temp I recommend to everyone. Especially if it’s a chill Sunday and you’re not in a rush. Let the ribs do their thing.
How Long to Cook Beef Ribs in Oven at 350°F
This one’s my weeknight hero—especially when I forget to start early.
At 350°F, beef ribs cook faster but still stay moist if handled right. It’s a good middle ground when you’re not aiming for perfection but still want something satisfying.
My Real-World Time Range: 2.5 to 3 Hours
Bone-in ribs usually finish around the 3-hour mark. Boneless might be done in 2 to 2.5. If they’re small or thin, check around the 2-hour point. I use a meat thermometer around the 2.5-hour mark and aim for that golden 200°F internal temp.
One time in Chicago, I had friends dropping by last-minute. I cranked the oven to 350°F, tossed together a dry rub with brown sugar and smoked paprika, and got the ribs in right before kickoff. I kept them covered for most of the bake, then finished them uncovered for the last 30–40 minutes. They came out tender, juicy, and caramelized on top—no grill needed.
Why 350°F Works
- Speeds things up without drying them out (if you’re careful)
- Great for short ribs and back ribs
- Lets you balance timing and texture for busy evenings
- Electric ovens hold this temp really well
Caution Zone
- Don’t leave ribs uncovered too long—they’ll dry out fast
- If using BBQ sauce, wait till the last 30 minutes or it might burn
- Always test doneness before pulling them out—don’t just rely on the clock
How Long to Cook Beef Ribs in Oven at 400°F
Now we’re in high-heat territory.
I only use 400°F when I’m working with thin-cut beef ribs or I’ve pre-cooked them (like boiled or pressure-cooked ribs). It’s fast, intense, and gives a quick bark, but there’s little room for error.
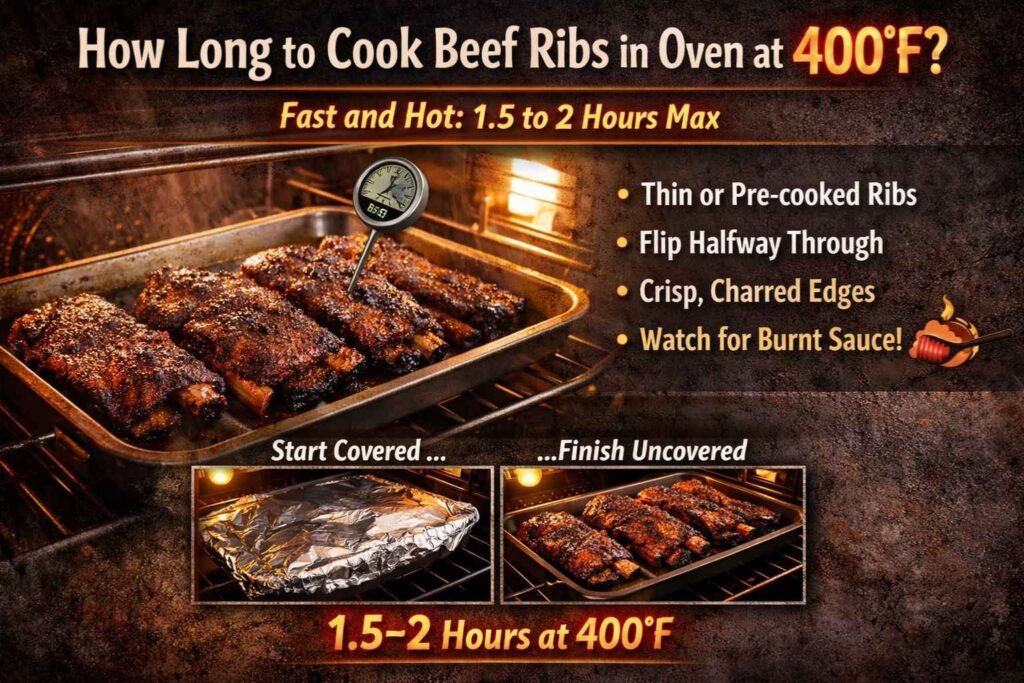
Fast and Hot: 1.5 to 2 Hours Max
Beef ribs at 400°F cook quick. Really quick.
I tried this last summer in Arizona when I didn’t want the oven on all day. I used boneless ribs, tossed them in a spicy dry rub, and baked them uncovered. They were done in under 2 hours—but I had to rotate them halfway through because the back of my oven ran hotter than the front. One side started crisping too early.
Why 400°F Is Tricky
- Heat can dry out the meat if it’s not fatty enough
- Hard to get fall-off-the-bone texture unless ribs are small
- Not ideal for thick cuts or frozen ribs
- BBQ sauce burns fast—so apply late or skip entirely
Best Use Cases
- Thin, boneless ribs
- Pre-cooked or parboiled ribs you’re finishing in the oven
- When time is short and you just need something hot and meaty
I wouldn’t recommend 400°F for first-timers. Too risky. But if you’re in a pinch—or want crisp edges fast—it can work.
Foil Tenting for Moisture Lock
When I want ribs that are juicy and soft, I cover them—at least for the first couple hours. Especially if I’m cooking at 275°F or 350°F.
Aluminum foil acts like a mini oven inside your oven. It traps steam, keeps moisture in, and helps the ribs cook evenly. I learned this one rainy Sunday in my old Tampa kitchen. The ribs were thick and stubborn, and the outer bark started forming way too early. I quickly covered the tray in foil, and boom—problem solved.
When I Always Cover My Ribs
- When the ribs are thick or bone-in
- When I’m using low temps (275°F) for a longer cook
- When it’s a dry rub with no sauce
- When the oven feels drier—like during winter in Chicago or summers in Arizona with AC running full blast
How I Do It
- Wrap the whole tray with foil OR
- Tent the ribs directly if they’re on a rack
- Remove foil for the last 30–45 minutes to develop bark
That final uncovered stretch is where magic happens. The ribs get that dark, caramelized look without losing all their juice.
Uncovered for Bark and Browning
There are times when I go in completely uncovered—but I plan for it. Usually with boneless ribs or thin back ribs.
Leaving them uncovered from the start helps form bark faster. You get those crispy edges and smoky colors. But it comes at a cost—dryness, if you’re not careful.
When I Bake Ribs Without Covering
- When ribs are already pre-cooked or parboiled
- When using a high temp (like 400°F) and need a crust
- When I’m glazing with a sticky BBQ sauce late in the cook
- When the oven is extra humid—like rainy days in Florida
I’ve had ribs come out leathery when I skipped foil too soon. One time I thought I’d get ahead of the game, went uncovered at 350°F, and after two hours the meat looked fine—but it chewed like jerky. Lesson learned.
Tips for Going Uncovered
- Use a baking rack over a rimmed sheet to promote airflow
- Baste with broth or sauce during the cook
- Flip halfway through if oven heats unevenly
- Watch for drying around bone tips
Brands like USA Pan and Nordic Ware make excellent sheet pans with racks. They help circulate heat and prevent soggy bottoms (which I’ve had more than once).
Quick Rule I Follow:
Covered first for moisture. Uncovered last for bark.
That rhythm works in any oven, any season. It’s saved me from dry ribs more times than I can count.
Internal Temperature (Target 195°F to 205°F)
Let’s start with the most reliable method: temperature.
Beef ribs aren’t done at 145°F like steaks. That’s the bare minimum for safety, but not for texture. To break down the collagen and fat in those tough rib cuts, you want to hit somewhere between 195°F and 205°F.
I use a ThermoPro digital probe thermometer in every batch now. It’s especially helpful when I’m multitasking—like roasting potatoes on the bottom rack or checking bread dough on the counter.
How I Check Temp
- Insert the thermometer into the thickest part, away from the bone
- Don’t let it touch the pan or the bone—gives a false reading
- If it reads 195°F+ and the meat wiggles, it’s ready
Tools I Trust
- ThermoPro
- Taylor Digital Thermometer
- Instant-read Thermapens (for quick spot checks)
Even in my old gas oven, where temps fluctuated 20–30 degrees, I could still get the doneness right thanks to that internal reading.
The Wiggle Test and Bend Test
This one’s old school—and still my favorite. No tools. Just hands and eyes.
When beef ribs are fully cooked, the meat shrinks back from the bones. You’ll see about a half-inch of clean bone exposed. But the real trick? The wiggle.
What I Look For
- Grab a bone with tongs and gently twist it
- If it wiggles easily and pulls a little from the meat—it’s done
- If it feels tight, give it another 20–30 minutes and check again
Another method I use: lift the rack of ribs with tongs from one end. If they bend and start to crack slightly in the center—they’re ready.
I remember the first time I did this with a tray of short ribs in my Chicago apartment. I lifted them, saw that bend, and I swear it felt like magic. That rack fell apart in the best way possible.
Smell and Surface Clues
This is the part most people overlook—your nose knows.
By hour three, your kitchen should smell rich, savory, and just a little sweet (if you used sugar in your rub). The aroma deepens when the ribs are near done—it’s almost like a signal from the oven.
Things I Smell for
- A shift from raw meat smell to roasted beef
- Slight smokiness or garlic (depending on my rub)
- No acrid or burnt smells—those mean you’ve gone too far
The surface also changes:
- Bark becomes darker, a little shiny with rendered fat
- Bone tips poke out
- Ribs look slightly dry on the edges—but moist in the middle
Avoid This Mistake: Don’t Judge by Color Alone
I learned this the hard way.
One time in Arizona, I had ribs that looked perfect at 2 hours—dark, barky, even a little charred. I pulled them out, sliced them up, and boom—tough and chewy inside. Not even close to done.
Color isn’t enough. Use temp. Use the wiggle. Trust your senses, not just your eyes.
Yes, You Can Bake Frozen Beef Ribs
Most people say, “don’t do it.” But I say, do it carefully.
The first time I cooked frozen ribs was on a snowy Saturday in Chicago. I had planned a slow-bake rib dinner, but forgot to pull them out the night before. I didn’t panic. I adjusted.
Instead of my usual 275°F, I bumped it up to 300°F and extended the time. And guess what? They turned out juicy.
How I Cook Frozen Beef Ribs
- Start covered with foil to lock in steam and soften the ice
- Add 30–40% more time than you would for thawed ribs
- Do not pre-season heavily until mid-bake (spices won’t stick well on icy meat)
Real Timing Example from My Kitchen
Let’s say you’re baking at 350°F:
- Thawed ribs = 2.5 to 3 hours
- Frozen ribs = 3.5 to 4+ hours
At 275°F, plan for 4.5 to 5 hours minimum, depending on thickness. I check doneness around hour four with a thermometer—if it reads below 180°F, it needs more time.
Pro Tips That Helped Me:
- Add ½ cup broth or water to the pan when baking frozen
- Cover tightly with foil to steam the meat
- After about 2.5 hours, remove foil, season properly, then continue baking uncovered
- Don’t try this at 400°F—it’ll cook the outside too fast while the center stays frozen
When It Doesn’t Work So Well
Let’s be honest—it’s not a perfect method.
- If the ribs are super thick (like meaty plate ribs), cooking from frozen can lead to uneven results
- You may need to rotate the pan or even flip the ribs halfway through
- The bark doesn’t develop as cleanly as with thawed ribs
Still, in a pinch, it works. I’ve served frozen-to-oven ribs that got compliments—and nobody knew I forgot to defrost.
Add Sauce During the Last 30 Minutes
This is my golden rule now. Always has been since I ruined a perfectly good rack in my Arizona kitchen.
I had slathered on a thick, sweet BBQ sauce right from the start—at 350°F. By hour two, the sugars had burned, the top turned bitter, and the bottom was a sticky mess. Lesson learned the smoky way.
Now I wait until the ribs are almost done—when they’ve hit around 180–190°F internal temp—and then brush the sauce on.
My Saucing Timeline
- Cook ribs covered for the first 75–80% of the total time
- Remove foil and check tenderness
- Brush on BBQ sauce in a thin layer
- Return to oven uncovered for 25–30 minutes
- Add a second coat if you want extra stickiness
Why Late Saucing Works
- Prevents sugar from burning
- Lets bark develop first before softening with sauce
- Avoids bitter or blackened crust
- Keeps ribs juicy underneath with a glossy top
I usually go with Sweet Baby Ray’s, Stubb’s, or my own homemade blend—especially for U.S. regional flavor profiles like Kansas City sweet or Texas smoky.
Thinner Sauce? Bake It in Two Layers
One thing I’ve noticed: watery or vinegar-heavy sauces don’t always cling well. So I:
- Bake the first layer for 20 minutes
- Let it bubble and reduce
- Then add a second thin layer and broil for 2–3 minutes if I want char
Once, in Florida, I used a Carolina-style mustard BBQ sauce. It was thin and tangy, so I built it in layers. The ribs turned out saucy but not soggy, and the mustard kick cut through the richness beautifully.
Tips for Baking BBQ-Sauced Ribs
- Keep oven at or below 350°F during the saucing phase
- Never use foil after saucing—it’ll peel off your glaze
- Watch closely in the last 15 minutes to avoid scorching
- Rest the ribs for 10 minutes after baking to let sauce thicken
And never, ever try to baste cold BBQ sauce on cold ribs. Warm it slightly in a pan or microwave first—it spreads better and sticks to the meat like it should.
Slow-Roasted in Cast Iron (Florida Humidity Test)
There’s something steady and grounding about cast iron. I used a Lodge cast iron roasting pan for a rack of short ribs on a muggy July weekend in Tampa.
The weather outside felt like soup, and that Florida humidity actually helped inside the oven. The ribs stayed moist. The bark formed slow but thick.
Why Cast Iron Works
- Holds heat evenly, even in ovens that fluctuate
- Perfect for low-and-slow at 275°F
- You can cover it with foil or a matching lid
- Works great with dry rubs and no liquid added
I didn’t add broth or water. The meat’s own fat was enough. After 4.5 hours, the ribs came out juicy, tender, and slightly smoky from the paprika rub.
Sheet Pan & Rack in Electric Oven (Midwest Winter Style)
This is my “Sunday in Chicago” setup—classic and reliable.
I use a rimmed USA Pan half-sheet and a stainless wire rack on top. It lets air circulate and the fat drip down without steaming the bottom. Electric ovens in the Midwest tend to run steady, especially during cold months when indoor temps don’t swing much.
My Process
- Preheat to 350°F
- Season ribs, place on rack
- Cover loosely with foil for first 2 hours
- Remove foil and finish uncovered for 40–45 minutes
- Optional sauce in last 30 minutes
This setup gives the best combo of bark, bite, and balanced texture. It’s also easier to clean—just line the pan with foil or parchment.
Dutch Oven Method (Dry Arizona Air)
In Arizona, the air is dry—even inside. I noticed my ribs were losing moisture faster, especially in my gas oven. That’s when I switched to a Staub Dutch oven with a tight-fitting lid.
No foil. No extra liquids. Just ribs, rub, and time.
What I Loved About Dutch Ovens
- Sealed environment traps natural moisture
- Ribs cook evenly even at low temps
- Great for braising or fall-apart ribs
- Excellent for winter cooking too
One time, I baked bone-in ribs at 300°F for 3 hours in the Dutch oven, uncovered them for the last 30 minutes, and they pulled clean off the bone. The bark was mild but flavorful. Not crunchy—more like a soft crust.
Perfect for when I’m not chasing that hard BBQ finish.
Glass and Disposable Pans: Meh.
Let me be honest—these didn’t do it for me.
I tried baking ribs in a glass Pyrex dish once in my New York trip (visiting my sister). It got the job done, but the bottom steamed too much and the edges burned faster than the center cooked.
Same thing with foil disposable pans at a Florida cookout. Too thin. No heat control.
They’re fine in a pinch, but if you’re serious about ribs, invest in a heavier pan.
Best U.S. Oven Setups I Recommend
Here are my personal picks after years of testing:
- Best for low-and-slow: Lodge cast iron roaster
- Best all-purpose combo: Sheet pan + rack (USA Pan or Nordic Ware)
- Best for moisture retention: Staub or Le Creuset Dutch oven
- Best for bark: Convection setting + rack baking
- Best on a budget: Cuisinart stainless roasting pans with a rack
Mistake #1: Not Preheating Properly
This might seem small, but it’s a big one. I used to toss the ribs in right as I turned the oven on—figuring it would “come up to temp” with the food inside. Big mistake.
Beef ribs need stable heat from the start. Without it, the meat cooks unevenly. I once ended up with ribs that looked perfect outside but were ice-cold in the center. That was in a rental oven in Tallahassee—old, gas, and stubborn.
Fix I Use Now
- Preheat at least 20 minutes
- Use an oven thermometer (I like Taylor or ThermoPro)
- Don’t trust the oven light—trust the actual temp
Mistake #2: Using the Wrong Pan Size
I learned this one in my Chicago apartment where space was tight. I crammed four beef ribs into a small 9×9 baking dish. Thought I was being efficient. What I got was steam-cooked ribs with rubbery bark and soggy bottoms.
Too small of a pan = no airflow = uneven cooking.
Too large of a pan? The juices spread thin and burn.
How I Adjust Now
- For 2–3 lbs of ribs: use a rimmed half-sheet pan with a rack
- For 4–6 lbs: use a cast iron roaster or Dutch oven
- Always leave ½ inch between ribs so air can move
Mistake #3: Skipping the Foil Phase
Somewhere along the way, I got obsessed with bark. I thought the longer I left ribs uncovered, the better they’d look. Problem was, they’d look good—but chew like jerky.
Especially in my Arizona kitchen where the dry air sucked moisture from everything (including my own face, let alone ribs).
What I Do Instead
- Always cover ribs for the first 70–80% of the bake
- Remove foil once internal temp hits ~180°F
- Then finish uncovered to crisp the top
It’s not fancy, but it works. And it’s saved me from overcooked meat more times than I can count.
Mistake #4: Relying Only on Time
Early on, I followed recipes to the minute. “Bake 3 hours at 350°F.” So I did. And my ribs still weren’t done. Or worse—overdone.
That’s when I realized every oven, every cut, and every rib rack is different.
What I Use Instead of Time Alone
- Thermometer (195°F–205°F target)
- Wiggle test (bone should move slightly)
- Look and smell (bark, exposed bones, savory aroma)
I also rotate the pan halfway if my oven has hot spots. (Most do. Mine in Chicago sure did.)
Mistake #5: Adding Sauce Too Early
I talked about this in Part 6, but it’s worth repeating. Adding sugary BBQ sauce early will wreck your ribs. The sugar burns, the sauce separates, and the top becomes bitter and black.
My first BBQ rib fail happened during a July 4th cookout in Tampa. I was trying to impress family, but all I served up was sticky disappointment.
Lesson Locked In
- Apply sauce only in the last 25–30 minutes
- Keep oven at or under 350°F during glazing
- Use two thin coats instead of one thick slather
Mistake #6: Cooking Straight from Frozen Without Adjusting
I’ve covered how to bake frozen ribs in Part 5, but here’s where folks go wrong—they treat frozen ribs like fresh. Same time, same temp. Doesn’t work.
You’ve got to plan for longer and steam them covered for at least 2–3 hours before even thinking of crisping the top.
Ingredients I Use Every Time
These are the flavors I trust and reach for over and over. You can tweak it, of course—but this base always delivers.
Ribs
- 3 to 3.5 lbs beef ribs (bone-in short ribs or back ribs work best)
Dry Rub
- 1 tablespoon smoked paprika
- 1 tablespoon brown sugar
- 1 teaspoon garlic powder
- 1 teaspoon onion powder
- 1 teaspoon kosher salt
- ½ teaspoon coarse black pepper
- Optional: pinch of cayenne for heat
BBQ Sauce (Optional but Recommended)
- ½ cup Sweet Baby Ray’s, Stubb’s, or homemade blend
- Warmed before brushing
Tools I Use (and Recommend)
- Sheet pan with a wire rack (I use USA Pan)
- Aluminum foil
- Digital meat thermometer (ThermoPro or Taylor)
- Basting brush
- Oven thermometer (if your oven’s moody like mine in Tampa was)
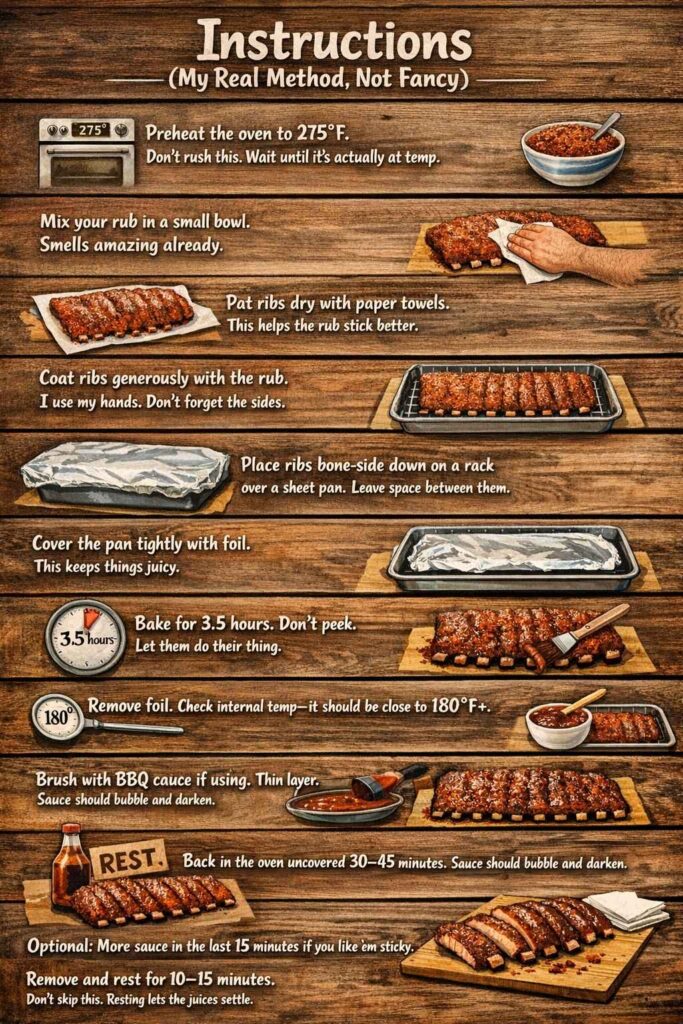
Instructions (My Real Method, Not Fancy)
I usually do this on a Sunday. It smells up the house in the best way.
- Preheat the oven to 275°F.
Don’t rush this. Wait until it’s actually at temp. - Mix your rub in a small bowl. Smells amazing already.
- Pat ribs dry with paper towels. This helps the rub stick better.
- Coat ribs generously with the rub. I use my hands. Don’t forget the sides.
- Place ribs bone-side down on a rack over a sheet pan. Leave space between them.
- Cover the pan tightly with foil. This keeps things juicy.
- Bake for 3.5 hours. Don’t peek. Let them do their thing.
- Remove foil. Check internal temp—it should be close to 180°F+.
- Brush with BBQ sauce if using. Thin layer.
- Return to oven uncovered for another 30–45 minutes. Sauce should bubble and darken. Bark should start to form.
- Optional second sauce layer during the last 15 minutes if you like them stickier.
- Remove and rest for 10–15 minutes.
Don’t skip this. Resting lets the juices settle. - Slice between bones and serve.
Grab extra napkins.
Real-Life Adjustments I Make
Because no oven—or day—is perfect.
- If I’m short on time, I bump temp to 300°F and reduce covered bake to 3 hours
- If my ribs are super fatty, I don’t add extra liquid—but if they’re leaner, I pour ¼ cup beef broth under the rack
- If cooking more than 4 lbs, I rotate the pan halfway through
- In summer, I sometimes finish the last 10 minutes under the broiler—but only if I’m watching closely
FAQs — Straightforward Answers for Real Cooks
How long to cook beef ribs in oven at 350°F?
Beef ribs need about 2.5 to 3 hours at 350°F. I cover them with foil for the first 2 hours, then uncover for the last 30–45 minutes to build bark or add sauce.
How long do beef ribs cook in the oven at 275°F?
At 275°F, I cook beef ribs for 3.5 to 4.5 hours, depending on thickness. This low-and-slow method gives the most tender results with juicy, pull-apart meat.
Should I wrap my beef ribs in foil while baking?
Yes—especially for the first part of the cook. Wrapping keeps moisture in and helps the ribs cook evenly. I unwrap them during the last 30–45 minutes to crisp the top.
How long to cook beef ribs in the oven if they’re frozen?
From frozen, beef ribs take about 30–40% longer. At 350°F, that’s usually 3.5 to 4 hours. I always cook them covered and don’t add sauce until they’re almost done.
What temperature should beef ribs be when fully cooked?
For oven-baked beef ribs, I look for 195°F to 205°F internal temp. That’s the sweet spot where connective tissue breaks down and the meat becomes tender.
Do I need a meat thermometer for ribs?
Yes. It’s the most reliable way to check doneness. I use a ThermoPro or Taylor probe. Look for 195°F+ in the thickest part of the meat.
Can I cook beef ribs at 400°F?
You can, but it’s tricky. I only use 400°F for thin, boneless ribs or when I’ve already pre-cooked them. They’ll be done in 1.5 to 2 hours, but you need to watch closely.
Do electric ovens cook beef ribs differently?
A little. Electric ovens hold heat better and cycle more evenly than gas. I find they bake ribs more consistently, especially at lower temps like 275°F.
What’s the best pan to use for oven ribs?
I love a sheet pan with a wire rack or a cast iron roaster. Both allow airflow and help form bark. Dutch ovens are great for moisture-heavy ribs with no sauce.
Do I need to flip beef ribs while baking?
Not usually. But if your oven has hot spots (like many gas ovens do), flipping once halfway through can help them cook more evenly.
I’m Mossaraof, a trained chef and the founder of OvenInsights.com. I spent years cooking at Larrupin’ Cafe and in kitchens across Chicago and Seattle. Now I test kitchen gear for a living. I moved to North Acton, London, and I test every tool I write about. I use real meals and real heat. No brand deals. No shortcuts. I cover 12 kitchen types and hundreds of recipes. I believe this: the right tools matter as much as the recipe.