Hey, I’m Mossaraof — a professional cook and food blogger.
We all want that warm, cozy pan of fluffy grains and tender meat that brings the whole family to the table. I will show you how to bake chicken and rice casserole in the oven so you get a rich, creamy bake without any dry spots or mushy rice.
My years in a busy Chicago kitchen taught me that a tight foil seal is the true secret to steaming everything to a perfect, soft finish. Use my Ultimate Guide to Master Your Oven to find the best rack spot for a bubbling, golden top. Let’s grab your favorite baking dish and start this heart-warming meal together right now!
What You’ll Need Before You Start
I’ve made this dish so many times that I can practically prep it in my sleep. But I’ve also had moments where I reached for the wrong pan or underestimated the rice. So here’s what I always check before turning on the oven.
Chicken Choices: Raw, Cooked, or Leftovers
I’ve baked this with everything from raw chicken breasts to leftover grilled thighs. Each version turns out a little different — and I’ve had wins and flops with all of them.
- Raw chicken breasts or thighs: These need the full cook time, usually 60–75 minutes depending on size.
- Precooked or rotisserie chicken: Great for quick dinners. I chop it up and reduce the oven time since the chicken’s already done.
- Frozen chicken: I don’t recommend using it straight from the freezer — unless you want soggy rice and uneven meat. Been there. Learned fast.
When I’m using raw chicken, I always aim for an internal temp of 165°F (thanks, USDA). I use my digital ThermoPro meat thermometer for that — it’s a lifesaver in my convection oven.
Picking the Right Rice
This might seem like a small detail, but rice type totally changes how your casserole bakes. I learned the hard way once when I used minute rice and it turned to mush.
- Long grain white rice: My go-to. Fluffy, reliable, and doesn’t go gummy.
- Brown rice: Needs more liquid and more time. I usually cover it tightly and bake at least 90 minutes.
- Minute rice: Works if you’re using precooked chicken. But it cooks fast, so the timing has to be adjusted or it’ll get mushy.
My Rule of Thumb:
For every 1 cup of uncooked rice, I use 1¾ cups of liquid if I’m including juicy chicken on top. If the meat’s precooked or dry, I bump it up to 2 cups.
Pan Talk: Metal, Glass, or Ceramic?
I’ve used almost every kind of bakeware at this point — from cheap foil trays to a 7-pound Staub casserole dish that I treat like a family heirloom.
Here’s what I’ve found:
- Glass (like Pyrex): Heats evenly but needs a little extra time in colder climates (looking at you, Michigan in February).
- Metal pans: Cook faster but can dry out the edges if you’re not careful. Not my favorite for casseroles.
- Ceramic (like Staub or Le Creuset): Heavy, dependable, holds heat like a champ. If you have one, use it. Just don’t drop it — I chipped mine once, and it still hurts.
In my gas oven, the ceramic dish works best. In my old electric oven, I had better luck with glass because the heat distribution was… let’s say “quirky.”
My Go-To Oven-Baked Chicken and Rice Casserole Recipe
This is the version I come back to over and over again. It’s simple. It’s flexible. And it saves me from ordering pizza when I’m already in pajamas.
Ingredients That Actually Work (No Weird Cans Needed)
I’ve seen a lot of recipes call for canned cream soups. They’re fine, but I prefer fresh or pantry-based swaps when I can. Here’s what I actually use most nights:
- 1 lb boneless, skinless chicken breasts or thighs (raw or pre-cooked)
- 1 cup uncooked long grain white rice (not instant)
- 1¾ cups chicken broth (low sodium works great)
- ½ cup milk (whole or 2%)
- 1 small onion, chopped
- 1 tsp garlic powder
- ½ tsp black pepper
- ½ tsp salt (adjust if broth is salty)
- ½ tsp dried thyme or Italian seasoning
- 1–2 tbsp butter (optional, for richness)
Optional add-ins (when I’m feeling fancy or need to use leftovers):
- Frozen peas, broccoli florets, mushrooms
- Shredded cheddar or Monterey Jack
- A dash of hot sauce or paprika for kick
I’ll sometimes swap in cooked rotisserie chicken if I’ve got leftovers. Just reduce the baking time (I’ll explain below).
Step-by-Step Instructions
Step 1: Preheat (and Why You Shouldn’t Skip It)
I know — preheating feels like a chore. But in this dish, it really matters. A cold oven can throw off the rice texture and undercook your chicken.
- Set your oven to 375°F (190°C).
- If using convection, I still use 375°F — it helps brown the top if I uncover it at the end.
On my old electric oven, I used an oven thermometer to double-check the temp because it ran 25 degrees cold. In Arizona’s dry climate, I also found that the top dried out faster — so I started preheating with a rack in the middle position and a foil tent ready.
Step 2: Layer Like a Lazy Genius
I’ve tried mixing everything in a bowl first. I’ve also dumped it right in the baking dish and hoped for the best. Honestly? The second method works just fine.
Here’s my go-to layering process:
- Grease the pan — butter or cooking spray.
- Pour rice into the bottom of the dish.
- Add chopped onion and seasonings on top of the rice.
- Stir in broth and milk directly in the dish.
- Place raw or cooked chicken on top.
- Dot with butter if using. Sometimes I add shredded cheese or veggies here too.
If I’m using raw chicken, I leave it whole so it stays juicy. For precooked, I shred or cube it so it reheats quickly.
Step 3: Cover It Right
This part makes or breaks the moisture level. I’ve had dry rice disasters from loose foil and overbaked chicken from forgetting to tent it later.
- Use foil or a tight-fitting lid.
- I press the foil snugly against the dish to trap steam.
- If I’m baking in a dry or drafty kitchen, I double-wrap the foil.
In winter, when my Chicago apartment feels like a walk-in fridge, I even preheat the dish slightly before layering to prevent sudden temp drops.
Step 4: Into the Oven
Now for the part everyone asks:
How long to cook chicken and rice casserole in oven?
Here’s what I’ve found through testing — and a few late dinners:
- With raw chicken + long grain rice:
375°F for 60–75 minutes covered.
Check chicken for 165°F internal temp. Rice should be tender. - With precooked chicken:
375°F for 35–45 minutes covered.
I often remove foil in the last 10 minutes to brown the top. - Chicken broccoli rice casserole in oven:
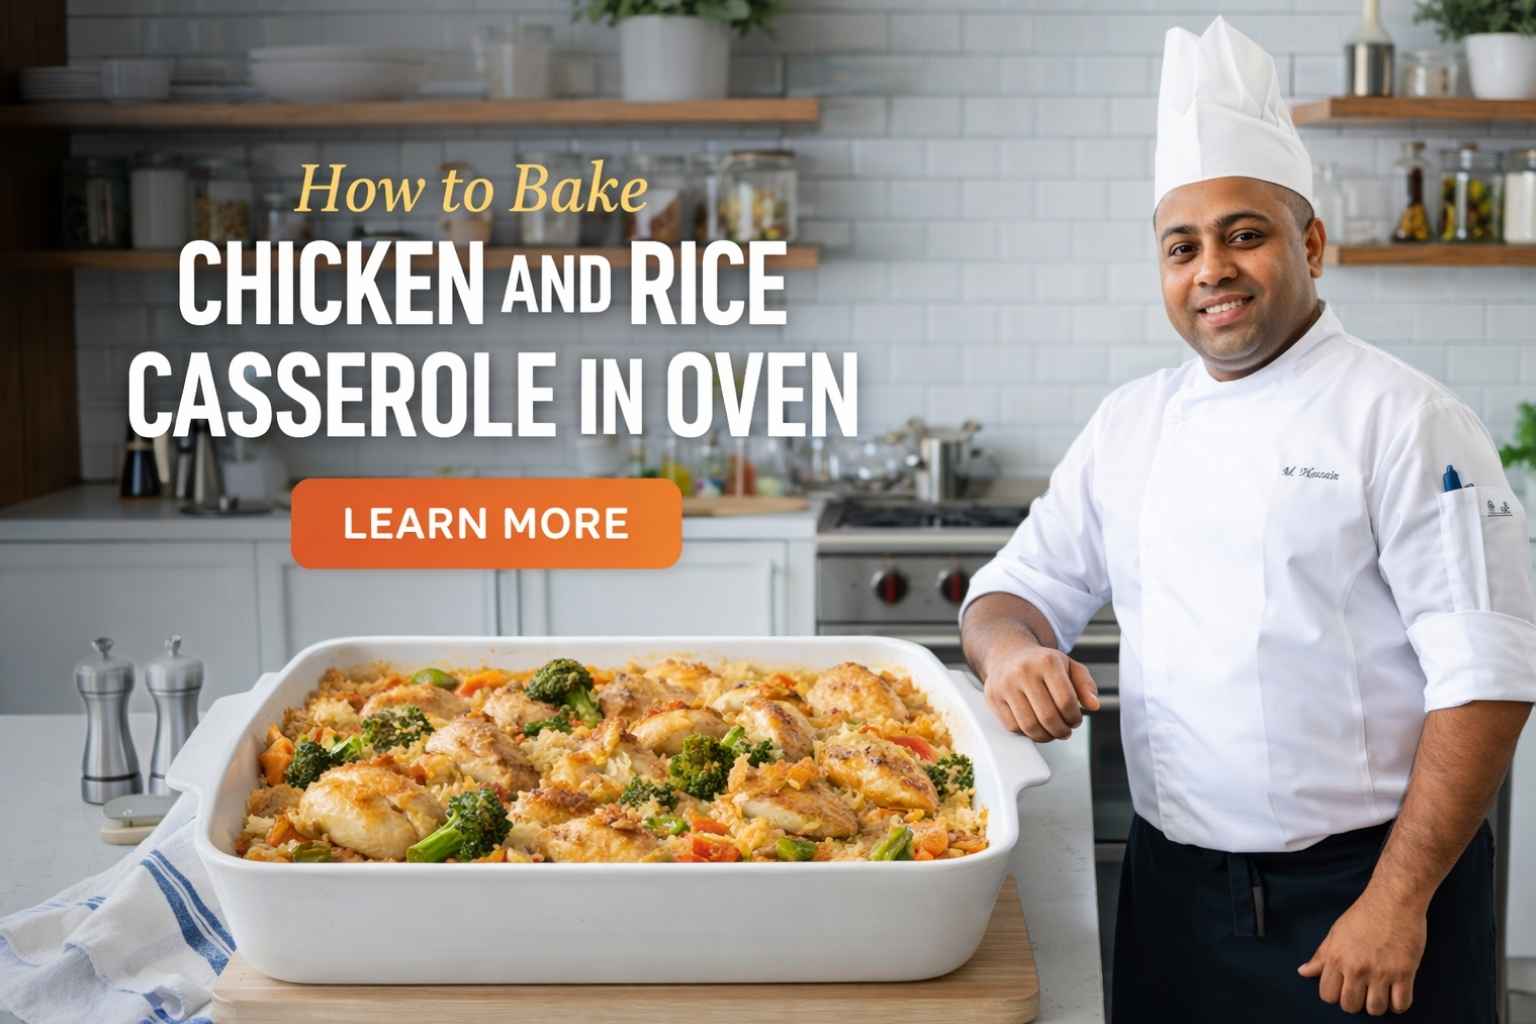
Same times as above, but add broccoli in last 25 mins so it doesn’t turn to mush. I scatter frozen florets right on top before re-covering.
If the rice is still a little firm after the timer, I splash in ¼ cup hot broth, re-cover, and bake 10 more minutes. I’ve done this many times. Totally saves the dish.
Common Problems I’ve Run Into (and How I Fixed Them)
This casserole is simple… until it isn’t. I’ve burned it. Undercooked the rice. Had chicken still pink at the center. Here’s everything that went sideways — and how I fixed it.
Undercooked Rice? Gritty, Crunchy Regret
There’s nothing worse than pulling it out of the oven, lifting the foil, and finding half-cooked rice sitting in cloudy liquid. Been there.
Here’s what I figured out:
- Rice-to-liquid ratio matters. I used to eyeball it. Bad move. Stick to at least 1¾ cups of liquid per cup of long-grain rice if you’ve got raw chicken on top.
- Cold broth = cold start. Use warm broth when possible. It gets things cooking quicker.
- Tightly cover your pan. Steam cooks the rice. Loose foil = crunchy mess.
- My backup fix:
- Pour in hot broth
- Cover tight
- Return to oven for 10–15 more minutes
Now I always check doneness at the 60-minute mark and keep broth on hand just in case.
Dry Chicken? Yep, That Happened Too
One night I cut the chicken into thin strips, trying to be efficient. Big mistake. It dried out before the rice finished cooking.
Here’s what helps:
- Keep chicken in bigger pieces. Whole breasts or large thighs hold moisture better.
- Use foil for most of the bake. Only uncover in the last 10–15 minutes (if at all).
- Try bone-in thighs. They take a little longer, but they stay juicy.
If I’m using leftover cooked chicken, I chop it into chunks and stir it in halfway through the bake so it doesn’t dry out.
Burned Bottom? Yep. That, Too.
This happened more than once in my older gas oven — especially when I used a thin metal pan. The edges would brown too fast while the center was still bubbling.
What I changed:
- Avoid cheap, thin pans. They heat unevenly. I swapped to ceramic or heavy glass.
- Lower the oven rack. Keeping the dish in the middle or upper-middle helps avoid direct heat underneath.
- Use a baking sheet underneath. It acts like a buffer and protects the bottom from scorching. It’s especially helpful if your oven runs hot or you’re baking on a dark metal rack.
I also stopped using dark-coated nonstick pans for this dish — they cook faster than I thought, and not in a good way.
Small Variations I Love (When I’m Not Feeling “Basic”)
Sometimes I want the classic. Sometimes I want to shake it up — just a little. Over the years, I’ve experimented with all sorts of swaps and add-ins. Some flopped (looking at you, overcooked zucchini). But others turned into household favorites.
How to Make Chicken and Rice Casserole in Oven with Minute Rice
So I’ll admit — I didn’t love Minute Rice at first. It felt like cheating. But one night, I was short on time, had leftover chicken, and needed dinner fast. Minute Rice to the rescue.
Here’s how I adjusted the recipe:
- Use cooked chicken only. Raw chicken takes too long and will dry out before the rice finishes.
- Reduce the liquid. I go with 1 cup of broth per cup of Minute Rice — any more and it turns mushy.
- Shorter bake time. 350°F for 25–30 minutes tops. Keep it covered the whole time.
I sometimes toss in frozen peas or broccoli halfway through. My trick? Don’t thaw them — just stir them in frozen so they don’t go soggy.
It’s not gourmet, but when you’re tired and the fridge is almost empty, it’s a win.
Cheesy Add-Ons
I’ve tried cheddar. I’ve tried mozzarella. But my favorite combo?
- Monterey Jack + sharp cheddar — creamy with a bite
- Add it in the last 10–15 minutes so it doesn’t overcook
- Scatter over the top and bake uncovered for a golden crust
Sometimes I even stir in a spoonful of cream cheese when I’m mixing the broth. It gives the whole thing a velvety finish — especially when I’m craving something cozy.
If you’re baking for kids (or picky eaters), cheese is the secret weapon. Add a pinch of paprika on top and boom — it looks fancy.
Rice Krispie Crusted Chicken Bake (Yes, It’s a Thing)
Okay. This one sounds odd. But I made it on a dare — and it turned out surprisingly good.
What I did:
- Dredged chicken pieces in a mix of egg + crushed Rice Krispies
- Placed the crispy chicken on top of the uncooked rice/broth layer
- Baked as usual (covered for 50 mins, then uncovered to crisp the coating)
The result? Juicy chicken with a crispy, crunchy top. The cereal stayed surprisingly firm, especially when baked uncovered at the end. Kids loved it. Adults were suspicious… until they tried it.
I wouldn’t make it every week. But as a fun twist? Worth it.
How to Reheat Chicken and Rice Casserole in Oven
Reheating this dish is where the magic either continues… or completely falls apart. I’ve had leftovers that were better the next day — and I’ve also had bone-dry disasters.
Here’s what works when reheating chicken and rice casserole in the oven — every time I’ve tested it.
Reheat Settings That Actually Work
I used to just toss the dish back in the oven at whatever temp I guessed. But casserole doesn’t play nice when you rush it. Too hot and you dry it out. Too low and it stays cold in the middle.
Here’s my reheating sweet spot:
- Oven temp: 325°F or 350°F
- Covered: Always, at least for the first 15–20 minutes
- Time:
- Whole dish: 25–35 minutes
- Single portion: 15–20 minutes
I check the center with my instant-read thermometer. I like it to hit at least 165°F. It’s not just about food safety — it’s about making sure the rice isn’t cold and clumpy.
If I’m reheating from the fridge and the casserole’s dense, I let it sit on the counter for 10 minutes before baking. That way, the center heats up more evenly.
Moisture Retention Tips
Dry leftovers are the #1 complaint with reheated casseroles. And I get it — rice soaks up everything overnight.
Here’s what I do to avoid it:
- Add a splash of broth (or milk) before baking — just 1–2 tablespoons per portion
- Cover with foil tightly for at least half the reheating time
- Optional butter dot — I sometimes put a tiny pat of butter on top before reheating. Adds moisture and flavor
I’ve also tried covering with parchment first, then foil. In drier winter climates like Colorado or Chicago in January, this keeps it from drying out while still letting it breathe a little.
Reheating a Single Portion vs the Whole Dish
When it’s just me (or I’m sneaking a late-night leftover scoop), I’ll reheat individual portions instead of the whole tray.
Here’s what I do:
- Use a small oven-safe dish or ramekin
- Add rice and chicken, splash of broth, cover with foil
- Reheat at 325°F for 15–20 mins
If I’m in a rush, I’ll use my toaster oven. It actually works great for single portions. Just make sure the edges don’t overcook — I lower the rack one level to prevent crisping too soon.
And yes — I’ve forgotten to cover it before. Crunchy rice. Sad chicken. Lesson learned.
Make-Ahead, Freeze, and Meal Prep Ideas
I’ve leaned on this dish during chaotic weeks — when life feels like laundry piles and unopened mail. Having it prepped or frozen has saved me more than once.
Freezing Tips (Do It Before or After Baking?)
This was a trial-and-error journey. I’ve frozen it raw. I’ve frozen it baked. Both work — but here’s what I learned:
- Freezing raw (uncooked rice + raw chicken):
- Works great if you layer everything like usual
- Use a foil pan or a freezer-safe baking dish
- Do NOT freeze hot broth in the dish — cool everything first
- Label with “Bake at 375°F for 70–80 mins from frozen or 55–65 if thawed”
- Freezing cooked casserole:
- Let it cool completely first
- Cut into squares or freeze the whole dish
- Wrap tightly with foil + plastic wrap to prevent freezer burn
I personally like freezing it raw when I’m prepping ahead. That way, it finishes fresh in the oven when I need it.
A word of caution:
I once froze it in a glass Pyrex dish and put it straight into a hot oven — it cracked. Now I always thaw glass dishes fully in the fridge first or use aluminum trays.
Reheating from Frozen
Here’s my playbook, after years of trial and one mushy disaster:
- If thawed overnight in fridge:
- Bake covered at 375°F for 55–65 minutes
- If baking straight from frozen:
- Cover tightly
- Bake at 375°F for 75–90 minutes
- Add extra broth (about ¼ cup) if rice looks dry halfway through
I usually check it at the 60-minute mark and poke a thermometer in the center. It should hit at least 165°F.
Portioning Like a Pro
Meal prep used to stress me out. But this casserole actually makes it easy. I’ve packed it for lunches, dinners, even a couple post-soccer-practice reheats for a neighbor’s kid.
Here’s what works best for me:
- Single-serving glass containers (like IKEA or Anchor Hocking)
- Portion after baking, while it’s still slightly warm — easier to slice
- Let it cool before sealing to avoid sogginess
When I’m on a budget week, I’ll skip the meat and bulk it with frozen peas and shredded cheddar. Still hearty. Still satisfying.
And honestly? It reheats better than most takeout.
Tools I Swear By for Better Bakes
You don’t need fancy gear to make a solid casserole. But let me tell you — the right tools have saved me from dried-out dinners, scorched bottoms, and midweek meltdowns.
These are the ones I reach for every time now.
Casserole Pans That Changed the Game
I’ve baked this dish in everything — thin metal pans from the dollar store, oversized glass dishes from my mom’s basement, and now, heavy-duty pieces I trust completely.
Here’s what I’ve learned:
- Glass (like Pyrex)
- Great for even heat
- Easy to see bubbling edges
- Can crack if you go from fridge to oven (ask my 2020 self)
- Ceramic (Staub, Le Creuset)
- Heats slowly but holds it well
- Heavy, steady, and looks good on the table
- A bit pricey, but mine’s lasted through serious use
- Cast Iron (like a Lodge enameled casserole)
- Best when I want crispy edges
- A beast to lift when full
- Retains heat longer — great for serving straight from oven
I avoid thin metal pans for this dish. Every time I’ve used them, the bottom cooks way faster than the center — especially in my old gas oven.
In my Whirlpool electric oven, ceramic does best. In my older rental’s convection oven, glass worked better. You really get to know your oven this way.
Thermometers, Timers, and Other Saviors
Before I got a thermometer, I used to cut into the chicken to check if it was done. Now I poke and move on with my life.
Here’s what I actually use now:
- ThermoPro digital meat thermometer
- Fast read
- Accurate
- Lives on my fridge via magnet like it’s part of the family
- Basic digital timer
- I don’t trust my oven’s built-in one anymore — it’s beeped off early more than once
- I use a $10 model from Target, and it’s perfect
- Heavy-duty aluminum foil
- If you’ve ever had foil tear mid-bake and lose steam, you know
- I wrap it tight and sometimes use two layers if my kitchen’s dry (like winter in Michigan)
I also keep a small silicone spatula around for scooping leftovers. It gets into corners and doesn’t scratch my ceramic bakeware — learned that after a loud “crack” and a very sad chip.
Final Notes from My U.S. Kitchen
After 14 winters, 3 broken Pyrex dishes, and more than 50 pans of chicken and rice casserole later… I still come back to this recipe.
It’s not flashy. It’s not trendy. But it works.
I make it on nights when I’m too tired to think. When the kitchen’s a mess. When I forgot to thaw the chicken — again. It’s the kind of meal that forgives you for being human.
I’ve baked it during snowstorms in Chicago, 90-degree evenings in Florida (with the oven fighting the AC), and even in a friend’s Arizona house with an oven that ran so hot I had to pull it out 15 minutes early.
Sometimes I burn the edges. Sometimes the rice is a little soft. One time I forgot the salt completely.
And still — it gets eaten.
It reminds me that cooking doesn’t have to be perfect to be good. That your oven doesn’t need to be expensive. That a scratched-up pan and a bag of frozen peas can still bring everyone to the table.
So if you’re wondering how to bake chicken and rice casserole in the oven — whether it’s your first time or your fiftieth — I hope my real kitchen stories help you find your rhythm. I hope the foil fits tight, the rice cooks through, and the chicken comes out just right.
And if it doesn’t?
There’s always extra broth. A little extra time. And maybe even a second helping anyway.
FAQs: How to Bake Chicken and Rice Casserole in Oven
How to bake chicken and rice casserole in oven step by step?
To bake chicken and rice casserole in oven, mix rice, broth, and chicken in a dish. Cover and bake at 375°F until rice is soft and chicken is done. Check once and stir for even cooking.
What temperature is best to bake chicken and rice casserole in oven?
The best temperature to bake chicken and rice casserole in oven is 375°F. This heat cooks the rice well and keeps the chicken juicy. Lower heat may leave rice undercooked.
How long does it take to bake chicken and rice casserole in oven?
It takes about 60 to 75 minutes to bake chicken and rice casserole in oven. Cover it first, then uncover near the end for a light golden top. Cooking time may vary slightly.
Can I use uncooked rice when baking chicken and rice casserole in oven?
Yes, you can use uncooked rice when you bake chicken and rice casserole in oven. Just add enough broth or water. The rice will cook as the casserole bakes.
How do I keep chicken moist when baking chicken and rice casserole in oven?
To keep chicken moist when baking chicken and rice casserole in oven, cover the dish well. Use enough liquid and avoid overbaking. This helps lock in moisture and flavor.
I’m Mossaraof, a trained chef and the founder of OvenInsights.com. I spent years cooking at Larrupin’ Cafe and in kitchens across Chicago and Seattle. Now I test kitchen gear for a living. I moved to North Acton, London, and I test every tool I write about. I use real meals and real heat. No brand deals. No shortcuts. I cover 12 kitchen types and hundreds of recipes. I believe this: the right tools matter as much as the recipe.