Hey, I’m Mossaraof — a professional cook and food blogger.
Craving a meal that melts in your mouth without the stress? I remember my first time learning how to cook beef short ribs in the oven, and the rich, cozy smell filled my whole home. After years in professional kitchens, I’ve found that slow heat is the secret to making this tough cut feel like butter. Check out my Ultimate Guide to Master Your Oven to ensure your heat stays steady for the best results. Grab your roasting pan and let’s get these ribs started!
Choosing the Right Type of Beef Short Ribs
The cut you pick can make or break your short rib experience. Trust me, I’ve made both choices—good and bad.
Bone-In vs Boneless Short Ribs
I’m usually a bone-in kind of chef. Bone-in ribs cook slower, yes—but that’s where the flavor hides. The marrow adds a richness that boneless just can’t match. That said, there are days when I’m short on time or cooking for someone who hates gnawing on bones. That’s when boneless saves the day.
In a humid Florida kitchen, bone-in ribs took longer to dry-brine, but cooked beautifully. In Arizona? I had to add more liquid—my gas oven there cooked a little hotter, and the dry air sped things up.
Here’s what I noticed when testing both:
- Bone-in ribs: Juicier, more flavor, better for long braising
- Boneless ribs: Faster to cook, easier to portion, can dry out faster
- What to watch: Thickness. Some boneless packs are super thin—those roast fast
And if you’re buying from U.S. stores like Costco or Kroger, always peek under the label. Sometimes boneless ribs are really just oddly trimmed brisket ends.
English-Cut vs Flanken-Style
I didn’t even know what flanken was until I accidentally bought a pack labeled “Korean-style beef ribs.” Surprise! They were cross-cut and totally different.
Now I love both styles—just not for the same recipe.
- English-cut: Long bone, thick meat, ideal for oven-braising
- Flanken-style: Thin, across-the-bone slices, better for high-heat or broiling
For most oven short rib recipes, I stick with English-cut. That’s what fits neatly in my Staub Dutch oven, and it gives me thick, hearty portions. Flanken I save for quick sears or Korean marinades.
If you’re buying in U.S. supermarkets, English-cut is way more common. But if you’re near a Hispanic or Asian market, flanken might be stacked high in the fridge section.
Where I Buy My Short Ribs in the U.S.
Let’s be honest—grocery store short ribs aren’t always cheap. But they’re worth it for a weekend meal or dinner guests.
Here’s where I shop and what I’ve found:
- Costco: Best value for bone-in, thick English-style ribs. Usually USDA Choice.
- Whole Foods: Great quality, but higher price. I get them here when I want grass-fed.
- Local butchers: I ask for thicker cuts and always get better marbling.
- Safeway / Albertsons: Watch the labels—sometimes “short ribs” are just chuck in disguise.
One Sunday, I found a killer deal at Kroger in Chicago—$5.99/lb for boneless short ribs. They were trimmed a little leaner than I like, but still cooked up tender.
The point? Don’t just look at the label. Look at the meat.
Prepping Beef Short Ribs for Oven Cooking
Before the oven even turns on, there’s work to do. And skipping prep is where I used to mess up the most.
Trimming the Fat — But Not All of It
The first time I trimmed all the fat off my ribs, they came out tough. No moisture, no flavor—just disappointment.
Now I just tidy them up. I leave a thin fat cap on top because it melts into the meat. If I see any silver skin underneath, I trim it—unless I’m lazy. Some days, I am.
Quick tip from my Chicago winter kitchen: Cold ribs are easier to trim. I pull them out of the fridge and get to work before they warm up.
Salting and Dry Brining Overnight
Dry brining was a game-changer. It’s simple—just salt. But it makes a huge difference in flavor and texture.
- I use kosher salt — about 1 tsp per pound.
- Sprinkle both sides, pat gently, and leave in the fridge uncovered.
- Overnight is ideal. If I forget, even 2 hours helps.
In my Arizona kitchen, I brine overnight, but I wrap them lightly because the dry air can crust the outside too fast.
The result? Meat that’s seasoned all the way through and stays juicy even after hours in the oven.
Marinating vs Dry Rubs
I love a good marinade, but I don’t always have the time. Dry rubs save me when I’m rushing—or when I want to keep things simple.
When I marinate:
- I go for wine, soy sauce, garlic, and rosemary.
- Let it sit 12 hours minimum.
- Works best for boneless or flanken-style ribs.
When I dry rub:
- Brown sugar, smoked paprika, onion powder, and black pepper.
- I keep it simple but flavorful.
- Perfect for bone-in English-cut ribs.
Some days, I combine both—salt and dry brine overnight, then a dry rub before baking. It’s extra work. But worth it.
How to Cook Beef Short Ribs in the Oven (Step-by-Step)
This is the heart of it—the part where prep turns into payoff. I’ve tested just about every way to cook short ribs in the oven, and here’s what’s worked (and what hasn’t).
The Classic Low-and-Slow Method
If you’ve got the time, this is the method I reach for 9 times out of 10. It’s the one that makes your whole kitchen smell like comfort. The kind that has neighbors asking, “What’s cooking?”
Here’s what I do:
- Preheat to 275°F or 300°F. Not higher.
- Sear the ribs first — stovetop, cast iron if I’m feeling fancy.
- Place them in a Dutch oven or deep baking dish.
- Add braising liquid: beef broth, red wine, garlic, bay leaf.
- Cover tightly — lid or foil.
- Bake for 3 to 4 hours, depending on thickness.
When they’re done, you’ll know. The meat pulls back from the bone, and you can shred it with a fork. I’ve even had a rib collapse on itself in the pan—that was a good day.
One tip? Don’t peek too often. Opening the oven kills the heat, and short ribs hate temperature swings. I learned that the hard way in my Chicago apartment where my oven struggled to hold temp when it was 10°F outside.
How to Cook Beef Short Ribs in the Oven Quick
Sometimes, I don’t have three hours to babysit. That’s when I shift to a faster method—still oven-baked, just quicker.
I only use this with boneless or flanken-style ribs. Thinner cuts, less cook time.
Here’s how I do it fast:
- Preheat to 375°F or 400°F.
- Skip the braise — this is more like a roast.
- Toss ribs in oil and seasoning or a glaze.
- Use a shallow baking sheet or roasting pan.
- Bake for 1 to 1.5 hours, flipping halfway.
What to watch for: Dry edges. I usually brush a little more marinade or broth on halfway through. And if they’re browning too fast, I tent with foil loosely.
This method saved my dinner one night in Florida when guests showed up unannounced. I had boneless ribs, a hot oven, and 90 minutes. Pulled it off—and they had no clue I was scrambling.
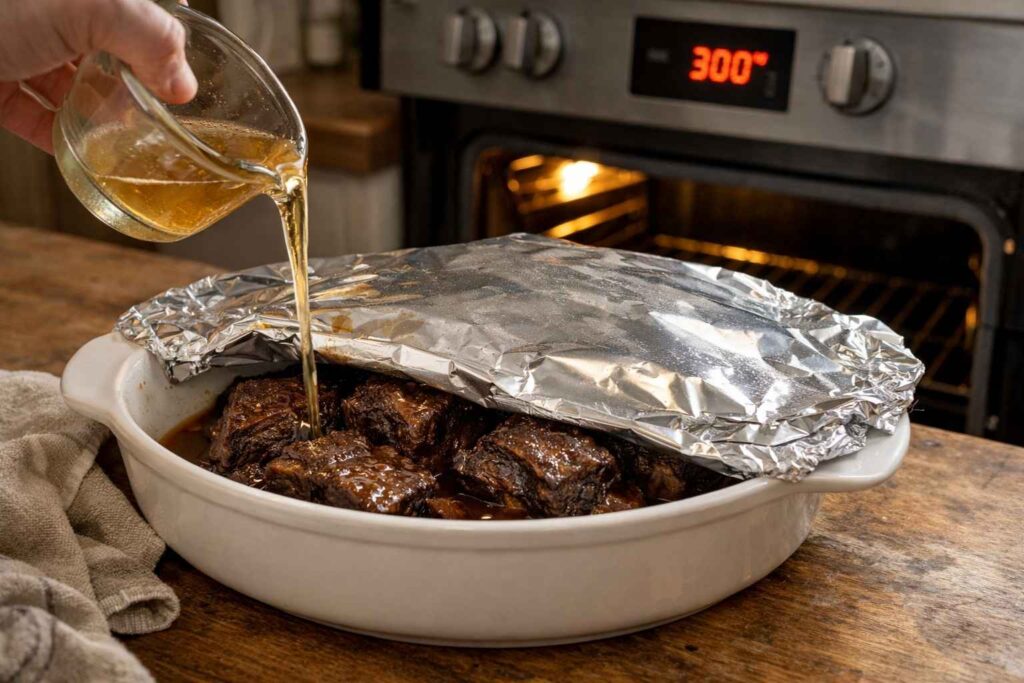
How to Bake Beef Short Ribs in Oven with Moisture (Braising Basics)
This is my go-to when I want depth. Braising builds layers. It makes the ribs buttery-soft and floods the house with that savory, rich smell you can’t bottle.
Here’s how I make it work:
- Sear the ribs until crusted. Remove and set aside.
- In the same pan, sauté onion, garlic, and celery — classic mirepoix.
- Add red wine, scrape the bits, then pour in beef broth.
- Return the ribs, making sure they’re ¾ submerged.
- Add herbs (I like rosemary and thyme).
- Cover and bake at 300°F for 3 hours.
One tip I learned the hard way: don’t skimp on liquid. In Arizona, the dry oven air can evaporate fast—even with foil. I now check halfway and top off with warm broth if needed.
How to Make Beef Short Ribs in the Oven Without Drying Them Out
Dry short ribs are a tragedy. I’ve made that mistake when trying to go uncovered too long or roasting without enough fat.
Here’s how I prevent it now:
- Always cover the pan — foil or a tight-fitting lid.
- Keep ribs partly submerged in broth or wine.
- Bake low and slow (275°F–300°F).
- Don’t overcrowd the pan. Ribs need space.
And don’t skip the resting step. After baking, I let the ribs sit, covered, for 15 minutes on the counter. The juices settle, and the texture finishes perfectly.
One time I skipped resting and carved too fast. Juices ran everywhere. I stood there with a soggy cutting board and dry meat. Lesson learned.
Do You Need to Sear First? My Honest Take
I’ll be straight with you—searing is optional. But I do it when I want deeper flavor and browning.
- In a rush? Skip it.
- Want that crusty caramelization? Do it.
- Use cast iron or heavy stainless steel.
- Don’t overcrowd — do it in batches.
When I sear, I add a bit of oil with a high smoke point—usually avocado oil or vegetable. Olive oil has burned on me at high heat. And don’t move the meat too early. Let it sit, sizzle, and crust.
Still, I’ve made braised ribs without searing that were amazing. Especially when using a strong marinade or sweet rub. It’s all about balance.
Quick Recap (Bullet Format for Scannability)
For tender, flavorful oven short ribs:
- Go low and slow: 275°F–300°F for 3–4 hrs
- Use a Dutch oven or covered dish
- Add broth, wine, or other braising liquids
- Keep ribs covered and moist
- Rest before serving
For quick oven short ribs:
- Use boneless or flanken cuts
- Roast at 375°F–400°F for 1–1.5 hrs
- Flip halfway, brush with broth or sauce
- Cover loosely if browning too fast
Tools I Trust for Cooking Beef Short Ribs in the Oven
You don’t need a chef’s kitchen—but the right tools can make the process smoother, tastier, and way less frustrating.
Dutch Oven vs Roasting Pan
I’ve cooked short ribs in just about everything—enameled Dutch ovens, cheap foil trays, even a too-shallow Pyrex (spoiler: it bubbled over).
My favorite? A Dutch oven.
It holds heat like a champ, and I don’t have to worry about liquids evaporating too fast. I use a 6.75-quart oval Le Creuset for most rib batches. It fits 4–6 bone-in ribs snugly.
But sometimes I need a bigger surface. That’s when I reach for a deep roasting pan and foil it tight.
Here’s what I’ve noticed:
- Dutch Oven Pros: Even heat, tight seal, stovetop to oven
- Dutch Oven Cons: Heavy, expensive, smaller capacity
- Roasting Pan Pros: Larger surface, budget-friendly
- Roasting Pan Cons: Needs tight foil, may cook unevenly in gas ovens
In my Arizona kitchen, I’ve used both depending on whether I was batch-cooking for Sunday dinner or just roasting two ribs on a weeknight.
Thermometers and Oven Calibration
Never trust the dial on your oven. I learned this the hard way when my beef short ribs turned out tough—not from technique, but because my oven ran 40°F cold.
Since then, I’ve used a Taylor oven thermometer in every kitchen I’ve cooked in. Even in my Florida rental, where the oven ran hot and uneven, I could course-correct thanks to that $9 tool.
For short ribs, 200°F internal temp is my target when braising. That’s when they turn fork-tender.
My essentials:
- Taylor Oven Thermometer: For checking actual oven temp
- Instant-Read Thermometer (like ThermoPro): For checking internal meat temp
Some ovens cycle wildly. If yours spikes up and down a lot, go with lower oven rack, and use a heavy pan to help stabilize the heat.
To Cover or Not to Cover: Foil, Lid, or Parchment
The first time I made ribs uncovered, I ended up with jerky. Since then, I’ve gotten very picky about how I seal in moisture.
- Dutch oven lid: Best seal
- Foil + roasting pan: Solid backup
- Foil + parchment combo: My go-to when using disposable pans
I layer parchment right over the meat, then cover with foil. It helps stop foil from touching the ribs directly and keeps everything steamy.
In dry regions like Arizona, this combo works beautifully. In Florida, I sometimes loosen the foil slightly near the end to prevent over-steaming. Depends on the day, honestly.
And yes, I’ve forgotten to cover the pan more than once. Don’t do that unless you want crunchy ribs.
Skillet for Searing (or Not)
If I decide to sear first, I grab my Lodge cast iron skillet. It’s been with me through 3 moves and still does the job better than any nonstick I’ve ever owned.
But I’ll be real—on hot summer days, I skip the sear to keep the kitchen cooler.
Here’s what helps:
- Cast Iron Skillet: Best crust, even heat
- Stainless Steel: Good browning, but meat sticks more
- Nonstick: Not ideal—can’t handle high heat or crust well
Sometimes I use a sheet pan lined with foil to roast ribs if I’m doing a quicker method. Just make sure it has sides at least 1 inch high—sauce and fat will bubble up.
Oven Types: Gas vs Electric (And Why It Matters)
Cooking ribs in a gas oven is different than using an electric one—I’ve used both in different homes, and you have to adjust slightly.
- Gas ovens: Quicker heat, bottom-heavy, tends to dry out dishes if uncovered
- Electric ovens: Slower to preheat, but more even heat
My Arizona gas oven preheats fast—I’ve overshot my target temp more than once. I now preheat, then wait 5 more minutes before placing anything inside.
In contrast, my old Chicago apartment’s electric oven took forever to warm up, but once it got there, it held steady like a dream.
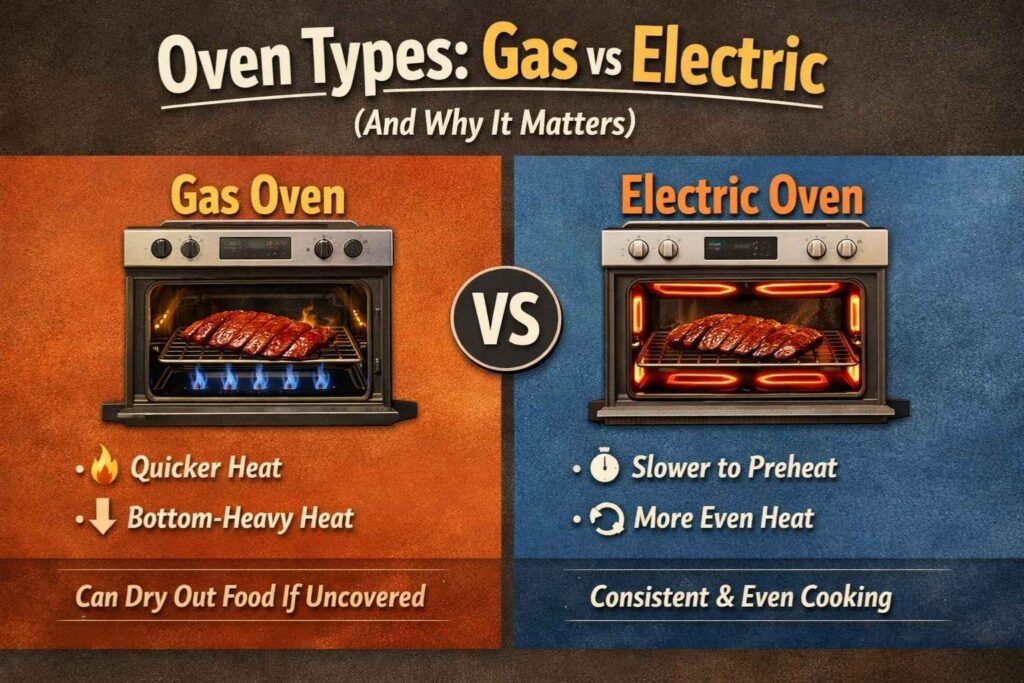
If your oven cooks unevenly, rotate the pan halfway through. I sometimes shift mine left-to-right or up-down, especially for long braises.
Aluminum Foil Pans (Budget Solution That Works)
When I’m making a big batch or don’t want to scrub dishes, I use Reynolds heavy-duty foil pans. Not ideal for perfect heat distribution, but I’ve made great ribs in them with smart tricks.
Tips when using foil pans:
- Use two stacked together for stability
- Line with parchment to help avoid metallic flavor
- Cover tightly with double foil
- Place a sheet pan underneath for extra support
Great for cookouts, potlucks, or nights when I don’t feel like washing up. They’re also ideal when cooking in someone else’s kitchen—like when I made ribs at my sister’s place in New York.
Other Handy Tools I Actually Use
- Tongs: Long, strong, with silicone tips
- Basting brush: For adding glaze near the end
- Fat separator: If you’re turning drippings into sauce
- Timer: Because I forget things when I multitask (happens too often)
Bullet Recap: My Rib Tool Kit
Here’s a quick breakdown of what I keep in rotation:
- Le Creuset or Staub Dutch oven
- Lodge cast iron skillet
- Taylor oven thermometer
- Foil + parchment combo
- Roasting pans (metal or disposable)
- Instant-read meat thermometer
- Gas oven or electric (adjusted accordingly)
Regional Tips from My U.S. Kitchens
I’ve cooked beef short ribs in three very different parts of the U.S.—each with its own kitchen quirks. The climate, oven behavior, and even how quickly liquids evaporate all make a difference.
Cooking in Humid Florida
I’ll never forget making short ribs in my Tampa rental. The air was sticky, my windows fogged up halfway through, and my oven… well, it had a mind of its own.
That Florida humidity messed with everything—especially when I tried to get a good sear.
Here’s what changed for me:
- Searing took longer. The surface of the meat stayed damp no matter how much I patted it dry. I had to leave it out longer before searing.
- Oven temps fluctuated. The built-in thermometer said 300°F, but it would spike randomly. I double-checked with my Taylor oven thermometer every 30 minutes.
- Dry brining mattered more. I always dry brined overnight, uncovered in the fridge, to wick away moisture before the big cook.
One afternoon, I made a batch of boneless short ribs with a dry rub and noticed the bark didn’t form the way it did back in Arizona. Took me a while to realize: humidity had something to do with that steam barrier. I started finishing uncovered for 15 minutes to get that last bit of caramelization.
Cooking in Dry Arizona
In Phoenix, my short ribs cooked faster than expected—every time.
There’s barely any moisture in the air here, and my gas oven heats up like it’s on a mission. I’ve had it overshoot 75°F past the set temp on multiple occasions. It’s one reason I always wait 5 minutes after preheat before putting anything in.
Here’s what I learned in Arizona:
- Liquids evaporate faster. If I didn’t top off the braising liquid halfway, the bottom of the ribs would start to burn.
- I had to cover tighter. Loose foil = dry meat. I double-wrap or add parchment now.
- Shorter cook times. The ribs hit fall-apart stage around 2 hours 45 minutes, instead of 3.5 hours. I learned to start checking early.
There was this one Sunday when I set the oven to 300°F, walked away, and returned 20 minutes later to find it had spiked to 375°F. I use a thermometer now religiously—and sometimes drop the set temp by 10 degrees to account for that wild heat burst.
Cooking in a Cold Chicago Winter
Chicago winters make me crave rich, hearty dishes—and nothing beats beef short ribs for that. But those old apartments? They come with unpredictable ovens and kitchens that never seem to warm up.
I remember one icy December weekend. My windows had frost on the inside. I baked a batch of English-cut short ribs and the kitchen never once smelled like meat. Turned out, the oven wasn’t holding heat properly. The ribs were tough, undercooked, and I had to finish them on the stovetop.
Here’s what I watch for in cold-weather kitchens:
- Longer preheat. I give the oven a full 20 minutes, sometimes more.
- Test batches. I’ll throw in one rib early to see how it behaves—especially if I’m cooking in a friend’s place.
- Thermometer juggling. Cold air outside the oven messes with readings. I’ve had to reposition thermometers just to get an accurate internal temp.
Electric ovens in these older buildings are slow to heat, but hold temp well once they get there. I just plan ahead—and I never trust what the dial says.
Oh, and one winter, my meat thermometer fogged up from the cold air. I had to use the old fork test: twist and check if the meat gives. It did… eventually.
How Region Changes the Cook — Quick Recap
Florida (humid):
- Pat ribs dry longer before searing
- Dry brine overnight, uncovered
- Use a thermometer—ovens tend to run wild
Arizona (dry + gas ovens):
- Add extra liquid halfway through
- Lower temps slightly to prevent overcooking
- Cover tightly with foil + parchment
Chicago (cold winters):
- Preheat longer than usual
- Watch for slow starts, then sudden heat surges
- Rely on thermometer more than instincts
One More Thing: Altitude
I haven’t lived at high altitude yet, but I once cooked short ribs in Denver while visiting a friend. It took noticeably longer to braise—closer to 4.5 hours—and I had to bump the oven up to 325°F to get the same tenderness.
Moral of the story? Your zip code affects your cook.
Flavor Additions That Work Every Time
Beef short ribs already pack serious flavor. But the right extras? They turn comfort food into something worth remembering.
Broths and Liquids That Build Depth
I’ve tried plain water. It works—but it’s boring. When I want short ribs to taste like they’ve been simmering all day (even if they haven’t), I go heavy on rich, layered liquids.
Here’s what I reach for depending on my mood:
- Beef stock: My go-to. Boxed works fine, but when I’ve got homemade, it’s gold.
- Red wine: Adds acidity, body, and a deep color that feels fancy, even if I’m barefoot.
- Balsamic vinegar: Just a splash—brightens everything.
- Soy sauce: A secret weapon. Just a tablespoon boosts umami.
- Worcestershire sauce: Another back-pocket flavor trick. Adds a savory tang.
One time, I accidentally added too much balsamic (oops, the cap fell off). It turned the whole dish sweet-sour and weird. I salvaged it with extra broth and a spoon of tomato paste, but yeah—go light with vinegar.
Aromatics I Never Skip
You don’t need a pantry full of spices. Just a few reliable aromatics can make your oven-baked beef short ribs sing.
My forever combo:
- Garlic cloves — smashed, not minced. I leave them whole and let them mellow in the heat.
- Yellow onion — cut into thick wedges. Sweetens as it roasts.
- Bay leaves — earthy, subtle, worth it.
- Rosemary and thyme — tied together with twine if I’m feeling organized (rarely).
Sometimes I toss in celery and carrots too, especially if I’m planning to make gravy from the drippings. That combo gives me a solid flavor base, no matter what else I do.
Spices and Rubs That Actually Add Something
I’ve experimented with everything from curry powder to smoked paprika. Some blends worked great. Others made my ribs taste like a spice drawer.
Now I stick to what I know works—especially when I’m going for that classic American oven-baked flavor:
- Smoked paprika — warm and sweet
- Black pepper — coarse, always fresh-ground
- Onion powder — adds savoriness without chunks
- Brown sugar — when I want a sticky finish or to counterbalance spice
If I’m using a dry rub, I mix those with kosher salt and coat the ribs well before baking. If I brined, I skip salt in the rub. (Learned that the hard way—one batch turned out salty enough to preserve fossils.)
Sauces and Finishing Touches I Swear By
Short ribs don’t need sauce—but that doesn’t mean I don’t use them. Some of my best batches came together when I poured something bold on top in the last 20 minutes.
Favorites for finishing:
- Kansas City-style BBQ sauce: Thick, sweet, and smoky. Great with browned boneless ribs.
- Spicy gochujang glaze: For when I’m in a Korean-style mood. A little goes a long way.
- Garlic butter glaze: I melt butter with minced garlic and thyme, then brush it on in the last 10 minutes.
- Red wine pan sauce: After baking, I reduce the braising liquid with a bit of butter. Fancy without fuss.
And if the ribs come out a bit dry? No shame in shredding them and drowning them in sauce. That’s my go-to salvage move. Toss it with a sticky glaze, pile it on mashed potatoes, and no one will complain.
Glazing Tricks That Add a Wow Factor
Sometimes I want that shiny, sticky finish—the kind you see in cookbooks but never quite hit at home. Here’s how I get close:
- Uncover for the last 15–20 minutes
- Baste with sauce or glaze
- Switch to broil for 2–3 minutes at the very end
- Watch closely — I’ve burned a glaze or two by looking away too long
I once broiled a red wine-butter glaze and walked away to answer the door. Came back to smoke and a sugary crust that looked like lacquer. Still edible, but… not proud of that one.
When I Keep It Simple
Not every short rib needs a complex setup. Some of my favorite versions used just:
- Salt
- Black pepper
- Garlic
- Onion
- Beef broth
And that’s it.
If the meat is good quality and cooked well, it doesn’t need a spice parade. That’s why I always tell people—start simple. Learn what the meat tastes like. Then layer on flavor next time.
Bullet Recap: My Flavor Staples
For broth and liquid:
- Beef stock or red wine
- Soy sauce or Worcestershire
- Balsamic (carefully)
For aromatics and herbs:
- Garlic, onion, bay leaf
- Rosemary and thyme
- Mirepoix (onion, carrot, celery) for gravy
For spices:
- Smoked paprika, brown sugar
- Onion powder, coarse black pepper
- Salt (skip if already brined)
For finishing sauces:
- BBQ, gochujang, garlic butter
- Red wine pan sauce
- Broil at the end for glaze magic
How to Reheat Beef Short Ribs Without Drying Them Out
Leftover short ribs can be just as magical as day one—if you reheat them right. I’ve ruined enough batches to learn the hard way what not to do.
Oven Method (My Favorite)
The oven takes longer, but it’s the gentlest way to reheat short ribs without zapping the moisture or turning them into rubber. I usually reheat a full portion this way—especially when I’ve got a little leftover sauce or braising liquid to work with.
Here’s how I do it:
- Preheat oven to 300°F
- Place ribs in an oven-safe dish
- Add a splash of broth, pan sauce, or even water
- Cover tightly with foil
- Heat for 20 to 30 minutes, depending on portion size
I’ve done this with both bone-in and boneless, and it works every time—as long as you don’t forget the liquid. One time I skipped it, and the meat turned leathery. Not fun.
Bonus: If you saved the drippings from your original bake, warm those up and pour them over the ribs while they reheat. It’s a flavor bomb.
Skillet Reheat (Quick and Crispy)
When I’m short on time—or just craving crispy edges—I reheat short ribs in a nonstick or cast iron skillet.
This method works best for boneless ribs or shredded leftovers.
Steps:
- Add a splash of broth or water to the skillet
- Place ribs in, cover with a lid
- Heat on medium-low until warmed through (about 8–10 minutes)
- Uncover and crank up the heat to get a quick crust
One rainy night in Chicago, I made this method work with just one rib and a half slice of stale cornbread. The crispy edges made up for the bare fridge.
Microwave (Only If I Have To)
Let’s be honest—sometimes the microwave is all you’ve got. And that’s okay. But you’ve got to baby the meat a little.
My emergency microwave method:
- Place ribs in a microwave-safe dish
- Add a tablespoon or two of broth
- Cover loosely with a lid or microwave-safe wrap
- Heat in 30-second bursts, turning between each round
- Total time: about 2 minutes for one serving
Don’t overdo it. I’ve dried out more ribs in the microwave than I care to admit. But when I’m in a rush—like in between recipe testing or during late-night editing—it gets the job done.
Leftover Magic: What I Do with Day-Old Short Ribs
Honestly? Leftover beef short ribs are some of my favorite things to cook with. The flavors deepen overnight, and they’re ridiculously versatile.
Here’s what I’ve done:
- Short rib grilled cheese: Shredded rib meat + sharp cheddar on sourdough
- Beef short rib tacos: Warmed up in a skillet with a little lime juice
- Short rib hash: Chopped meat, diced potatoes, eggs on top
- Next-day pasta: Tossed with buttered noodles and pan juices
- Stuffed baked potato: Load a russet with shredded meat, sour cream, chives
One time, I made a short rib sandwich with pickled onions and horseradish mayo on a toasted hoagie roll. It never made it to the table—my friend and I split it standing at the counter. No regrets.
Bullet Recap: Reheating & Leftover Ideas
Reheating tips:
- Oven at 300°F with added liquid (best texture)
- Skillet with lid, then crisp (for boneless or shredded)
- Microwave in short bursts with broth (only if desperate)
Leftover favorites:
Baked potato piled with meat + cheddar
Grilled cheese with shredded ribs
Soft tacos with lime + cabbage slaw
Breakfast hash with crispy potatoes
Pasta tossed in braising juices
Pairings I Love With Beef Short Ribs
Short ribs are rich, meaty, and comforting—but the right side dish can elevate them from “good” to “why didn’t we make this sooner?”
Classic Pairings I Keep Coming Back To
When I want comfort food that hugs you from the inside, I stick to the basics. These are the sides I’ve served for Sunday dinners, snowy Chicago nights, and one unforgettable Thanksgiving where short ribs stole the show.
My go-to classics:
- Creamy mashed potatoes: Yukon Golds, plenty of butter, a touch of garlic
- Roasted carrots: Halved lengthwise, drizzled with maple or honey
- Buttered green beans: Blanched, then sautéed with shallots
- Soft dinner rolls: To mop up every drop of sauce
One night in Florida, I paired bone-in short ribs with just mashed potatoes and pan gravy. The plate looked simple—but it was silent at the table. That’s when you know it hit right.
Bold Pairings That Break the Routine
Sometimes I want something unexpected. These are the bolder sides I’ve tested that ended up being stars in their own right—especially when I serve ribs for a dinner party or want a little kick.
When I want bold, I go for:
- Creamy polenta: Rich, cheesy, and great with braised juices
- Garlicky kale or Swiss chard: Something bitter to cut the fat
- Baked mac & cheese: Comfort meets indulgence
- Sweet potato mash with chipotle: Sweet + smoky works like magic
I once made short ribs with roasted poblano grits for a Saturday dinner in Arizona. The ribs were fork-tender, and the spice in the grits brought everything to life. I served it with lime-pickled red onions, and folks still ask about it.
Lighter Sides for Balance
Short ribs can be heavy. When I want to keep the meal from feeling like a food coma, I pair them with lighter, brighter sides that still feel satisfying.
Here’s what I mix in:
- Simple green salad: Arugula, lemon vinaigrette, shaved Parmesan
- Roasted Brussels sprouts: Crisp edges, a splash of balsamic
- Cucumber-dill slaw: Fresh, tangy, and perfect with saucy ribs
- Steamed rice: Jasmine or basmati—especially if the ribs are glazed
I once served short ribs with just rice and cucumber slaw on a humid day in Florida. No heavy sides. Just clean, crisp flavors that let the meat shine.
For the Bread Lovers
I’m a sucker for a warm roll or a crusty baguette. Especially when that sauce is just sitting there, begging to be mopped up.
Favorite breads to serve with short ribs:
- Buttermilk biscuits
- Rustic sourdough
- Garlic butter Texas toast
- Cornbread (especially with spicy-glazed ribs)
In colder months, I lean heavier—breads and carbs. In warmer weather, I scale back and focus on greens. It’s less about rules and more about reading the room… or the weather.
Drinks That Match the Mood
I don’t always drink when I cook, but when I serve short ribs, the right drink rounds out the moment.
Pairings I’ve actually served:
- Red wine: Cabernet or Syrah—big, bold, perfect with beef
- Dark beer: A stout or porter can match the richness
- Sparkling water with lemon: For balance and reset between bites
- Iced tea with mint: Especially during summer cookouts
I once served ribs with a bourbon-spiked sweet tea at a backyard dinner. Let’s just say… it was a laid-back evening and no one left hungry.
Bullet Recap: Side Pairings I Trust
Classic sides:
- Mashed potatoes
- Roasted carrots
- Green beans
- Dinner rolls
Bolder choices:
- Creamy polenta
- Mac & cheese
- Garlicky greens
- Spiced sweet potatoes
Lighter options:
- Arugula salad
- Cucumber slaw
- Steamed rice
- Roasted Brussels sprouts
Bread options:
- Buttermilk biscuits
- Garlic toast
- Cornbread
- Sourdough
Mistakes I’ve Made — So You Don’t Have To
I’ve cooked beef short ribs dozens of times. And not all of them were proud moments. But every mistake taught me something useful—and usually the hard way.
Mistake #1: Cooking Too Fast at High Heat
I once tried to rush short ribs on a busy weeknight. Set the oven to 400°F, skipped the liquid, skipped the lid, and just hoped for the best.
They looked beautiful on the outside—browned and caramelized. But inside? Still tough. I cut into one and actually saw grayish meat that hadn’t broken down yet.
What I learned:
- Low and slow isn’t optional—it’s the rule.
- Anything under 2.5 hours at 275°F is risky.
- Braising needs time, and collagen won’t melt in a hurry.
Mistake #2: Forgetting to Salt Early
This one’s on me. I seasoned the ribs right before baking and expected them to taste great. But after four hours, the texture was right… the flavor wasn’t.
They tasted like unsalted stew meat. I was shocked. Four hours and all that flavor—and still, something was missing.
Now I always:
- Dry brine overnight or at least 2 hours before cooking.
- Use kosher salt (Diamond Crystal is my favorite).
- Salt first, then decide later if I want a rub or marinade.
And if I forget again (which I did once in Arizona)? I shred the meat and toss it with sauce afterward to make up for it.
Mistake #3: Not Adding Enough Liquid
In my early days, I thought covering the ribs tightly was enough. But without enough liquid, they didn’t braise—they baked. The bottom of the pan scorched, and the smell gave it away before I even opened the oven.
This happened in Phoenix, where my gas oven ran hotter and dryer than I expected. I opened the foil and saw a thick brown crust at the bottom of the dish—and not the good kind.
Fix:
- Add enough liquid to come about halfway up the meat.
- Broth, wine, or even water with herbs works.
- Check halfway if using foil—top off with warm liquid if needed.
Mistake #4: Skipping the Rest
I pulled the ribs straight from the oven and served them once. Big mistake. The meat was technically done—but the juices hadn’t settled. It bled onto the plate, and the meat dried out fast.
It wasn’t inedible—but it definitely didn’t wow anyone.
Now I always:
- Let the ribs rest for 10–15 minutes, still covered.
- Give the fat a chance to settle and the juices to stay in the meat.
- Use the time to reheat sides or finish sauce.
Even 5 minutes makes a difference. And if you’ve ever cut into a steak too early, you know exactly what I’m talking about.
Mistake #5: Overcrowding the Pan
Once, trying to make a big batch for a party, I crammed too many ribs into a single roasting dish. The result? Uneven cooking. Some ribs were drowning in broth while others were dry and tough on top.
And the worst part? I didn’t realize it until plating. Half the batch was perfect. The rest? Chewy.
What I do now:
- Use multiple pans if needed
- Leave space between ribs for even heat
- Rotate pans halfway if the oven runs unevenly
Yes, it takes up more oven real estate. But it’s better than explaining why half the table got the chewy ones.
Mistake #6: Using the Wrong Pan
I once baked short ribs in a shallow glass dish. It looked fine going in—but as it cooked, the sauce bubbled over. Not only did I lose half my liquid, but the sugar in the rub caramelized onto the oven floor and filled the whole house with smoke.
Lesson learned:
- Use deep pans—at least 2.5 inches.
- Dutch ovens work best.
- If using foil pans, double them up and always place on a sheet pan.
And always clean your oven after a spill. I skipped that once and smoked out my next batch of cookies.
Bullet Recap: Mistakes You Can Skip
- Don’t rush with high heat—go slow.
- Salt early, not right before the oven.
- Always braise with enough liquid.
- Let meat rest before slicing.
- Don’t overcrowd your dish—give ribs room.
- Use a deep, sturdy pan (not glass or shallow dishes).
- Watch for spills and sugar burns—especially with glazes.
Final Thoughts From My Kitchen
After all the testing, tasting, mistakes, and wins—I still find myself coming back to beef short ribs. Especially when I want something that feels like home.
There’s just something about oven-cooked short ribs. Maybe it’s the smell that slowly takes over the house. Or that first bite when the meat practically melts. Or maybe it’s how the process forces you to slow down. You can’t rush short ribs—and honestly, that’s the point.
I’ve made these in every kind of kitchen—tiny rentals, gas ovens that overheat, electric ovens that drag their feet. I’ve used fancy Dutch ovens, disposable foil pans, even one glass dish I regret (still scrubbing that burnt sugar). And through it all, the basics haven’t changed.
Salt early. Cook slow. Keep them moist. Don’t overthink it.
I’ve served these to friends on a random Tuesday, to family at holiday dinners, and once, to myself after a really rough week. Every time, they felt right. Like a meal that says, “Hey, you’re home now. Sit down.”
If you’ve made it this far, you’re already halfway to mastering how to cook beef short ribs in the oven. All that’s left now? Pick your cut, prep your pan, and let the oven do the rest.
Trust me—your kitchen is about to smell amazing.
✅ FAQs
How long should I cook beef short ribs in the oven?
Cook beef short ribs at 275°F–300°F for 3 to 4 hours until tender. Lower temps and longer time give the best texture.
Do I need to sear beef short ribs before baking?
Searing adds flavor but isn’t required. You can skip it if braising or using strong marinades. Both methods can turn out delicious.
Should short ribs be covered when baking?
Yes. Covering traps steam and keeps ribs moist. Use foil or a tight lid, especially when braising with broth or wine.
Can I cook beef short ribs in the oven quickly?
Yes, use boneless or flanken-cut ribs at 375°F–400°F for 1 to 1.5 hours. Add sauce and flip halfway to avoid drying out.
What’s the best pan for oven-baked short ribs?
Dutch ovens are best for even cooking. Roasting pans work too—just cover tightly and add enough liquid to keep ribs from drying.
I’m Mossaraof, a trained chef and the founder of OvenInsights.com. I spent years cooking at Larrupin’ Cafe and in kitchens across Chicago and Seattle. Now I test kitchen gear for a living. I moved to North Acton, London, and I test every tool I write about. I use real meals and real heat. No brand deals. No shortcuts. I cover 12 kitchen types and hundreds of recipes. I believe this: the right tools matter as much as the recipe.