Hey, I’m Mossaraof — a professional cook and food blogger.
We have all felt that pang of fear when the broiler turns a meal to ash in seconds. I want to teach you how to broil safely without burning food so you can get that perfect golden glow. My years in hot kitchens taught me that a watchful eye is better than any timer. You can use my Ultimate Guide to Master Your Oven to learn how your heat works best. Let’s turn on the light and master the flame together right now!

Understanding the “Upside-Down Grill” Logic
Before you push that button, you need to know how the heat actually moves inside your oven. It is not like baking a cake; it is a direct fight between fire and meat.
Most US ovens use either gas flames or electric coils. In a gas oven, like a Frigidaire, the flame is instant. In an electric one, the coil has to get red hot first. Think of it as a sun inside a box. If you get too close to the sun, you burn.
- Radiant Heat: This travels in a straight line.
- The Inverse Square Law: If you move the food twice as close, it gets four times hotter.
- Oven Cavity: Small ovens trap heat faster than big ones.
The Science of the Sear
In the South, where it’s humid, your broiler helps dry out the surface of the meat. In dry places like Denver, the meat might dry out too fast. You have to watch the “glow.” When that coil is bright red, the magic happens. This is called the Maillard reaction. It makes things taste savory and delicious.
Setting the Stage: Gear and Prep
You cannot just use any pan for this. I once saw a glass dish shatter into a thousand pieces under a broiler. It was a mess and a waste of a good dinner.
If you want to know how to broil safely without burning food, start with a heavy pan. I love my Lodge cast iron skillet. It can handle the heat. Most US kitchens have a broiler pan that came with the oven. Use it! It has slots to let fat drip away. If fat sits near the flame, it catches fire.
- Cast Iron: Best for steaks and pork chops.
- Stainless Steel: Good for fish or quick melts.
- Broiler Tray: Keeps grease away from the heating element.
- Never use Glass: Pyrex is great for baking, but it will explode under a broiler.
Choosing the Right Oil
Do not use butter yet. Butter burns at a low heat. Use Avocado oil or Grapeseed oil. They can handle the “sun” in your oven. In my kitchen, I keep a spray bottle of high-heat oil. A light mist is all you need. If you see white smoke, your oil is too weak.
- Avocado Oil: Very safe for high heat.
- Grapeseed Oil: Good and cheap at most US grocery stores.
- Extra Virgin Olive Oil: Save this for your salad. It will smoke and taste bitter here.
The Golden Rules of Broiler Safety
Safety is not just about fire. It is about how the food tastes when it hits your tongue.
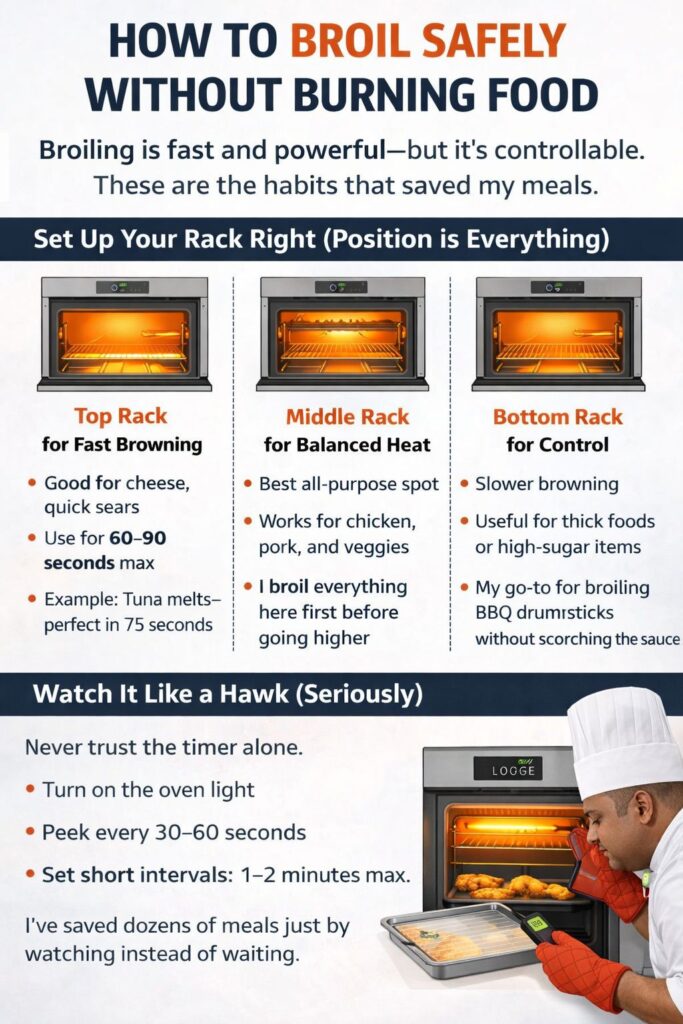
I always tell my friends to stay in the kitchen. If you are broiling, do not leave. Don’t go to the laundry room. Don’t check the mail. Stay right there. Use your nose. If it smells like toast, it’s good. If it smells like a campfire, you are too late.
The “Door Crack” Trick
Many electric ovens in the US work better if you leave the door open an inch. This stops the oven from getting too hot and turning off the element. If the element turns off, you lose your sear. Check your manual first, though. Some new gas ovens will turn off if the door is open.
Distance is Your Dial
Bottom Rack: Rarely used for broiling, but good for thick veggies.
Top Rack: For melting cheese or thin fish.
Middle Rack: For thick steaks or chicken.
Actionable Steps for Common American Staples
You have your pan and your rack in the right spot. Now, let’s talk about the food we actually eat on a busy Tuesday night in a real US kitchen.
I have cooked thousands of steaks. I have roasted heaps of peppers for salsa. The secret of how to broil safely without burning food is all in the timing. You cannot set a timer and walk away to watch the news. You have to be the boss of the heat.
The Perfect Broiled Ribeye (Steakhouse Style)
Most people in the US go to a steakhouse for that charred crust. You can do it at home with a Samsung or GE oven. I use my Lodge cast iron skillet for this. I put the pan in the oven while it preheats. This gets the metal screaming hot.
- Step 1: Pat the steak dry with a paper towel. Wet meat will steam, not sear.
- Step 2: Salt it well. I use Kosher salt because it sticks better.
- Step 3: Place the steak 5 inches from the heat.
- Step 4: 4 minutes on side one. Flip it. 4 minutes on side two.
Use a meat thermometer. For a medium-rare steak, pull it out at 130°F. It will keep cooking on the counter. If you wait until 145°F in the oven, it will be dry.
Crispy Skin Chicken Thighs
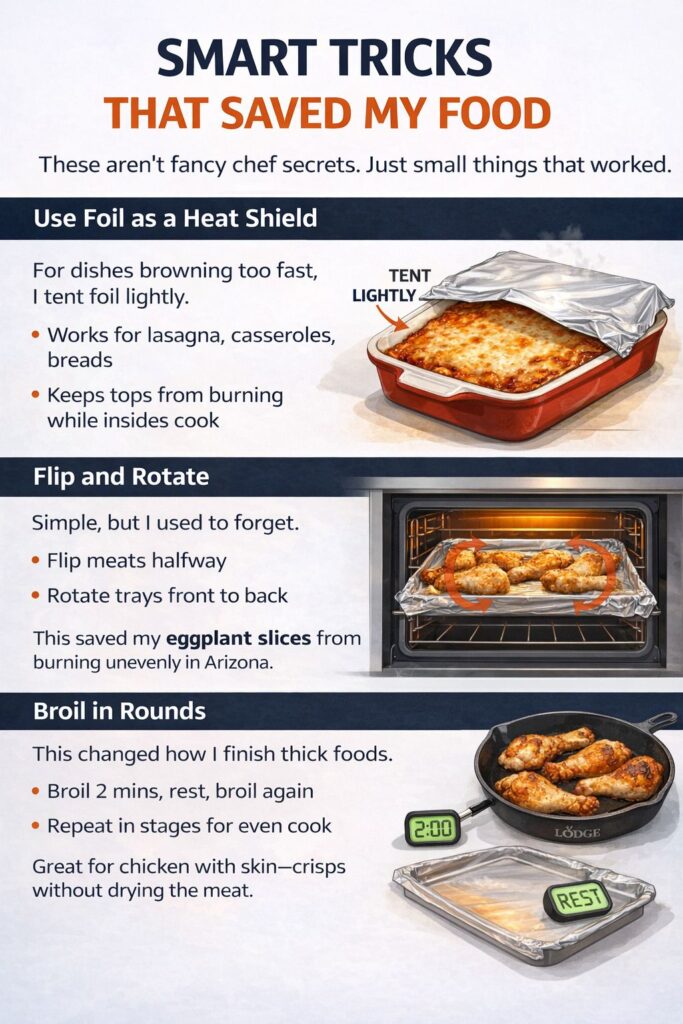
Chicken is tricky. The fat in the skin can flare up. I’ve had many small fires in my day because of chicken fat. If you see a small flame, don’t scream. Just turn off the broiler. Keep the door closed. The fire will go out.
- The Chef Trick: Start with the skin side down.
- The Middle Rack: Use the second or third rack down.
- The Final Flip: Flip the chicken to skin-side up for the last 3 minutes. This makes the skin go “crunch” like a potato chip.
Mastering Vegetables and Sides
Vegetables are the unsung heroes of the broiler. They get sweet and smoky very fast.
In a professional kitchen, we char peppers until they are black. Then we peel off the skin. You can do this at home for your Sunday meal prep. It makes your kitchen smell like a campfire in a good way.
Charring Peppers for Salsa
I love doing this with bell peppers or poblanos. Put them on a baking sheet. Use the top rack. Turn them every 2 minutes. When they look burnt and bubbly, they are done. Put them in a bowl and cover it with plastic wrap. The steam makes the skin slide right off.
- Asparagus: 3 minutes on the top rack with a little oil.
- Corn on the cob: Roll it every minute for a grilled look.
- Zucchini: Slice it thin and watch it turn gold in 90 seconds.
Troubleshooting and Real-Life Fixes
Even pros make mistakes. I have burnt my share of garlic bread. It happens to the best of us.
If you smell smoke, do not panic. Most smoke comes from old grease on the bottom of the oven. Or it comes from a pan that is too full of fat. In the US, our portions are big, and our pans get crowded. Crowded pans lead to steam and grease fires.
What to Do if You See Smoke
- Step 1: Turn off the broiler button.
- Step 2: Do not open the door yet. Let the smoke settle.
- Step 3: Check your vent. Make sure your stove fan is on “High.”
The “Sugar Warning” for Glazes
I love BBQ sauce. But sugar burns at 350°F. Your broiler is 500°F or more. If you put sauce on at the start, it will turn black and bitter. Always add your sauces in the very last minute of cooking. Just long enough for it to bubble.
Maintenance for Long-Term Success
High heat is hard on your tools. If you use cheap pans, they will warp. They will make a “pop” sound and twist in the heat.
I tell my friends to buy a heavy rimmed baking sheet. A “half-sheet” pan from a restaurant store is best. They are thick and won’t bend. Also, keep your broiler element clean. If you spill cheese on the ceiling of the oven, it will smoke every time you cook.
- Clean the Coils: Wipe them with a damp cloth when the oven is cold.
- Scrub your Pans: Use a bit of baking soda for burnt-on grease.
- Check the Vent: Make sure no foil is blocking the airflow.
Advanced Techniques: The Reverse Sear and More
Once you know the basics of how to broil safely without burning food, you can start to play with advanced moves. One of my favorite tricks is the “Reverse Sear.”
In high-end US steakhouses, they often cook meat slowly first and finish it with high heat. You can do this at home with your standard oven. It gives you a perfect pink center and a crust that looks like a professional made it. I do this every Christmas for my family. It takes a bit more time, but the look on their faces is worth it.
- Slow Cook First: Bake your steak or thick pork chop at 250°F until it is almost done.
- The Rest: Take it out and let it sit for ten minutes.
- The Finish: Turn on the broiler. Put the meat back in for just 60 seconds per side.
This method is very safe. Since the meat is already warm, it doesn’t need much time under the flame. This lowers the chance of the outside burning before the inside is hot.
Tool Maintenance for High-Heat Cooking
Your tools take a beating under the broiler. I have seen many cheap pans “pop” and twist because they couldn’t handle the heat. This is common with thin pans you might buy at a big-box store.
To keep things safe, you need to care for your gear. If you use a cast iron skillet, make sure it is seasoned well. A dry pan will cause food to stick. When food sticks, it burns. When it burns, it smokes. It is a cycle you want to avoid.
Caring for Your Broiler Pan
- The Soak: After you cook, pour some hot water and soap into the pan while it is still warm.
- No Abrasives: Avoid using steel wool on coated pans. It creates scratches where grease can hide.
- The Ceiling Check: Every few weeks, look at the top of your oven. Wipe away any grease splatters near the element.
Avoiding Thermal Shock
This is a big one for US home cooks. Never take a cold pan from the fridge and put it right under the broiler. The metal can warp or even crack. Let your pan come to room temperature first. This is especially true for ceramic dishes. Even if they say “oven-safe,” the broiler is a different beast.
Broiling for Bread and Small Bites
Sometimes you aren’t cooking a whole meal. You just want some garlic bread or a quick tuna melt. These are the easiest things to burn because they are so light.
I have a rule: if it’s bread, don’t look away. I count to thirty in my head. Bread goes from gold to black in the blink of an eye. If you are making a sub sandwich with cheese, put it on the middle rack. The top rack is too aggressive for bread.
- Garlic Bread: Use the middle rack. It takes about 2 minutes.
- Cheese Toasts: Use a lower rack if the cheese is thick. This lets the cheese melt before the edges of the bread char.
- Croutons: Watch them like a hawk. They need about 90 seconds.
Final Chef Secrets for Your Home Kitchen
The biggest secret to how to broil safely without burning food is confidence. Don’t be afraid of the “High” setting. Just learn to respect it.
I always keep a pair of long tongs nearby. You don’t want to use short ones and burn your knuckles. In the US, our ovens can be quite deep. Long tongs keep your hands away from the heat. Also, make sure your oven mitts are dry. A wet mitt will turn into steam and burn your hand instantly. I learned that the hard way during a busy Saturday shift.
Proper Lighting: Turn on your oven light so you can see the color change without opening the door.
Dry Mitts: Always check for moisture before grabbing a hot pan.
Long Tongs: Protect your skin from the 500°F air.
The Broiler Mindset: Thinking Like a Line Cook
To really master how to broil safely without burning food, you have to change how you think. In a professional kitchen, we don’t just cook food; we manage energy. The broiler is a raw, wild energy source. You are the one who has to tame it.
I always tell people to trust their senses. Your ears will hear the fat sizzle. Your nose will smell the sugar caramelizing. Most of all, your eyes will see the smoke. If you see thin, white wisps of smoke, you are doing great. That is just moisture leaving the food. If the smoke is gray or black, pull the tray out fast!
- Focus: Do not start a conversation while the broiler is on.
- Position: Stand where you can see the oven light.
- Patience: Let the element get fully red before you start.
A Final Safety Checklist for Every US Home Cook
Before you hit that “Broil” button tonight, run through this list. It only takes ten seconds. These ten seconds can save your dinner and your smoke alarm. I do this every time I cook at home, even after years of professional work.
I keep a small fire extinguisher under my sink in my apartment. I have never had to use it for a broiler fire, but it makes me feel better. Being a pro means being prepared for the “what if.”
- Check the Pan: Is it metal? (No glass allowed!)
- Check the Oil: Is it high-heat oil like Avocado or Grapeseed?
- Check the Rack: Is it at least 4-5 inches from the top?
- Check the Fan: Is your vent hood turned on to “High”?
- Check the Clock: Do you have 5 minutes of total focus?
Why the Broiler is Your Best Friend
Once you get over the fear, you will use this tool every day. It is faster than a grill and easier than a pan-sear. I use it for my breakfast grapefruit and my late-night steak. It is the secret to getting “restaurant quality” food in a normal American kitchen.
I hope my stories and mistakes help you feel more at ease. Cooking should be fun, not stressful. Just remember that the broiler is just a tool. You are the one in charge. If things get too hot, just move the rack down. That is the beauty of it. You can always adjust.
- Speed: It saves you 15 minutes of preheating a whole oven.
- Flavor: Nothing else gives that “charred” taste.
- Ease: One pan to wash, and you are done.
Now, go grab that cast iron skillet and try it out. Start with something simple like a piece of toast or some asparagus. You’ll be a pro in no time.
Broiling Fruit: The Secret to Fast, Fancy Desserts
If you want to impress your friends without spending hours in the kitchen, broil your dessert. It turns simple fruit into something that tastes like it came from a fancy bistro in New York or San Francisco.
I love doing this with stone fruits in the summer. When peaches are ripe, they have so much natural sugar. The broiler turns that sugar into a dark, sticky syrup in just a few minutes. It is much faster than baking a pie. Plus, it won’t heat up your whole house on a hot July day.
- Peaches and Plums: Cut them in half and remove the pit. Put them cut-side up.
- Pineapple: Rings or spears work best. They get beautiful “grill” marks from the broiler coils.
- Bananas: Slice them lengthwise and leave the peel on. It acts like a little boat to hold the juices.
How to Broil Fruit Safely Without Burning Food
Fruit has more sugar than steak, so it burns even faster. I never walk away when I am broiling dessert. I stay right by the oven door. If you want a little extra crunch, sprinkle a tiny bit of brown sugar on top. But watch it! Sugar turns to carbon very quickly.
Brand Spotlight: US Tools That Handle the Heat
Not all pans are created equal. In the US, we have some great brands that are built for the intense heat of a broiler.
I always suggest investing in one or two good pieces. You don’t need a whole set. Just one solid pan can last you twenty years. In my kitchen, I have a mix of old and new. I trust the brands that have been around since my grandmother was cooking.
- Lodge Cast Iron: Made in Tennessee. It is basically indestructible. It can go from a campfire to a 500°F broiler without a flinch.
- All-Clad Stainless Steel: These are the workhorses of the pro kitchen. They stay flat and don’t warp.
- Made In: A newer US brand that makes restaurant-quality gear for home cooks. Their carbon steel is amazing for a quick broiler sear.
What to Avoid in the US Market
Be careful with “non-stick” pans. Many of them are only safe up to 400°F or 450°F. The broiler can hit 550°F easily. If you put a cheap non-stick pan under there, the coating can break down. It can release fumes that are not safe. Always check the bottom of your pan for an “Oven Safe” stamp and look for the max temperature.
The Clean-Up: Keeping Your Oven Fire-Safe
A clean oven is a safe oven. This is the part no one likes to talk about, but it’s the most important part of how to broil safely without burning food.
If your oven smells like old pizza every time you turn it on, you have a problem. That smell is old grease burning. Eventually, that grease can catch fire. I make it a habit to wipe down the “ceiling” of my oven once a month. It only takes a minute with a damp cloth.
- The Drip Tray: If you use a broiler pan, wash it right away. Don’t let the fat sit and harden.
- Foil Liners: Never put foil on the very bottom of a gas oven. It blocks the air. You can line your pan with foil, but don’t line the oven itself.
- Smoke Check: If you see blue smoke, it’s usually grease. If it’s white smoke, it’s usually just steam.
Conclusion: You Are the Master of the Flame
Broiling is the ultimate “shortcut” for a busy cook. It gives you the power of a grill inside your house. Whether you are searing a steak or caramelizing a peach, you now have the tools to do it safely.
I hope these tips help you feel like a chef in your own kitchen. Remember to stay focused, use the right pans, and always trust your nose. Cooking is about the journey, and the broiler makes that journey much faster.
- Stay Present: Never leave the kitchen while the broiler is on.
- Respect the Heat: Use dry mitts and long tongs.
- Have Fun: Try new things, like broiled grapefruit or even broiled oysters!
FAQs : How to Broil Safely Without Burning Food
How to broil safely without burning food at home?
Broil on the middle rack, preheat first, and watch the food every minute. Short checks help you stop cooking before the top turns dark and bitter.
Why does food burn so fast under the broiler?
Broilers use very high top heat with no fan. Food sits close to the heat, so even one extra minute can turn golden into burned.
What rack level is best when broiling food?
The middle rack is safest for most foods. It gives strong heat but more time to react before food starts to scorch.
Should I flip food when using the broiler?
Yes, flip meats and thick veggies halfway through. This helps both sides brown and keeps one side from taking all the heat.
What pans are safe to use under the broiler?
Use metal trays or cast iron. Avoid glass and thin ceramic dishes, since they can crack or shatter under strong broiler heat.
I’m Mossaraof, a trained chef and the founder of OvenInsights.com. I spent years cooking at Larrupin’ Cafe and in kitchens across Chicago and Seattle. Now I test kitchen gear for a living. I moved to North Acton, London, and I test every tool I write about. I use real meals and real heat. No brand deals. No shortcuts. I cover 12 kitchen types and hundreds of recipes. I believe this: the right tools matter as much as the recipe.