
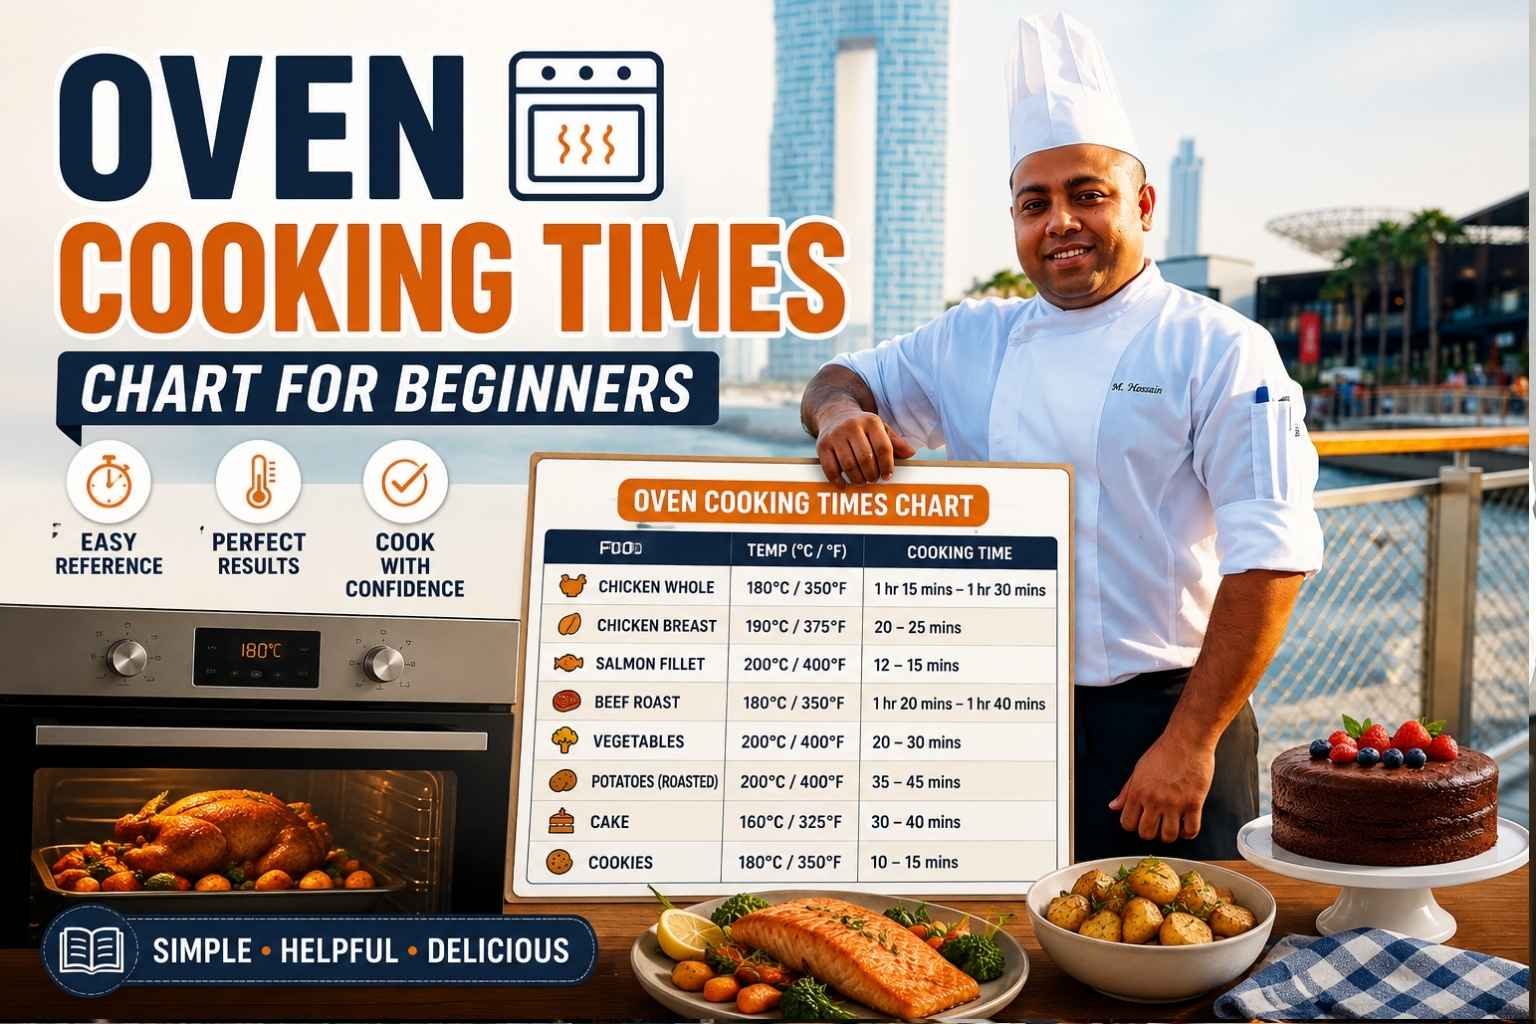
At A Glance
- Oven cooking times are starting points, not rules – thickness, starting temperature, pan material, and your specific oven all shift the actual time needed.
- The only reliable way to know food is done is with an instant-read thermometer; color and timer alone will get you into trouble.
- The master chart below covers 30+ common beginner foods across six categories, with temperature, time range, and internal doneness targets.
- Convection mode (the fan setting) cuts cooking time by roughly 25% and browns food faster – reduce either the temperature by 25°F or the time by 20-25%, not both.
- One oven thermometer (under $15) will fix more beginner problems than any chart – most home ovens run 25-50°F off from what the dial says (America’s Test Kitchen, 2024).
I burned a whole chicken once. Not “a little dry”—burned. Black on the outside, raw near the bone. That night, I made my first oven cooking times chart for beginners, and I taped it inside my kitchen cabinet.
I’m Mossaraof, and I’ve cooked in busy kitchens for years. I still use charts like this one every single week. They save time. They save food. They save your dinner from disaster.
This guide gives you simple, clear numbers for every meat, veggie, and bake. No guessing. No stress. Just good food, done right.
The Master Oven Cooking Times Chart
Use this chart as a baseline. Always check for doneness using the internal temperature targets in the rightmost column – these come directly from USDA Food Safety guidelines (USDA, 2024).
Poultry
| Food | Oven Temp (°F) | Time | Internal Temp |
|---|---|---|---|
| Whole chicken (4-5 lb) | 425°F | 60-75 min | 165°F in thigh |
| Bone-in chicken thighs | 425°F | 35-45 min | 165°F |
| Boneless chicken breasts (6 oz) | 400°F | 22-28 min | 165°F |
| Chicken wings | 425°F | 40-50 min | 165°F, skin crisp |
| Turkey breast (bone-in, 6 lb) | 325°F | 2.5-3 hrs | 165°F |
Red Meat
| Food | Oven Temp (°F) | Time | Internal Temp |
|---|---|---|---|
| Beef roast (3 lb, medium rare) | 325°F | 1.5-2 hrs | 135°F |
| Beef roast (3 lb, medium) | 325°F | 2-2.5 hrs | 145°F |
| Meatloaf (2 lb) | 350°F | 55-65 min | 160°F |
| Lamb chops (1 inch thick) | 400°F | 20-25 min | 145°F |
| Pork tenderloin (1 lb) | 425°F | 20-25 min | 145°F |
| Pork chops (bone-in, 1 inch) | 400°F | 25-30 min | 145°F |
Fish and Seafood
| Food | Oven Temp (°F) | Time | Internal Temp |
|---|---|---|---|
| Salmon fillet (1 inch thick) | 400°F | 12-15 min | 125-130°F (flakes easily) |
| White fish fillet (tilapia, cod) | 400°F | 10-14 min | 145°F |
| Shrimp (peeled, medium) | 400°F | 6-8 min | Pink, opaque throughout |
| Whole fish (1.5 lb) | 400°F | 25-30 min | 145°F |
Vegetables
| Food | Oven Temp (°F) | Time | Doneness Cue |
|---|---|---|---|
| Broccoli florets | 425°F | 18-22 min | Edges charred, stems fork-tender |
| Brussels sprouts (halved) | 425°F | 22-28 min | Cut side golden brown |
| Carrots (1-inch pieces) | 400°F | 25-30 min | Fork-tender, caramelized edges |
| Potatoes (cubed, 1 inch) | 425°F | 30-35 min | Golden, crisp outside |
| Whole baked potato | 400°F | 55-65 min | Skin crisp, give when squeezed |
| Asparagus (medium stalks) | 425°F | 10-14 min | Tips lightly browned |
| Zucchini (sliced) | 425°F | 15-20 min | Edges golden, not mushy |
Baked Goods
| Food | Oven Temp (°F) | Time | Doneness Cue |
|---|---|---|---|
| Banana bread (9×5 loaf) | 350°F | 55-65 min | Toothpick clean, top cracked |
| Chocolate chip cookies | 375°F | 10-12 min | Edges set, center looks underdone |
| Blueberry muffins | 375°F | 18-22 min | Domed, toothpick clean |
| Pizza (homemade, thin) | 475°F | 10-14 min | Crust golden, cheese bubbling |
| Dinner rolls | 375°F | 18-22 min | Deep golden, hollow sound when tapped |
| Cornbread (8-inch pan) | 400°F | 20-25 min | Toothpick clean, edges pulling away |
Casseroles and Pasta Bakes
| Food | Oven Temp (°F) | Time | Doneness Cue |
|---|---|---|---|
| Lasagna (covered, then uncovered) | 375°F | 45 min covered + 15 min uncovered | Bubbling edges, top browned |
| Mac and cheese (from scratch) | 375°F | 25-35 min | Top golden, edges bubbling |
| Chicken casserole | 350°F | 45-55 min | 165°F internal, top browned |
| Vegetable gratin | 375°F | 35-45 min | Tender throughout, top deep golden |
Why Oven Cooking Times Are Starting Points, Not Deadlines
Every time range in the chart above assumes average conditions – a properly calibrated oven, food at refrigerator temperature (around 40°F), a standard metal pan, and no overcrowding. Change any one of those variables, and the time changes.
Here are the four factors that matter most:
Thickness. A 1-inch boneless chicken breast cooks in about 22 minutes at 400°F. A 2-inch one can take 35 minutes at the same temperature. The chart gives you a baseline thickness. Adjust up or down based on what you actually have.
Starting temperature. Cold food from the fridge takes longer than food that has sat out for 20-30 minutes. For large cuts of meat – a roast, a whole chicken – pulling them from the fridge and letting them rest at room temperature for 30 minutes before they go in the oven gives you more even cooking (America’s Test Kitchen, 2024).
Pan material. Dark pans absorb more heat and cook faster. Light-colored pans reflect heat and cook slower. Glass and ceramic retain heat longer than metal. If a recipe was tested in a light metal pan and you use a dark one, start checking 5-10 minutes early.
Oven accuracy. Most home ovens are off by 25-50°F (America’s Test Kitchen, 2024). Set yours to 350°F and it might actually be 375°F or 325°F. A standalone oven thermometer (also called an oven-safe thermometer or hanging thermometer) tells you what your oven is actually doing. Buy one. Use it every time.
How to Read and Use the Cooking Times Chart Correctly
The chart gives you a time range, not a single number. Always start checking at the low end of the range – pull out the rack, check the internal temperature or poke the food, and decide whether it needs more time. Do not wait until the high end to check for the first time.
Resting time matters as much as oven time. Meat continues cooking after it leaves the oven. This is called carryover cooking – the internal temperature rises another 5-10°F after you pull the pan out. For chicken, pull it at 160°F. By the time it has rested 5 minutes on the counter, it will hit 165°F (USDA, 2024). For a beef roast targeting 145°F, pull it at 138-140°F.
Resting time by food type:
- Whole chicken or turkey: rest 10-15 minutes before carving.
- Chicken breasts and thighs: rest 5 minutes.
- Beef and pork roasts: rest 10-20 minutes.
- Fish: no rest needed – serve immediately.
- Baked goods: follow the recipe’s cooling time exactly; cutting too early makes them gummy.
Visual and tactile cues back up the thermometer reading. Chicken juices run clear when pierced. Fish flakes when pressed with a fork. Vegetables feel tender when a fork slides in without force. Cookies look underdone when they are actually done – they firm up as they cool. These cues are secondary; they confirm what your thermometer already told you.
Beginner Mistakes That Ruin Cooking Times
Beginners most often go wrong in four specific ways. Each one is easy to fix once you know it exists.
Opening the oven door repeatedly. Every time you open the door, the temperature drops 25-50°F (Serious Eats, 2023). An oven with a glass door lets you check visually without opening it. If you do not have one, check once at the low end of the time range, then again near the high end. That is usually enough.
Wrong rack position. The middle rack is the default for almost everything. Top rack browns and crisps faster – use it for gratins or broiling at the end. Bottom rack gets more direct heat – use it for pizza and anything you want a crispier bottom crust on. If the recipe does not specify, use the middle rack.
Cooking food straight from frozen. A frozen chicken breast takes 50% longer than a thawed one (USDA, 2024). Frozen vegetables roast unevenly – they steam instead of roast because of the excess moisture. Thaw proteins overnight in the fridge. If you must cook from frozen, add 50% to your cook time and check the internal temperature every 10 minutes after the halfway mark.
Overcrowded pans. When food sits too close together, steam builds up between pieces instead of escaping. The food braises in its own moisture instead of roasting. The result: pale, soft surfaces instead of browned, caramelized ones. Leave at least half an inch of space between every piece. If you have a lot of food, use two pans and rotate them halfway through.
Cooking Times by Food Category: What Every Beginner Needs to Know
Poultry: The Category Where Getting It Wrong Actually Matters
Chicken and turkey must hit 165°F to be safe – this is a USDA food safety requirement, not a preference (USDA, 2024). Undercooked poultry carries real risk of salmonella. Do not rely on color; pink near the bone does not always mean undercooked, and fully cooked chicken can look slightly pink near the joint.
Higher heat gives you crispier skin. I cook bone-in chicken pieces at 425°F rather than 350°F. The skin renders faster, the meat stays juicier, and the total time is shorter. For whole birds, 425°F for the first 20 minutes followed by 375°F for the remainder gives you deep brown skin without drying out the breast meat.
Red Meat: Use a Thermometer, Not a Color Test
The “cut and look” test for beef is unreliable. Red meat can look rare while the thermometer reads 145°F, and it can look brown while still being under-temperature in the center. The USDA minimum safe temperature for whole cuts of beef, pork, veal, and lamb is 145°F with a 3-minute rest (USDA, 2024).
For a beef roast, low and slow is more forgiving than high heat. At 325°F, you have a wider window between done and overdone. At 450°F, a few extra minutes can mean the difference between medium and well-done.
Fish and Seafood: The Most Forgiving Category If You Go Fast
Fish cooks faster than almost anything else in the oven – and it overcooks just as fast. A 1-inch salmon fillet at 400°F is done in 12-15 minutes. At 15-17 minutes, it is dry. The texture test: press the thickest part gently with a fork. If the flesh separates into clean flakes, it is done. If it resists and feels translucent, give it 2 more minutes.
The USDA recommends 145°F for fish (USDA, 2024). Many chefs and food writers, including those at Serious Eats, cook salmon to 125-130°F for a silkier, more moist texture. For beginners, I recommend the USDA target until you are comfortable with how cooked fish should look and feel.
Vegetables: Higher Heat, More Space, Better Results
Most beginners roast vegetables too low and too crowded. 350°F steams them. 425°F roasts them. The difference is browning – a chemical reaction called the Maillard reaction that creates flavor and color. You cannot get it without high heat and dry air around each piece.
Cut vegetables to a similar size so they finish at the same time. Dense vegetables like carrots and potatoes take longer than tender ones like zucchini and asparagus. Do not mix them in the same pan unless you add the slow-cooking ones first and the fast-cooking ones later.
Baked Goods: Where Precision Becomes Non-Negotiable
Baking is different from cooking proteins and vegetables. The ratios in baked good recipes are chemistry. A 25°F temperature error that hardly affects roasted chicken can give you a dense muffin or a burnt bottom on cookies.
Use the toothpick test: insert a wooden toothpick or thin knife into the center. If it comes out with wet batter, the item needs more time. If it comes out with moist crumbs or clean, it is done. Cookies are the exception – pull them when the edges look set but the center still looks underdone. They firm up on the hot pan after you pull them out (King Arthur Baking, 2024).
Casseroles and Pasta Bakes: Cover First, Uncover to Finish
Casseroles go into the oven covered – usually with foil – to trap steam and heat the interior without drying the top. In the last 15-20 minutes, you remove the cover to let the top brown and any liquid reduce. If your casserole is bubbling at the edges and the center reaches 165°F (for any dish containing cooked or raw meat), it is done.
Gas vs. Electric Oven: What Beginners Need to Know
Gas ovens heat from the bottom and tend to run hotter near the floor of the oven. Electric ovens heat from both top and bottom elements and tend to distribute heat more evenly.
In a gas oven, the bottom rack can over-brown the bottom of pies and bread. Move them to the middle rack, and consider putting a baking sheet on the rack below to deflect the direct heat. Electric ovens are more consistent but can take longer to preheat fully. Preheat for at least 15-20 minutes in an electric oven before anything goes in (Serious Eats, 2023).
Convection Mode: When to Use It and How to Adjust Times
Convection mode (also called “fan” mode or “convection bake”) uses a fan to circulate hot air around the food. The moving air strips away the cool, moist air that surrounds food and replaces it with dry, hot air – which speeds cooking and improves browning.
For roasted meats and vegetables, convection is a clear upgrade. Food browns more evenly, skin and edges get crispier, and total time drops.
How to adjust for convection:
- Reduce oven temperature by 25°F and keep the same time, OR
- Keep the same temperature and reduce time by 20-25%.
- Do not do both at once.
Avoid convection for cakes, soufflés, and custards. The moving air can cause uneven rising and cracking. For everything else – chicken, vegetables, roasts, cookies – convection gives a better result when you use it correctly.
How to Tell Food Is Done Without a Timer
A timer is a reminder to check food, not proof that it is done. Here are the cues I use in professional kitchens, in order of reliability.
Internal temperature is the only method that works across every food type. Buy an instant-read thermometer (also called a digital meat thermometer). The ThermoWorks Thermapen and the ThermoPro TP19 both read in 2-3 seconds and cost $15-$100 depending on the model. Insert it into the thickest part of the food, away from bone.
The poke test works for proteins: press the thickest part firmly with your finger. Raw chicken feels like pressing your cheek – very soft and yielding. Fully cooked chicken feels like pressing the heel of your palm – firm and springy. Overcooked chicken feels like pressing your forehead – hard. This takes practice, but it becomes reliable.
Color cues work as secondary confirmation:
- Chicken skin should be deep golden to mahogany.
- Roasted vegetables should show charred edges with golden centers.
- Baked goods should be golden on top with edges pulling away from the pan.
- Fish should be opaque throughout, with no translucent center.
Why Every Beginner Needs Two Thermometers
Meat thermometer: Confirms doneness and food safety. Do not guess. The USDA estimates that roughly 48 million Americans experience foodborne illness each year, and undercooked poultry and meat are among the most common causes (USDA, 2023). A $15 instant-read thermometer eliminates the risk.
Oven thermometer: Confirms your oven is at the temperature you set. This is the one most beginners skip – and the one that explains more failed recipes than any other single factor. Most home ovens run 25-50°F hotter or cooler than the dial setting, and many have hot spots that cook one side of the pan faster than the other (America’s Test Kitchen, 2024). A hanging oven thermometer costs $8-$15 and hangs from the middle rack. Check it after your oven has preheated for 20 minutes.
How Altitude, Pan Color, and Pan Material Affect Cooking Time
Altitude: At elevations above 3,500 feet, water boils at a lower temperature and the air is drier. Baked goods rise faster and set more slowly, which can cause them to collapse. The King Arthur Baking high-altitude guide recommends reducing leavening (baking soda and baking powder) by 15-25% and increasing liquid slightly for baking above 3,500 feet (King Arthur Baking, 2024). Roasting proteins and vegetables is not affected significantly by altitude.
Pan color: Dark pans absorb more radiant heat from the oven walls and floor. Light or shiny pans reflect it. For cookies and cakes, use light-colored pans to prevent over-browning on the bottom. For roasted meats and vegetables, a darker or non-stick pan can give you better color on the bottom.
Pan material: Heavy-gauge aluminum heats evenly and is the professional standard. Thin, cheap baking sheets develop hot spots and warp. Cast iron retains heat better than any pan material, which makes it excellent for searing and roasting but slow to adjust when you turn down the heat. Glass and ceramic baking dishes hold heat longer than metal – food continues cooking in them even after you pull them out, so account for that in your timing.
A Chef’s Personal Tips for Beginner Oven Success
I have been cooking professionally since 2008. I trained in France and have worked in restaurants from Paris to Chicago. I have also burned more food than I can count, including – embarrassingly – an entire tray of dinner rolls on my second day at my first real job. What I have learned is this: beginners fail at oven cooking not because of skill, but because of missing information.
Here are the opinions I have developed the hard way:
Always preheat fully. Put an oven thermometer on your middle rack. Set your oven to the target temperature. Wait until both the oven’s beep and the thermometer agree. That usually takes 15-20 minutes for electric ovens and 10-15 for gas. Starting food in a cold oven gives you uneven cooking and unreliable times.
Do not crowd the pan. I would rather cook two batches of vegetables than steam one batch in an overcrowded pan. Browning requires direct contact with hot air. Stack food on top of itself and you get soggy, pale, sad results.
Write down what actually worked. Every oven is different. The first time you roast a chicken in your specific oven and it comes out perfectly at 67 minutes at 425°F, write that down. That is worth more than any generic chart.
Invest in a sheet pan with a wire rack. A wire rack inside a rimmed baking sheet (also called a sheet tray) lets air circulate under the food. Chicken thighs roasted on a rack get crispy all the way around, not just on top. This is one setup change that immediately improves most meat and poultry results.
Taste as you go. Season vegetables before roasting and taste one when you pull them. Does it need more salt? A squeeze of lemon? A drizzle of olive oil? The oven handles the cooking; you handle the flavor.
Frequently Asked Questions About Oven Cooking Times
How do I know when chicken is done without a thermometer?
Without a thermometer, pierce the thickest part of the chicken with a thin knife or fork. The juices should run completely clear, with no pink tint. The meat should feel firm when pressed, not soft and yielding. That said, a $15 instant-read thermometer is more reliable than any visual test – the USDA recommends 165°F as the safe internal temperature for all poultry (USDA, 2024).
Why is my food burning on the outside but raw in the middle?
This almost always means one of three things: your oven is running hot (check with an oven thermometer), the food pieces are too thick or too large for the time given, or you placed the pan on a rack that is too close to a heating element. Try dropping the temperature by 25°F, moving to the middle rack, and checking early.
Does it matter if I open the oven door while cooking?
Opening the door drops the oven temperature by 25-50°F each time (Serious Eats, 2023). For most roasting, one or two peeks will not ruin your food, but avoid opening repeatedly. For baked goods – especially cakes and soufflés – avoid opening the door at all during the first two-thirds of the bake time. That early heat is what sets the structure.
What is the difference between bake and broil?
Bake uses heat from both the top and bottom elements (or from the gas burner below) to cook food evenly throughout. Broil uses only the top element at high heat (usually 500°F+) to brown the surface quickly, similar to a grill. Use broil for the last 2-4 minutes to brown the top of a casserole, crisp chicken skin, or finish a gratin – not to cook food all the way through.
Can I cook two things at different temperatures at the same time?
You can, but compromise is required. Pick a temperature between the two targets and adjust your times accordingly. Alternatively, cook the item that needs lower heat first, rest it covered in foil, then crank the oven for the item that needs higher heat. Cooking two things at the same temperature is always simpler.
How do I adjust oven cooking times for a bigger or smaller piece of meat?
Use the internal temperature target, not the time, as your guide. A larger piece needs more time to reach the same internal temperature; a smaller one needs less. Start checking at roughly 75% of the stated time for smaller pieces. For large roasts, a rough rule is 20 minutes per pound at 325°F for beef, but always verify with a thermometer (America’s Test Kitchen, 2024).
Why do vegetables get soft instead of roasted and brown in my oven?
Two causes account for almost every case: too low a temperature and too much crowding. Vegetables need 400-425°F to brown properly. At 350°F, they release moisture faster than it evaporates, which means they steam instead of roast. Spread them in a single layer with space between each piece. Use the highest-rimmed baking sheet you have – deep sides trap steam; low sides let it escape.
How do I know when baked goods are done if the toothpick test gives mixed results?
The toothpick test works best in the true center of the item, not near the edges where things cook first. If your toothpick comes out with wet batter, the item needs more time. Moist crumbs mean done for most cakes and quick breads. A fully clean toothpick is right for cornbread and muffins but actually means slightly overdone for a fudgy brownie. Learn the specific target for each item you bake (King Arthur Baking, 2024).
Key Takeaways
- Cooking times are ranges, not fixed numbers. Thickness, starting temperature, pan material, and your oven’s actual temperature all shift the result. Start checking at the low end of any time range.
- Buy an oven thermometer. Most home ovens run 25-50°F off the dial setting. This single $10 tool explains more failed recipes than any other factor (America’s Test Kitchen, 2024).
- Use an instant-read thermometer for all proteins. Color, juices, and texture are secondary cues. Temperature is the only reliable doneness check.
- Resting time is part of the cook. Pull meat 5-10°F before the target temperature. Carryover cooking brings it to the right temperature during the rest.
- High heat roasts; low heat steams. Vegetables need 400-425°F and space in the pan to brown properly. Crowded pans and low temperatures give you pale, soft results.
- Convection mode improves most roasting. Reduce temperature by 25°F or reduce time by 20-25% when switching from conventional to convection.
- Write down what works in your oven. Every oven has quirks. A personal log of actual times that worked for you is worth more than any generic chart.

I’m Mossaraof, a trained chef and the founder of OvenInsights.com. I spent years cooking at Larrupin’ Cafe and in kitchens across Chicago and Seattle. Now I test kitchen gear for a living. I moved to North Acton, London, and I test every tool I write about. I use real meals and real heat. No brand deals. No shortcuts. I cover 12 kitchen types and hundreds of recipes. I believe this: the right tools matter as much as the recipe.




