Hey, I’m Mossaraof — a professional cook and food blogger.
Nothing beats the smell of a roasting bird filling the house on a lazy Sunday. I want to show you exactly how to cook a Perdue oven stuffer roaster chicken so it stays moist and full of flavor. After years in professional kitchens, I’ve found that these larger roasters are the secret to a stress-free family feast. You can check out my Ultimate Guide to Master Your Oven to ensure your heat stays steady for that golden skin. Let’s get your pan ready and make a meal your friends will love!
My First Encounter with the Oven Stuffer
This bird is a different beast than the small fryers you see in the meat aisle.
It was a rainy Tuesday when I decided to test the limits of my home oven. I noticed the Perdue Oven Stuffer was much heavier and had a deeper yellow hue to the skin. This usually means a higher fat content, which is a chef’s best friend for flavor.
In my experience, these birds are the “Cadillacs” of the poultry world. They are bred to be meaty, succulent, and forgiving for the home cook. Here is what I noticed right away:
- The Weight: They usually clock in between 5 and 8 pounds.
- The Build: The breasts are wider, making them perfect for slicing.
- The Prep: They often come with the giblets tucked inside, so don’t forget to look!
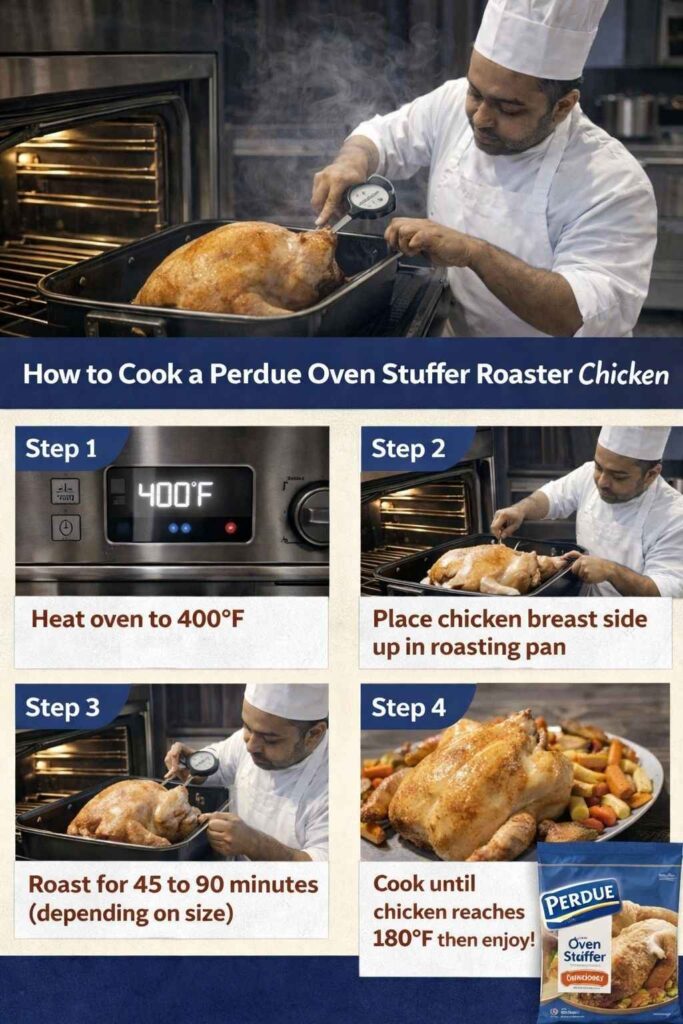
How to Cook a Perdue Oven Stuffer Roaster Chicken: The Foundation
Cooking this bird requires a bit of patience and the right set of steps to ensure the meat stays juicy.
I always start by taking the bird out of the fridge at least 45 minutes before I cook. If you put a cold bird in a hot oven, the outside gets tough before the inside is even warm. I call this the “chill-out” phase. It is essential for an even cook.
While the bird rests on the counter, I prep my aromatics. I love using classic American flavors like sage, rosemary, and plenty of garlic. I don’t just put them in the pan; I stuff them right into the cavity. This scents the meat from the inside out.
- Pat it dry: Use a lot of paper towels. Dry skin equals crispy skin.
- Salt early: I use Kosher salt to draw out moisture and season deeply.
- Oil vs. Butter: I prefer high-quality butter for that rich, American diner-style flavor.
How Do I Cook a Perdue Oven Stuffer Roaster Chicken in a Roaster Oven?
Using a standalone roaster oven is a great way to save space in your main oven during the holidays.
I remember one Thanksgiving in a crowded kitchen where the main oven was full of pies. I pulled out an electric roaster oven to handle the chicken. It worked like a charm, but there are some tricks to it. These machines trap a lot of steam because the lids fit so tightly.
If you use one, keep the lid closed. Every time you peek, you lose about 15 minutes of heat. It’s like a sauna for your chicken. The meat comes out incredibly tender, almost like it was slow-cooked, but the skin might stay a bit soft.
- Preheat well: Give the roaster at least 20 minutes to get up to temp.
- Use the rack: Never let the bird sit in its own juices or the bottom will be soggy.
- Browning tip: If the skin looks pale, rub a little paprika on it at the start.
Perdue Oven Ready Roaster Chicken: How Long Does it Take?
The “Oven Ready” version is a lifesaver for those of us who have zero time after a long shift.
I’ve had days where I get home at 6 PM and the kids are starving. The “Oven Ready” bag is a gift from the kitchen gods. You don’t even have to touch the raw meat. You just cut a few slits in the bag and slide it onto a baking sheet.
Usually, these take about 90 minutes to 2 hours depending on the weight. The bag acts like a vacuum, locking in every drop of moisture. It’s almost impossible to mess up. Even as a chef, I can appreciate the science behind a perfectly engineered roasting bag.
- Check the timer: Most come with a pop-up timer, but I still use my digital probe.
- Let it rest: Even in the bag, the juices need time to settle back into the meat.
- Careful with steam: When you cut that bag open, the steam is hot enough to burn.
Timing Your Roast Like a Pro
Getting the timing right is the difference between a standing ovation and a trip to the local pizza joint.
I’ve stood in front of many ovens, watching the clock and praying for that golden glow. It’s easy to get nervous when the family is hungry and staring at you. But roasting is more of a dance than a math problem. You have to listen to the sizzle and trust your tools.
The weight of the bird is your primary guide, but every oven has its own personality. Some run hot in the back, while others lose heat every time the door clicks open. Here is a breakdown of what I’ve found works best in real-world American kitchens.
How Long to Cook a Perdue Oven Roaster Chicken?
For a standard oven at 350°F, you are looking at about 20 minutes per pound. If you have a 6-pound bird, that’s two hours of oven time. I always set my kitchen timer for 15 minutes early just to be safe. It’s better to check too soon than too late.
- 5 lbs: About 1 hour and 40 minutes.
- 7 lbs: About 2 hours and 20 minutes.
- Check the thigh: The meat should be 165°F when it’s done.
How Long to Cook 2 Oven Stuffer Roaster Chickens?
When I’m hosting a big backyard BBQ or a Sunday lunch for the whole crew, I often cook two at once. You don’t need to double the time, but you do need to add about 15 to 30 minutes to the total. The extra mass in the oven absorbs more heat, so the air takes longer to recover.
Make sure there is at least two inches of space between the birds. If they touch, the skin will stay pale and rubbery in those spots. I usually rotate the pans halfway through to ensure even browning. If your oven has a convection setting, now is the time to use it.
The Frozen Bird Dilemma
We have all been there—you realize at 4 PM that the chicken is still a solid block of ice in the freezer.
I remember one Saturday when I promised a roast chicken dinner but forgot to move the bird to the fridge. I felt that pit in my stomach. You can actually cook it from frozen, but you have to change your strategy. It’s not the “chef-preferred” way, but it works in a pinch.
The main issue is the “danger zone” where bacteria can grow. To avoid this, you need to keep the heat steady. Don’t try to crank the oven to 450°F to “speed it up.” You will just burn the outside while the inside stays raw. Slow and steady wins this race.
How Long to Cook a Frozen Oven Stuffer Roaster Chicken?
If you are starting from a frozen state, add 50% more time to your roast. A bird that usually takes 2 hours will now take 3 hours. I start the bird covered tightly with heavy-duty Reynolds Wrap. This traps the heat and helps thaw the center.
- First 90 minutes: Keep it covered at 325°F.
- Remove foil: Increase heat to 375°F to crisp the skin.
- The Giblet Hunt: Be careful! The plastic bag of giblets is often frozen inside. You’ll need to pull it out with tongs once the bird thaws enough mid-roast.
Finding the Perfect Fit: How High is an Oven Stuffer Roaster Chicken?
Kitchen space in the U.S. varies wildly, from massive suburban kitchens to tiny city studios.
I once lived in a place where the oven was so small I could barely fit a cookie sheet. When you buy a Perdue Oven Stuffer, remember they are tall birds. They sit much higher than a standard fryer. I’ve seen many home cooks accidentally let the top of the breast touch the top heating element.
This results in a scorched, black patch on an otherwise beautiful bird. Before you even turn the oven on, do a “test fit.” Put the chicken in the pan and slide it onto the lowest rack. You want at least three inches of clearance from the top.
- Adjust your racks: Move them down before the oven gets hot.
- Pan choice: Use a low-profile roasting pan if height is an issue.
- Safety first: A tall bird is heavy; make sure your oven rack is sturdy and locked in place.
Mastering the Heat: How to Cook a Perdue Oven Stuffer Chicken
The temperature you choose determines the texture of the meat and the color of the skin.
In my professional opinion, 350°F is the “sweet spot” for roasting. It’s hot enough to render the fat but cool enough to keep the breast meat from drying out. I’ve tried the high-heat method (425°F), and while the skin is amazing, the meat often suffers.
I like to use a bit of “oven logic.” If I’m in a rush, I start high and then go low. But for a relaxing Sunday, I stay at a steady 350°F. This allows the collagen in the legs to break down, making them melt-in-your-mouth tender.
- The Butter Rub: I mix softened butter with garlic powder and onion powder.
- The Basting Myth: You don’t actually need to baste every 10 minutes. Opening the door just drops the temp.
- Placement: Keep the legs pointing toward the back of the oven, as that’s usually the hottest spot.
The Magic of the Resting Phase
If you take one thing away from my years in the kitchen, let it be this: wait.
I know the house smells like heaven. Your family is likely circling the kitchen like hungry sharks. But if you cut into that bird the second it leaves the oven, you lose. All that beautiful juice will pour out onto your cutting board. That leaves the meat dry and sad.
Think of the muscle fibers like little sponges that tightened up in the heat. As the chicken sits, those fibers relax. They soak the juices back in. This is how you get a breast that is actually moist. I usually use this time to finish my sides or make the gravy.
- How long? At least 15 to 20 minutes for a bird this size.
- The “Tent” Trick: Lay a piece of foil loosely over the top. Don’t wrap it tight or the skin will steam and get soft.
- Carving Board: Use one with a “juice groove” around the edge just in case.
Crafting the Perfect American Pan Gravy
Those brown bits at the bottom of your pan are liquid gold; don’t you dare wash them away.
In every U.S. home I’ve cooked in, the gravy is the star of the show. Since the Perdue Oven Stuffer is a bit fattier, you get amazing drippings. I start by pouring all the fat and juice into a glass measuring cup. Let it sit for a minute so the fat rises to the top.
I use a bit of that fat to cook some flour in a saucepan. This is called a roux. Then, I slowly whisk in the juices and some chicken stock. I love using brands like Swanson or Kitchen Basics if I don’t have homemade stock. It tastes like home, and it’s a total crowd-pleaser.
- Deglaze: Put your roasting pan on the stove over low heat. Add a splash of white wine or broth to scrape up the flavor.
- Whisk constantly: Nobody likes lumpy gravy. Keep it moving!
- The Secret Ingredient: A tiny drop of soy sauce or Worcestershire sauce adds a deep, savory color.
How to Roast a Chicken Using a Roaster Oven for Holidays
When the big holidays hit, your main oven is usually tied up with yams, rolls, and green bean casserole.
I remember one Christmas when I was tasked with cooking for 15 people. My main oven was a war zone. I set up my Hamilton Beach roaster oven on the back porch (it was a cool day). This kept the kitchen from getting too hot and gave me an extra appliance to work with.
These roasters are basically large, portable ovens. They are great for the Perdue Oven Stuffer because they hold a very steady heat. Just remember that they cook from the sides, not the top. This means the wings might get done faster than the legs.
- Don’t lift the lid: I can’t say this enough. You lose so much heat every time you look.
- Use a meat probe: Since you can’t see through the lid easily, a digital thermometer with a wire is perfect.
- Crisping finish: If you want that deep brown skin, you can pop it under the broiler in your real oven for 3 minutes at the very end.
Carving Your Masterpiece
Now comes the part that scares a lot of people, but I promise it’s just basic anatomy.
I used to get nervous about carving in front of guests. Then I realized, even if it’s messy, it still tastes great. Use a sharp knife. A dull knife is actually more dangerous because it slips. I like a long, thin slicing knife or a classic chef’s knife.
Start by removing the legs and thighs. Find the joint and just pop it through. Next, find the breastbone right down the middle. Slide your knife down one side, hugging the bone. The meat should just peel away in a beautiful, thick lobe.
- Slice against the grain: This makes the meat even more tender to chew.
- The “Oyster”: Look on the back of the bird for two small knobs of meat. Those are the chef’s treat. Don’t share them!
- Platter style: Arrange the dark meat on one side and the white meat on the other. Garnish with some fresh parsley for that “Pinterest” look.
What to do with the Extras?
A Perdue Oven Stuffer is big, which means you’ll likely have leftovers for Monday.
In my house, the leftovers are sometimes better than the initial meal. I love making “Californian” style chicken salad with grapes and walnuts. Or, you can go the classic route with chicken noodle soup. The bones from this bird make a very rich broth because they are so sturdy.
Don’t let any of it go to waste. Pull all the remaining meat off the bones while the bird is still slightly warm. It comes off much easier than it does when it’s cold. Store it in airtight containers like Tupperware or Pyrex.
- Chicken Tacos: Shred the meat and toss it with some lime and cumin.
- Pot Pie: Use a store-bought crust and some frozen veggies for a quick Monday night dinner.
- The Stock: Throw the carcass in a pot with water, celery, and carrots. Simmer for 4 hours. Your house will smell amazing.
Regional Flavors: Giving Your Bird a US Road Trip
One of my favorite things about cooking in the States is how much the “perfect” chicken changes from coast to coast.
In the Midwest, we often stick to the “Big Three”: salt, pepper, and butter. It’s clean and honest. But when I’m feeling bold, I’ll take a trip down to the South. I’ll rub that Perdue bird with a heavy dose of Cajun spices—think paprika, cayenne, and thyme. It turns the skin a deep, fiery red that looks stunning on a white serving platter.
If you’re out West, you might see more citrus and herbs like cilantro and lime. The acidity of the lime cuts through the richness of the Oven Stuffer’s fat. No matter where you live, you can make this bird taste like your “home.”
- Tex-Mex Style: Rub with cumin, chili powder, and a touch of brown sugar.
- New England Style: Plenty of sage, onion powder, and maybe a side of cranberry sauce.
- California Fresh: Stuff the cavity with halved lemons and fresh rosemary sprigs.
The Economics of the Oven Stuffer: A US Shopper’s Guide
Let’s be real for a second—grocery prices in the U.S. haven’t been the kindest lately.
I’m always looking for ways to stretch my dollar at stores like Walmart or Aldi. One thing I’ve realized is that the Perdue Oven Stuffer is actually a great value. Even though the price tag looks higher than a small fryer, the “meat-to-bone” ratio is much better. You are paying for meat, not just a carcass.
For a family of four, one of these birds can easily provide two full meals. That’s a win in my book. I usually buy mine when they go on sale around the holidays and keep a spare in the deep freezer. It’s a reliable insurance policy for when the “What’s for dinner?” question hits.
- Watch the Sales: Look for “Price Blaster” or “Manager’s Specials” at your local grocery store.
- Bulk Buying: If you have a Costco or Sam’s Club membership, you can often find them in two-packs.
- Freezer Life: These birds stay great in the freezer for up to 9 months if the seal is tight.
Health and Nutrition: The Feel-Good Roast
I get asked a lot if roast chicken is actually “healthy.”
In my professional opinion, it’s one of the best things you can eat. When you cook a Perdue Oven Stuffer at home, you control the salt. Store-bought rotisserie chickens are often injected with massive amounts of sodium to keep them moist on the shelf. When you do it yourself, you keep it clean.
The meat is packed with high-quality protein, which keeps you full longer. I like to roast mine with a big tray of root vegetables underneath. The carrots and parsnips soak up a tiny bit of the chicken fat, which makes them taste like candy, but they are still full of fiber and vitamins.
- Skinless Option: If you are watching your fat intake, just pull the skin off after cooking.
- Natural Juices: Avoid heavy cream sauces and stick to the natural pan jus.
- Veggies are Key: Fill half your plate with roasted broccoli or a side salad to balance the meal.
Troubleshooting: When Your Bird Isn’t “Acting Right”
Even after years in the kitchen, I still have days where the oven decides to act up.
I remember one night the power flickered and my oven reset. I didn’t realize it for 30 minutes. My chicken was just sitting there in the lukewarm air. If your bird is taking way too long, don’t panic. Just increase the heat by 25 degrees and move it to a higher rack.
Another common issue is “bloody joints.” If you cut into the leg and see a bit of pink near the bone, don’t freak out. In young, large birds like the Oven Stuffer, the bone marrow can sometimes stain the meat. As long as your thermometer says 165°F, it is safe to eat.
- The “Pale Skin” Fix: If it’s cooked but not brown, turn on the broiler for 2 minutes. Watch it like a hawk!
- The “Dry Breast” Fix: If you overcooked it, slice it thin and pour extra warm gravy or broth over it.
- The “Pop-up” Failure: Sometimes the plastic timer doesn’t pop. Always trust your metal thermometer over the plastic one.
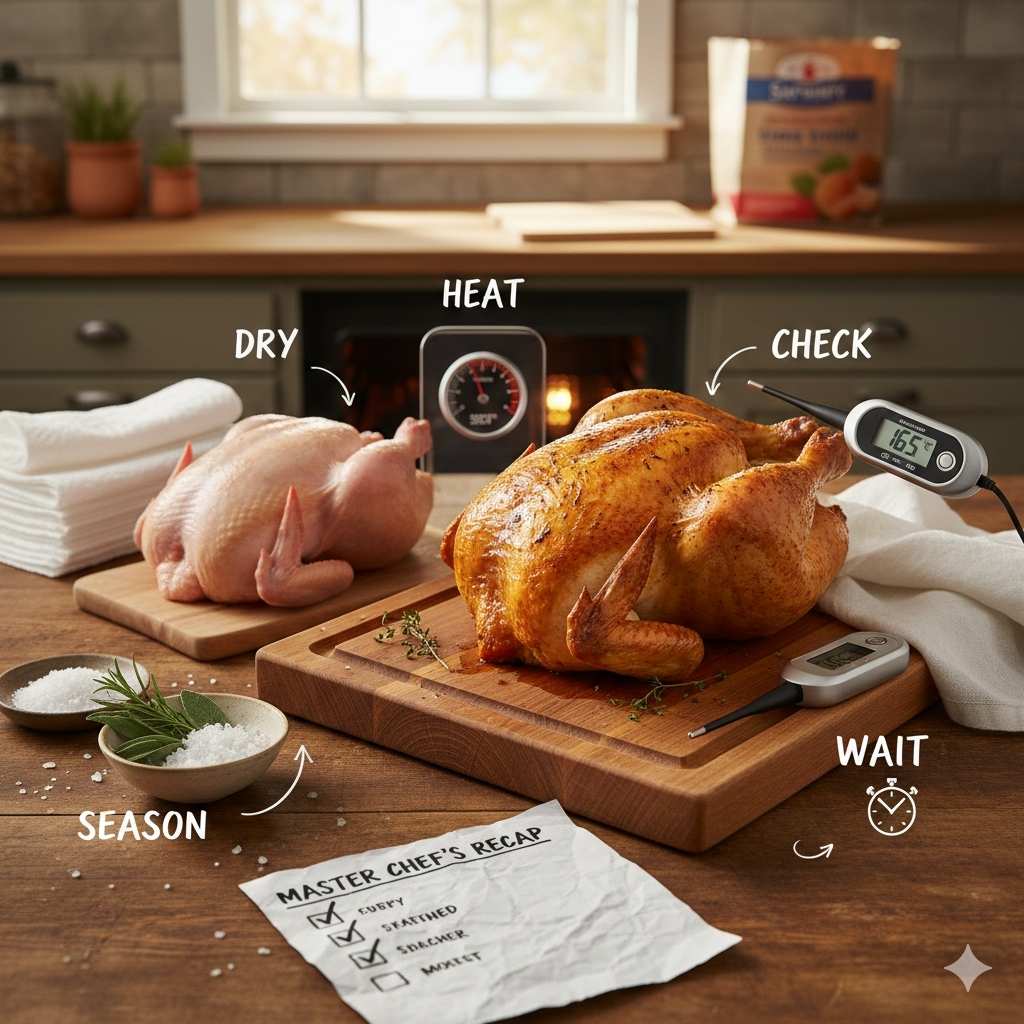
The Master Chef’s Recap: Your Cheat Sheet
After all the stories and tips, let’s boil it down to the essentials for your next grocery trip.
I’ve found that having a simple checklist prevents those “oh no” moments when you’re halfway through a recipe. When I’m in a rush at a busy U.S. supermarket like Safeway, I just run through this list in my head. It keeps me focused. You don’t need a culinary degree to master this; you just need a plan.
Think of this as your “greatest hits” list. If you follow these five steps, your Perdue bird will be the star of the neighborhood. People will start asking you for your “secret recipe,” and you can just smile and tell them it’s all in the prep.
- Dry: Paper towels are your best friends.
- Season: Salt like you mean it, especially in the cavity.
- Heat: 350°F is your steady, reliable companion.
- Check: Use a digital thermometer; don’t guess.
- Wait: Resting is the hardest, but most important, step.
Frequently Asked Questions
How do I know if my chicken is actually done?
While the pop-up timers that come with some birds are a nice backup, they aren’t perfect. I always use a digital meat thermometer. You want to aim for 165°F. Stick the probe into the thickest part of the thigh, making sure you don’t hit the bone. If you hit the bone, you might get a false high reading.
Should I cover my chicken with foil while it cooks?
I only use foil if the skin is getting too dark too fast. If the breast looks mahogany but the timer still says you have 30 minutes left, drape a piece of foil loosely over the top. This acts like a heat shield. Otherwise, leave it uncovered so the skin can get that “shatter-crisp” texture we all love.
Why is there pink near the bone?
This is a question that scares a lot of people! If you have checked the temp and it’s 165°F, it is safe. In younger, larger birds, the bone marrow can sometimes seep through the soft bone during the cooking process. It’s a natural occurrence and doesn’t mean the chicken is raw.
Can I cook vegetables in the same pan?
Absolutely. In fact, I highly recommend it. I love tossing some chopped Yukon Gold potatoes, carrots, and onions in the bottom of the roasting pan. They cook in the drippings from the Perdue bird. It’s like they’re being braised in liquid gold. Just make sure you don’t crowd the pan too much, or the vegetables will steam instead of roast.
What is the best way to reheat leftovers?
To keep the meat from getting that “leftover” taste, I avoid the microwave if I can. Instead, I put the chicken in a baking dish with a splash of chicken broth and cover it with foil. Heat it at 325°F until it’s just warmed through. This keeps it moist and preserves that Sunday-dinner flavor.
Does it matter if I use a glass or metal pan?
Metal pans (like stainless steel or cast iron) are better for heat conduction and will give you a better sear on any veggies in the pan. Glass pans take longer to heat up and can sometimes lead to uneven cooking. If you use glass, you might need to add five or ten minutes to your total cook time.
Sensory Details: The Professional Kitchen Experience
A great roast is more than just a meal; it’s a sensory journey that starts the moment the heat hits the bird.
I love the sound of the butter sizzling against the skin about 45 minutes into the roast. It’s a rhythmic, crackling sound that tells me the fat is rendering perfectly. The kitchen begins to smell like toasted garlic and warm poultry, a scent that defines “home” for so many of us in the States.
When you finally pull it out, the skin should be a deep mahogany color. If you tap it with a spoon, it should sound hollow and crisp. That’s the “chef’s knock.” It’s the ultimate sign of success.
- The Sight: Golden-brown skin with no pale spots.
- The Sound: That beautiful sizzle in the pan.
- The Touch: Meat that yields easily when you press a fork against it.
Final Thoughts: You’ve Got This!
Cooking is a journey, and every bird you roast makes you a better, more confident cook.
I’ve had my share of burnt wings and dry breasts over the years. That’s how I learned! The Perdue Oven Stuffer is a fantastic tool to help you find your groove. It’s forgiving, it’s flavorful, and it’s a classic part of the American dining experience.
So, next time you’re at the store, grab that big yellow-labeled bird with confidence. Put on some music, pour a glass of something you like, and enjoy the process. Your family will thank you, your house will smell incredible, and you’ll feel like the pro you are becoming.
Quick Reference Timing Table
| Bird Weight | Oven Temp | Approx. Cook Time |
| 5 lbs | 350°F | 1 hr 40 mins |
| 6 lbs | 350°F | 2 hrs |
| 7 lbs | 350°F | 2 hrs 20 mins |
| 8 lbs | 350°F | 2 hrs 45 mins |
Note: Always use a meat thermometer to ensure the internal temperature reaches 165°F in the thickest part of the thigh.
I’m Mossaraof, a trained chef and the founder of OvenInsights.com. I spent years cooking at Larrupin’ Cafe and in kitchens across Chicago and Seattle. Now I test kitchen gear for a living. I moved to North Acton, London, and I test every tool I write about. I use real meals and real heat. No brand deals. No shortcuts. I cover 12 kitchen types and hundreds of recipes. I believe this: the right tools matter as much as the recipe.