
Hey, I’m Mossaraof — a professional cook and food blogger.
If you have ever searched for How to Cook Chicken Francese in the Oven, you may have felt unsure. I did too the first time. I loved the bright lemon sauce, but I did not want to stand over a hot pan.
After years of testing oven baked chicken francese in small home kitchens and busy prep days, I found a way that keeps the chicken soft and the sauce fresh and bold. In this guide, I will show you how to cook chicken francese in the oven step by step, with simple heat control and easy timing.
If you want a light, golden crust and that classic lemon butter flavor without stress, you are in the right place. And if you want to master your heat settings first, read The Complete Guide to Using an Oven to build a strong base before we start. Let’s cook it the smart way.
Why I Started Making Chicken Francese in the Oven
Let’s just say it wasn’t planned. It was more like a happy kitchen accident on a day when I was over everything — the noise, the mess, the grease.
The Day That Changed Everything
I remember the exact moment. It was a Wednesday in July. Florida heat. No breeze. The air outside felt like soup, and my kitchen wasn’t any better. I was halfway through dredging chicken when I looked at the skillet and thought, “I can’t do this again.”
The stovetop had been my go-to for Chicken Francese. That buttery sear, that signature golden crust — I knew it well. But I also knew what came after:
- Grease splatter on the backsplash
- My shirt smelling like lemon and oil for hours
- Standing at the stove, sweating, while flipping chicken like it’s a cardio workout
So I broke the pattern. I seared the cutlets quickly on the stove, then shoved the pan in the oven and walked away.
Not out of strategy — out of survival.
How That First Oven Batch Turned Out
I had zero expectations. Honestly, I assumed I’d overcook it or end up with limp crust. But when I pulled the pan out after 15 minutes, I was floored.
The chicken looked… perfect.
Golden brown. Still crisp. And when I sliced into it — juicy, not dry. The egg coating didn’t slide off like I feared. The crust had held up better than some stovetop versions I’d made before.
That moment kind of changed how I cook.
The Oven Gave Me Room to Breathe
Since that day, oven-baking Chicken Francese has been my default — especially on busy weeknights or when I’m juggling too many things. Because here’s what the oven gives me that the stovetop never could:
- Hands-free time while the chicken bakes
- Consistent doneness (no half-raw middle, no burned edges)
- A cooler kitchen in humid U.S. climates
- Less mess, fewer pans to scrub
And when I’m cooking in tight spaces — like in a Chicago apartment with a barely-vented range hood — that makes a huge difference.
Ingredients You’ll Need for Oven Chicken Francese
This isn’t one of those recipes that’ll have you running to three stores. Everything here is simple, familiar, and U.S. pantry-friendly.
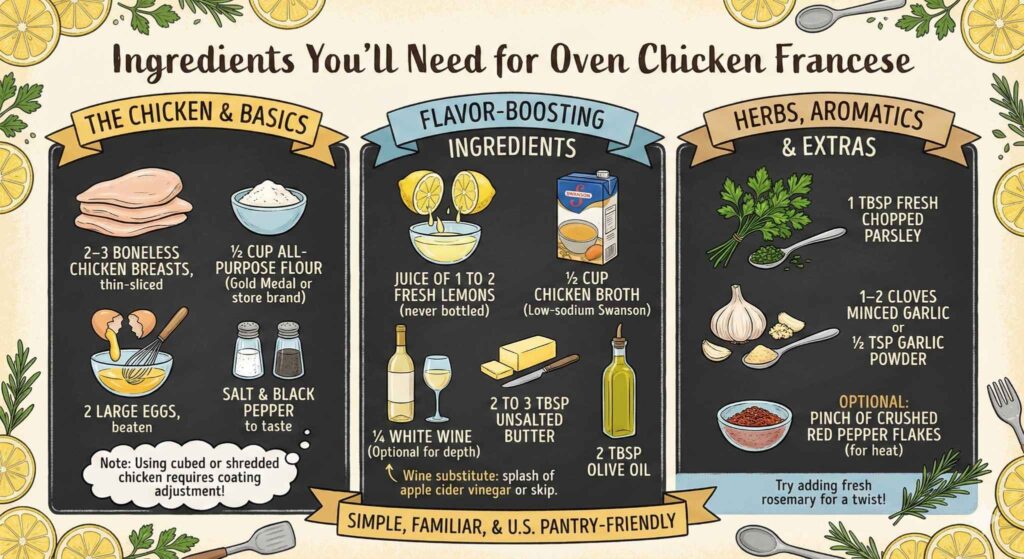
The Chicken and Basics
I usually start with boneless, skinless chicken breasts. Thin ones work best. Sometimes I buy them pre-sliced, but honestly, most days I just butterfly a couple thick ones myself and pound them a bit flatter with a rolling pin.
Here’s what you’ll need:
- 2 to 3 boneless chicken breasts, thin-sliced
- ½ cup all-purpose flour (nothing fancy, just Gold Medal or store brand)
- 2 large eggs, beaten
- Salt and black pepper to taste
If you’re using cubed chicken or shredded chicken breast (yep, I’ve tried both oven-style), you’ll need to adjust the coating a bit — but I’ll explain that later.
Flavor-Boosting Ingredients
What makes Chicken Francese stand out is that bright lemony sauce paired with a savory egg-coated crust. It’s the kind of dish that smells like a restaurant kitchen but tastes like comfort.
These are my go-tos:
- Juice of 1 to 2 fresh lemons (never bottled)
- ½ cup chicken broth (I stick with low-sodium Swanson)
- ¼ cup white wine — optional, but I love the depth it adds
- 2 to 3 tablespoons unsalted butter
- 2 tablespoons olive oil
If I’m out of white wine, I’ve used a splash of apple cider vinegar or skipped it altogether — it’s flexible.
Herbs, Aromatics, and Extras
These are small details, but they really round it out — especially if you’re serving this for guests or trying to impress your mother-in-law (which I did once, successfully, thanks to parsley).
- 1 tablespoon fresh chopped parsley
- 1–2 cloves minced garlic or ½ teaspoon garlic powder
- Optional: a pinch of crushed red pepper flakes for heat
I’ve also added fresh rosemary when testing a rosemary chicken breast in the oven version. It gave the whole dish a cozy, woodsy vibe — great for fall dinners.
Tools That Actually Help (U.S. Kitchen Insights)
I’ve made this dish in all kinds of ovens — from a retro coil-top electric range in Indiana to a sleek Frigidaire convection setup in Florida. The tools you use can make or break the texture.
My Go-To Pans (Yes, the Pan Matters)
I used to think any skillet would work. But after burning the egg coating more than once in a cheap thin pan, I learned quick — heat distribution is everything.
Here are the pans that actually work:
- Lodge 12″ Cast Iron Skillet
Holds heat like a champ. I can sear the chicken on the stovetop, then slide it right into the oven. - Staub Enamel Braiser (3.5 qt)
Pricey, but it’s my go-to when I’m hosting or want to serve straight from the oven to the table. Plus, it holds the lemon sauce like a dream. - Cuisinart Stainless Oven-Safe Skillet
Lighter than cast iron but still sturdy. Good backup when my main pans are “soaking” (aka I haven’t done dishes).
What Type of Oven You Have Can Change the Game
If you’re cooking in the U.S., your oven could be gas, electric, or convection. I’ve worked with all three — and they each have their quirks.
Here’s what I’ve noticed:
- Gas ovens (like the Whirlpool one in my old Chicago apartment) tend to run hotter at the bottom. I had to raise the rack to keep the crust from burning.
- Electric ovens give more even top-to-bottom heat. That’s what I use now, and it works great for this recipe.
- Convection ovens make the egg coating crispier, faster — but you’ll want to lower the temp by 25°F and cut the time slightly.
If you’re using a power air fryer oven (yep, I tested it), it can work too — just know it browns quickly, so keep an eye on it.
A Meat Thermometer = Sanity Saver
I didn’t use to bother with a thermometer. I’d just poke the chicken and hope it wasn’t raw. But after one batch came out dry (and one dangerously underdone), I got smart.
Now I use:
- ThermoPro digital instant-read thermometer
Affordable and accurate. I just stick it in the thickest part. When it hits 165°F, it’s done.
If you’ve ever stood by your oven debating whether another 3 minutes will dry it out — just get the thermometer. Trust me.
Step-by-Step: How to Cook Chicken Francese in the Oven
This is the exact method I use — messy counter, rolling lemon, apron tied in a crooked knot. Let’s keep it real.
Step 1 — Preheat and Prepare Your Setup
I always start by preheating the oven to 375°F (conventional setting). If I’m using convection, I drop it to 350°F — that’s the sweet spot where the crust stays crisp without burning.
While the oven’s heating:
- Lightly grease your oven-safe pan
- Beat your eggs in a shallow bowl
- Set up your flour in another shallow dish
- Pat chicken dry with paper towels (key for getting the coating to stick)
Sometimes I add a little garlic powder or black pepper right into the flour — gives it a little more personality.
Step 2 — Dredge and Dip Like a Pro
Here’s the order I follow — no shortcuts:
- Light flour coat (shake off excess)
- Dip in beaten egg, let it drip just a second
- Lay it gently on a plate while you finish the others
Don’t stack the pieces. I did that once and ended up with a stuck-together mess.
Step 3 — Sear Quickly, Then Let the Oven Work
This is where oven-cooked Francese starts to feel like a life hack.
- Heat 1 tbsp butter + 1 tbsp olive oil in your pan over medium-high heat
- Sear chicken 2 minutes per side, just until lightly golden
- Transfer the whole pan to the preheated oven
If you’re using a thin pan, make sure you have a baking sheet under it to catch drips. Trust me — I learned that one the hard way.
Step 4 — Bake Until Perfectly Cooked
In my electric oven, thin cutlets usually take 12 to 15 minutes. Thicker ones go up to 18 minutes.
I use my ThermoPro to double-check:
- Internal temp = 165°F
- Edges start to pull away slightly
- Crust stays intact and golden
While the chicken bakes, I start the lemon sauce on the stovetop (or sometimes in a saucepan on a back burner — multitasking magic).
Step 5 — Make the Signature Francese Sauce
Here’s my personal version — not too sharp, not too buttery:
- Deglaze a small pan with ¼ cup white wine (or skip it, no judgment)
- Add ½ cup chicken broth + juice of 1 lemon
- Simmer 4–5 minutes, stir in 1 tbsp butter to finish
- Sprinkle in chopped parsley at the end
Sometimes I add a dash of crushed red pepper if I want a kick.
Step 6 — Combine and Finish
Once the chicken is out:
- Pour the hot lemon sauce over the baked chicken
- Optional: pop it back into the oven (uncovered) for 3 minutes to let it bubble and caramelize the edges
- Plate it up with pasta, rice, or even sautéed spinach
The smell alone will bring people to the kitchen — I’ve literally had neighbors knock just to ask what I was making.
How Long to Cook Chicken Francese in the Oven
Cooking times can be a little different depending on how thick your chicken is, what kind of oven you’re using, and — let’s be honest — how temperamental your oven is that day.
My General Rule of Thumb
When I’m working with standard thin-sliced chicken breasts (about ½ inch thick), I bake them at 375°F for around 12 to 15 minutes. That’s in a conventional electric oven. Thicker pieces? I go closer to 18 or even 20 minutes.
Here’s what I’ve learned from trial and error:
- Thin cutlets = 12–15 minutes
- Regular ¾-inch breasts = 16–18 minutes
- Bone-in or thick = 20+ minutes (but I rarely use bone-in for Francese)
The key? Don’t guess. Use a thermometer.
How Convection Mode Changes the Game
When I use the convection setting — especially in newer U.S. ovens like the Frigidaire Gallery or GE Profile — I always:
- Lower the temp to 350°F
- Reduce cook time by about 3–4 minutes
- Use the middle rack to avoid over-browning the bottom
Convection ovens circulate heat, which crisps up that egg coating faster — but if you’re not careful, it can dry out the meat too. I’ve overcooked a few batches when I forgot to adjust the timing. Live and learn.
Visual Signs It’s Done (Even Without a Thermometer)
Sometimes I just trust my eyes and the way the chicken feels with a quick fork press. Here’s what I look for:
- Edges slightly browned and pulling away
- No visible egg wet spots
- Juices run clear when pierced
- Slight firmness, but not rubbery
But honestly? A thermometer is your best friend here. I use it every time now.
Quick Reference Chart for Oven Timing
| Chicken Thickness | Oven Type | Temp | Cook Time |
|---|---|---|---|
| ½ inch | Conventional | 375°F | 12–15 minutes |
| ¾ inch | Convection | 350°F | 13–16 minutes |
| 1 inch+ | Gas Oven | 375°F | 16–20 minutes |
| Cubed Chicken | Convection | 350°F | 10–12 minutes |
| Power Air Fryer Oven | Air Fry | 360°F | 8–10 minutes |
I’ve tested this recipe in a convection toaster oven, a Whirlpool gas range, and a NuWave air fryer oven — and I still come back to my plain electric oven with cast iron.
Tips for Perfect Texture and Flavor
I’ve ruined enough batches to know what not to do. These tips came from trial, error, and a few moments of pure dumb luck.
Use Real Lemon Juice — Always
I tried bottled lemon juice once. Just once. The flavor was flat, weirdly sour, and kind of metallic.
- Always squeeze fresh lemons
- I keep a bowl of them on the counter — they look nice and smell even better
- One large lemon usually gives me 3 tablespoons of juice
If you’re in a rush, you can microwave a lemon for 10 seconds before juicing — it gives you more juice with less elbow grease.
Pat the Chicken Dry Before Dredging
Seems small, but it matters. Wet chicken = slippery egg coating.
- Use a paper towel and get both sides dry
- Helps the flour stick better too
- I used to skip this — not anymore
And if you’re working with shredded chicken breast or cubed chicken, it’s even more important. You don’t want mushy, clumpy mess.
One Egg Dip Is Enough
When I first started making Francese, I thought more egg meant more crisp. Nope.
- Too much egg = thick, rubbery coating
- Just one dip does the job — in and out, no long soaks
- Let the excess drip off before laying it in the skillet
And never stack dredged pieces while waiting. They’ll stick together and tear when you separate them.
Sauce Last, Not First
Pouring the lemon sauce over the chicken after baking makes a huge difference.
- Keeps the crust crispy
- You can control how much sauce you use
- If you sauce it too early, it’ll get soggy fast
I usually plate the chicken, spoon over the sauce, and garnish with parsley right before serving.
Let It Rest for 2–3 Minutes Before Serving
This one feels small, but it really helps the juices settle.
- Resting keeps the meat juicy
- Gives you time to heat side dishes
- Makes it easier to slice, if you’re serving with pasta or stuffing in a sandwich
Speaking of sandwiches — I’ve stuffed this chicken into sandwich rolls, melted provolone on top, and broiled the whole thing for 2 minutes. If you’ve ever had Sandwich Bros chicken melts, it’s like that — only homemade and ridiculously good.
U.S. Variations I’ve Tried (and Loved)
Once you get the oven method down, it’s hard not to experiment. I’ve tried these spins on Chicken Francese over the years — some were brilliant. One got weird. All taught me something.
Chicken Francese with Rosemary (Cold Night Comfort)
I made this on a chilly evening in Illinois — snow outside, oven warming the whole apartment.
Instead of plain flour, I mixed in:
- 1 teaspoon finely minced rosemary
- Dash of lemon zest
- Cracked black pepper
It gave the dish this rustic, herby flavor — like something you’d eat with roasted baby potatoes and a glass of red wine. Very Sunday-night-dinner vibes.
Also a win with Midwest guests who lean savory over bright citrus.
Tandoori Chicken Francese Hybrid (Yes, It Worked)
Okay, this one was risky.
I had leftover tandoori chicken marinade (yogurt, turmeric, garlic, paprika) and thought, “What if I marinate the chicken before dredging for Francese?”
So I did. Then baked it using the usual method.
- The coating picked up an orange tint
- Spices played surprisingly well with the lemon sauce
- I skipped the wine and added a little ginger to the sauce
It turned out like a bold, fusion version of Francese. Probably not for purists, but I’d make it again in a heartbeat — especially during a winter dinner party with naan on the side.
Power Air Fryer Oven Version (Speedy but Limited)
I get a lot of questions about how to cook Chicken Francese in a Power Air Fryer Oven, and yep — I’ve tested it.
Here’s the deal:
- Preheat to 360°F
- Cook 8–10 minutes, flip halfway
- Sauce has to be separate — the oven basket can’t hold liquids well
Texture was super crisp, but it lost some of the softness I love from oven baking. Great if you’re in a rush, though.
Shredded Chicken Francese Bowls (Leftover Magic)
One day I had leftover shredded chicken breast in the fridge — no time to dredge or pan-sear.
So I:
- Tossed the shredded chicken with flour, a touch of beaten egg, salt
- Baked it spread out on a parchment-lined pan
- Poured lemon sauce over it and served in bowls with rice and spinach
Not traditional, but it scratched the same flavor itch. Honestly perfect for meal prep.
Francese-Style Sandwich Melts (Inspired by Sandwich Bros)
This one started with leftovers and hunger at midnight.
I reheated two baked Francese cutlets, sliced them up, stuffed them into sandwich buns, and added:
- Provolone cheese
- A spoon of sauce
- Quick broil for 2 minutes until bubbly
It felt like a fast-food sandwich — but better. Crisp, lemony, cheesy. I’d eat that again on any road trip, if I could pack it warm.
Common Mistakes and How to Fix Them
Let me tell you — I’ve messed this dish up more times than I’d like to admit. But each screw-up taught me something useful.
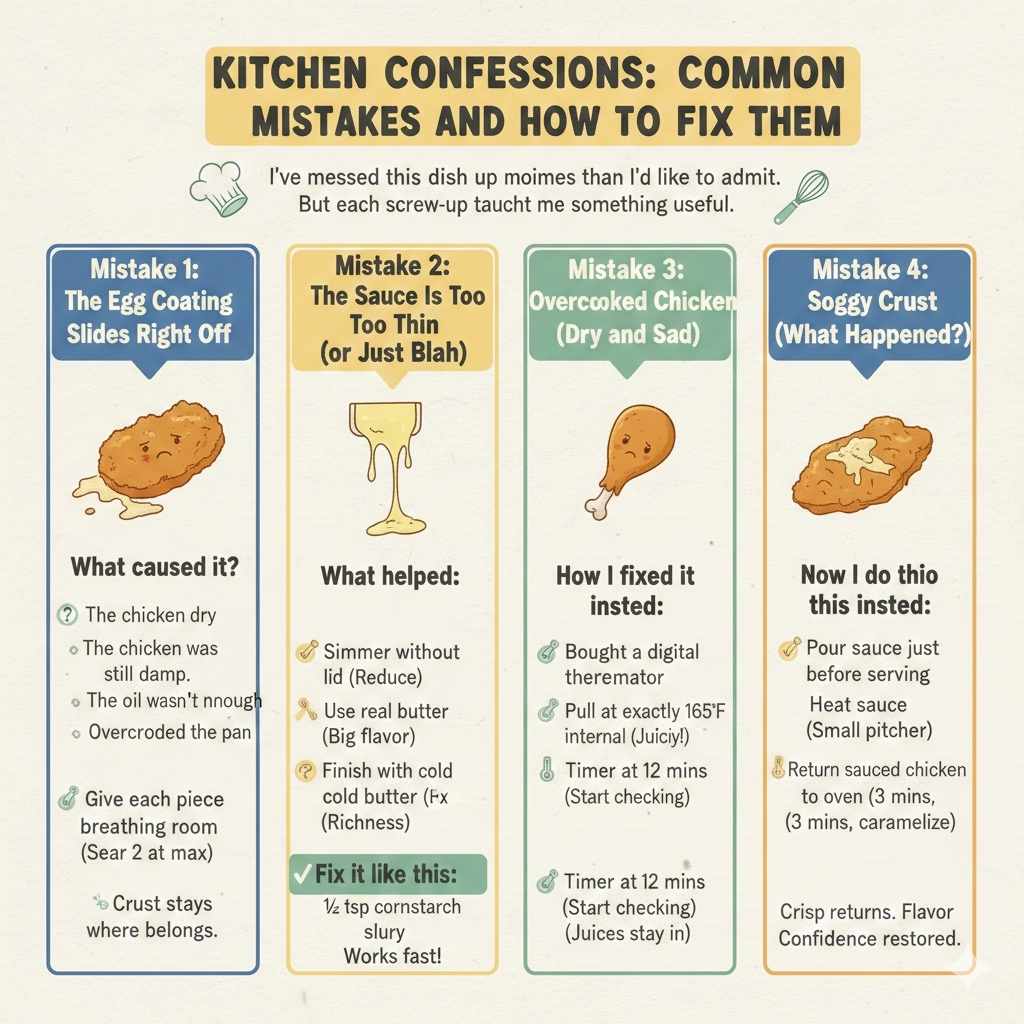
Mistake 1: The Egg Coating Slides Right Off
This used to drive me crazy. I’d pull the chicken from the oven and half the coating was stuck to the pan.
What caused it?
- The chicken was still damp
- The oil wasn’t hot enough during the sear
- I overcrowded the pan and steamed it instead of searing
Fix it like this:
- Pat chicken dry before dredging
- Make sure oil is shimmering hot before adding meat
- Give each piece breathing room in the pan
Now I sear two pieces at a time, max. The crust stays right where it belongs.
Mistake 2: The Sauce Is Too Thin (or Just Blah)
I’ve made lemon broth that looked great… and tasted like hot water. I’ve also made sauce that slid right off like it had somewhere better to be.
What helped:
- Simmer without a lid to reduce and thicken
- Use real butter, not margarine — big flavor difference
- Finish with a bit of cold butter for richness
And if it’s too thin? I stir in a tiny cornstarch slurry (½ tsp cornstarch + 1 tbsp cold water). Works fast and doesn’t mess with the flavor.
Mistake 3: Overcooked Chicken (Dry and Sad)
This one happened to me a lot when I was still trusting the clock instead of the thermometer.
- I’d set 20 minutes… then forget it
- Or I’d panic and give it “just 2 more minutes” (which turned into five)
How I fixed it:
- I bought a $15 digital thermometer
- I pull it at exactly 165°F internal — juicy every time
- If I’m distracted, I set a timer at 12 minutes and start checking
Bonus trick: let it rest 3–5 minutes after baking. The juices stay in instead of running all over the cutting board.
Mistake 4: Soggy Crust (Ugh, What Happened?)
Sometimes I got too excited and poured the sauce over the chicken while it was still in the pan… in the oven.
Result? A soggy bottom and sad face.
Now I do this instead:
- Pour the sauce just before serving
- Sometimes I heat sauce separately and serve it in a small pitcher
- Or return the sauced chicken to the oven, uncovered, for 3 minutes to caramelize slightly
Crisp returns. Flavor blooms. Confidence restored.
Related Chicken Oven Recipes to Explore Next
When I find a method that works, I can’t help but try it a dozen different ways. These are the chicken recipes I reached for after Francese — each one taught me something new.
How to Make Chicken Francese in the Oven (Base Recipe)
If you’re reading this, you’ve already found it — but this version is where everything started for me.
- Flexible enough to swap in herbs or skip wine
- Easy enough for weeknights
- Fancy-looking enough for dinner guests
I’ve used this as a base to create half the variations in my rotation now.
How to Cook Rosemary Chicken Breast in the Oven
When I want something more earthy than citrusy — usually in the fall — I lean into rosemary.
- I rub fresh rosemary into olive oil and marinate for 30 minutes
- Bake uncovered at 375°F
- Serve it with roasted carrots and potatoes — cozy dinner done
It’s my go-to when I’ve had enough lemon for a while but still want something that smells amazing.
How to Cook Tandoori Chicken in a Clay Oven (or Dutch Oven)
Okay, I don’t own a traditional clay oven. But my Staub Dutch oven gets close. I tried this recipe using:
- Yogurt, garlic, paprika, turmeric marinade
- High oven heat (425°F) for 25 minutes
- Quick broil to char the edges
Came out juicy and bold. I even tried finishing it over coals once during a backyard BBQ — the oven version held its own.
How to Cook Cubed Chicken in the Oven
Meal prep days call for simplicity.
- Tossed cubed chicken in olive oil, garlic powder, smoked paprika
- Spread on a baking sheet
- Baked at 400°F for 15 minutes, stirred once halfway
It’s not flashy like Francese, but I use these cubes in wraps, bowls, and last-minute dinners when I’m just done.
How to Cook Shredded Chicken Breast in Oven
I used to boil or slow-cook for shredding, but oven-roasting works too.
- Lightly oil whole breasts
- Season simply with salt and pepper
- Bake at 350°F for 25–30 minutes, then shred while warm
Perfect for tacos, salads, and even turning into a Francese-style bowl with lemon sauce on top. (Yep, I did that.)
How to Cook Rotisserie-Style Chicken in the Oven
There’s nothing like homemade rotisserie-style chicken — especially when you season it just how you like.
- I truss a whole bird, rub with butter, garlic, herbs
- Bake on a roasting rack at 375°F for about 1 hour 20 minutes
- Baste halfway through for that golden skin
I’ve also tried a version in my Power Air Fryer Oven — worked great for smaller birds around 3 lbs.
FAQs
How to Cook Chicken Francese in the Oven without drying it out?
To cook Chicken Francese in the oven, bake at 375°F after a quick pan sear. Spoon lemon butter sauce on top. Cover loosely with foil to keep it moist and tender.
What temperature is best for Chicken Francese in the oven?
The best temp for Chicken Francese in the oven is 375°F. It cooks the egg-coated chicken gently and keeps the lemon sauce bright, not burnt or bitter.
How long to cook Chicken Francese in the oven?
Chicken Francese in the oven takes about 18–25 minutes. Bake until it hits 165°F inside. Thin cutlets cook faster, so check early to avoid overcooking.
Can I skip frying when making Chicken Francese in the oven?
Yes, but a quick sear helps flavor and texture. If you skip frying, bake on parchment and brush with olive oil so the coating still sets well.
What sauce works best for oven baked Chicken Francese?
A simple lemon butter sauce with garlic and broth works best. Pour it over before baking. It keeps the chicken juicy and gives that classic bright flavor.