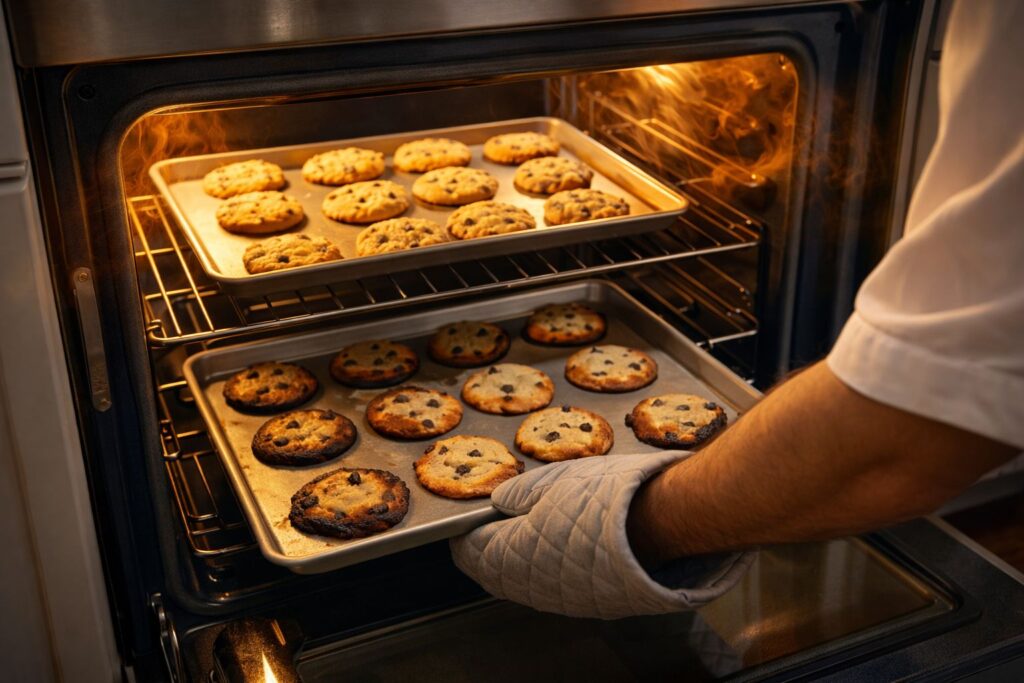
Hey, I’m Mossaraof — a professional cook and food blogger. One day, I pulled a tray of cookies from the oven. Some were burnt. Others were still raw. I had no clue what went wrong.
That’s when I learned about oven hot spots. If you’re asking what are oven hot spots and how do you deal with them, I’ve got you. In this guide, I’ll share what they are, how they happen, and how you can fix them for good.
If you want a full breakdown of how ovens heat, where racks should go, and how different settings affect food, I cover all of that in The Complete Guide to Using an Oven at Home. It helped me understand why hot spots happen in the first place.
The Science of Uneven Heat in American Ovens
Ovens look like simple metal boxes, but inside, they are a battleground for moving air and rising heat. Understanding the “why” helps you stop the “burnt.”
In the U.S., most of us have either gas or electric ranges. Electric ones use those glowing orange coils. Gas ones use a flame hidden under a metal plate. Both types have a big problem: they don’t heat the air evenly. The corners are usually hotter because heat gets trapped there. The area near the door is usually cooler because the seal isn’t perfect.
- Heat Rises: Hot air wants to go up. This makes the top rack different from the bottom.
- Metal Matters: The walls of your oven soak up heat and radiate it back.
- Fan Power: If you have a convection setting, a fan moves the air. If not, the air just sits there in “pockets.”
- The Door Gap: Every time you peek, you lose about 25 degrees of heat instantly.
How to Identify Your Oven’s Secret Hot Spots
You can’t fix a ghost, and hot spots are like ghosts—you only see the damage they leave behind. Here is how I hunt them down in any kitchen.
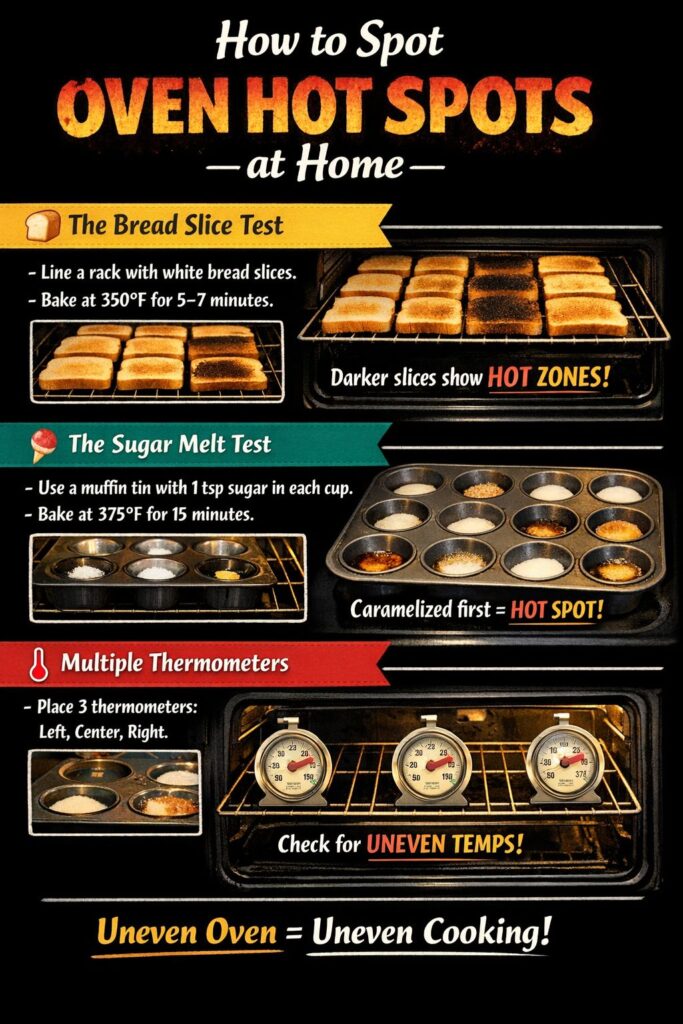
I like to use the “Toast Test.” It is cheap and easy. You don’t need fancy tools. Just a loaf of cheap white bread. I usually grab a loaf of Great Value or Wonder Bread. It’s consistent and shows color really well.
The White Bread Toast Test
This is my favorite trick. It creates a “map” of your oven floor.
- Layer it up: Cover your middle rack with slices of bread. Do not leave gaps.
- Set the heat: Turn your oven to 350°F.
- Watch the clock: Let it go for about 5 to 8 minutes.
- The Reveal: Pull the rack out. Look at the colors.
The dark brown slices show where your hot spots are. The white or light tan slices are your “cold zones.” In my old apartment, the back-right corner always turned black first. Now, I know never to put a delicate cake back there. It’s a game-changer for your baking.
Using an Oven Thermometer
Most ovens lie to you. The little beep that says “I’m ready” is usually a big fat lie.
I always keep a small Taylor or Rubbermaid thermometer hanging on the rack. I’ve seen ovens say they are at 400°F when they are really at 360°F. If your chicken takes longer than the recipe says, your oven might just be slow. In the U.S., our power grids and house wiring can even cause slight shifts in how fast those coils heat up.
- Move it around: Test the front, back, and sides.
- Check the offset: You might find your oven is always 20 degrees off.
- Trust the dial: Once you know the gap, just turn the knob higher or lower to match.
Professional Strategies to Deal With Hot Spots
Knowing the spots is half the battle, but as a cook, I need solutions that work while I’m busy. Here is how I keep things even.
I often think of my oven like a car engine. It needs time to get up to speed. If you rush it, it performs poorly. I usually preheat for at least 30 minutes, even if the light goes off sooner. This lets the heavy metal walls get hot, not just the air inside.
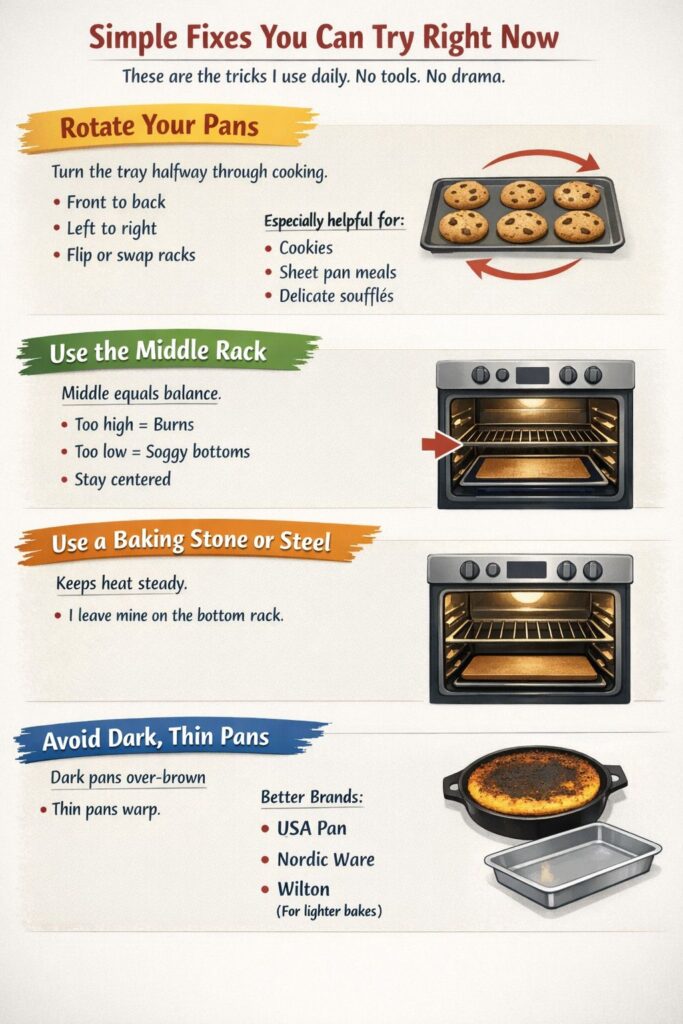
The Power of the Pizza Stone
A pizza stone isn’t just for pizza. It is a “heat battery.”
I keep a heavy stone or a Lodge baking steel on my bottom rack almost all the time. It takes a while to get hot, but once it does, it stays hot. If I open the door to check my fries, the stone helps the oven temp bounce back fast. It acts like an anchor for the heat.
- Steady Heat: It stops the “on-off” cycle of the heating element from swinging the temp too much.
- Better Crusts: It radiates heat upward to help the bottom of your pans.
- Leave it there: You don’t even have to move it for most cooking.
Rotating Your Trays (The 180-Degree Rule)
In a pro kitchen, we call this “spinning the decks.” It’s a habit for me now.
If I’m roasting a tray of veggies, I set a timer for halfway through. I open the door, grab the pan, and flip it 180 degrees. The side that was in the back is now in the front. This cancels out the hot spots. It sounds simple, but it’s the difference between a “good” meal and a “perfect” one.
Check the bottom: Sometimes I even swap the top and bottom trays if I’m cooking two things at once.
Be Fast: Don’t leave the door open too long.
Use Good Mitts: I like the heavy silicone ones. They give you a better grip for quick turns.
Airflow and Rack Management
Don’t suffocate your food. Your pans need room to breathe so the heat can dance around them.
In my home kitchen, I see people shove big baking sheets right against the back wall. This blocks the heat from rising. It creates a “dead zone” where the air just sits and gets cold. I always leave at least an inch of space on all sides of my pans. This lets the hot air flow up and over the food, like a warm blanket.
- Center is King: Most of the time, the middle rack is the safest bet for even cooking.
- Stagger Your Pans: If you have two trays, put one on the top left and one on the bottom right.
- Size Matters: Don’t use a “Texas-sized” sheet pan in a tiny apartment oven. It will burn the edges and leave the middle raw.
Advanced Fixes: When It’s Not Just a “Hot Spot”
Sometimes the problem isn’t the air. It’s a part of the machine that is tired or broken.
I’ve lived in rentals where the oven door didn’t close right. You could feel the heat hitting your shins while you stood at the stove. That is a huge waste of energy. It also makes the front of your oven much colder than the back. Dealing with What Are Oven Hot Spots and How Do You Deal With Them sometimes means grabbing a screwdriver.
The Faulty Igniter or Element
If your gas oven takes forever to click on, your igniter might be dying.
In electric ovens, the coils can get thin spots or cracks. If you see a “bright spot” on the orange coil, it’s about to break. This causes huge swings in temperature. One minute it’s 300 degrees, the next it’s 400. Replacing an element is usually a $30 fix you can do yourself. It’s much cheaper than a new stove.
- Listen for Clicks: A healthy gas oven should light up within 30-60 seconds.
- Check for Glow: Electric coils should be a steady, even orange all the way across.
- Clean the Sensors: Sometimes a little bit of burnt grease on the temp sensor makes it “read” wrong.
Worn Door Gaskets
The rubber seal around your oven door is like the weather stripping on your house.
If it’s cracked or hard, heat escapes. This creates a permanent “cold spot” at the front of every tray. I check mine by closing the door on a piece of paper. If I can pull the paper out easily, the seal is bad. Replacing this gasket can make an old GE or Whirlpool oven feel brand new again.
Tools to Help You Master Oven Heat
You don’t need a professional kitchen, but a few small upgrades make a massive difference.
I’m a bit of a gear nerd. I love tools that last a lifetime. In the U.S., we have access to some great brands that pros use every day. You don’t need the most expensive stuff, just the right stuff. These tools help distribute heat so your “hot spots” don’t stand a chance.
- Nordic Ware Sheet Pans: These are made of thick aluminum. Aluminum is a great heat conductor. It spreads the warmth evenly across the whole surface.
- Digital Probe Thermometers: I use these for big roasts. You stick the needle in the meat and leave the screen on the counter. It tells you exactly when the center is done.
- Cast Iron Skillets: A Lodge skillet is basically a portable hot spot killer. It holds so much heat that once it’s hot, nothing can cool it down.
Convection Fans: The Pros and Cons
Many modern American ovens have a “Convection” button. It sounds fancy, but it’s just a fan.
When the fan is on, it blows the hot air around. This helps get rid of hot spots by force. But be careful! The moving air cooks things about 25% faster. If I’m baking a delicate cake, I usually leave the fan off. If I’m roasting a chicken for Sunday dinner, I turn it on to get that skin extra crispy.
Common Questions About Oven Heat (FAQ)
I get asked these all the time when I’m helping friends fix their “baking fails.”
Can I fix a hot spot myself?
Mostly, yes! You can’t change the shape of the oven, but you can use a pizza stone or rotate your pans. Most “fixes” are just about changing how you use the tool, not taking it apart.
Does the age of the oven matter?
Yes and no. Old ovens often have better insulation because they were built like tanks. New ovens have better digital controls. But both will have hot spots. An old oven with a new door seal can often out-cook a cheap new model.
Why does my broiler only heat the middle?
Broilers are designed to be intense. Most only have one small heating element in the center. If you want even browning under the broiler, you have to move the food around every 30 seconds. It’s an active job!
The Altitude Factor (Mountain vs. Coast)
I once helped a friend bake in Denver after years of cooking at sea level. I was shocked. The oven acted like it was on another planet.
In the U.S., our geography changes how heat works. At high altitudes, air is thinner. This means it doesn’t hold heat as well, and moisture evaporates faster. If you are in the Rockies, your oven hot spots might actually feel “hotter” because the air is so dry. Your food might look done on the outside but stay raw in the middle.
- Dryness: High-altitude air makes cakes dry out before they rise.
- Boiling Point: Water boils at a lower temp up high. This affects steam in your oven.
- The Fix: Increase your oven temp by about 15 to 25 degrees if you are above 3,000 feet.
My Personal Ritual for a Perfect Bake
I have a routine I follow every time I walk into a kitchen. It’s a bit like a pre-flight check for a pilot.
I start by checking the racks. I make sure they are clean and level. A tilted rack is the cousin of a hot spot; it makes your cake batter tilt to one side. Then, I give the oven a “sniff test.” If I smell old grease, I know that smoke will mess with the flavor of my food. I want a clean slate for my heat to flow.
The 30-Minute Rule
I never put food in as soon as the buzzer goes off. It is a trap!
Most home ovens in the States, like those from Samsung or LG, use a fast-preheat cycle. They blast the top and bottom elements at 100% power to get the air hot. But the walls of the oven are still cold. If you put a tray in now, the temp will drop 50 degrees the moment you open the door. I wait 30 minutes. I want the metal to be as hot as the air.
- Thermal Mass: Hot metal stays hot. Cold metal sucks the heat out of your food.
- Even Recovery: When the walls are hot, the oven “recovers” its temp in seconds.
- Consistency: This is how I get the same result every single time.
Why Your Pan Choice Matters More Than You Think
I’ve seen people blame their oven when the real villain was their cheap, thin baking sheet.
If you use those thin, dark-colored pans from the grocery store, you are asking for trouble. Dark colors absorb heat faster than light colors. This makes the bottom of your cookies burn before the top is even set. It’s like wearing a black t-shirt on a sunny day in Florida—you’re going to get way too hot.
Aluminum vs. Steel
In my professional opinion, aluminum is the king of the kitchen.
Most pros use “Half-Sheet” pans made of rimmed aluminum. Brands like Nordic Ware or Volrath are staples here. They are thick and silver. The silver color reflects some of the harsh heat, while the thick metal spreads the rest evenly. This prevents the “hot spot” under the pan from burning a hole in your dinner.
- Avoid Non-Stick Coatings: They often peel and can’t handle high heat well.
- Heavy Duty: If you can bend the pan with your hands, it’s too thin.
- Insulated Air Sheets: These are okay for some things, but they often make it hard to get a crispy bottom.
Dealing With “Hot Bottoms” and “Cold Tops”
Sometimes the hot spot isn’t a corner; it’s the entire bottom of the oven.
If you have an electric oven, that bottom coil is a beast. I used to burn the bottom of my biscuits all the time. I realized my oven was just too aggressive from below. I had to learn to “shield” my food. This is a trick I use when I’m baking delicate things like macarons or custards.
The Double-Pan Trick
If your oven has a “hot floor,” just use two pans instead of one.
I stack one baking sheet directly inside another. This creates a tiny layer of air between the two pieces of metal. That air acts as an insulator. It slows down the heat just enough so the bottom of your food doesn’t scorch. It’s a simple fix that costs nothing if you already have two pans.
Simple Setup: No fancy tools required, just a second tray.
Perfect for Cookies: No more black bottoms!
Great for Pizza: It gives you a crunchy crust without the burn.
The Impact of Grease and “Gunk” on Heat Flow
I’ve walked into many home kitchens where the oven floor looks like a disaster zone. There are bits of burnt cheese, drips of old pie filling, and a thin layer of grease. As a cook, I can tell you: a dirty oven is an uneven oven. Those black, carbonized bits of food actually absorb and hold heat differently than the clean metal walls.
When you have a pile of “burnt offerings” at the bottom, they create mini-volcanoes of heat. They smoke, they smell, and they mess with the air currents. I make it a point to wipe down my oven floor once a week. You don’t always need the “Self-Clean” button—which can actually get so hot it breaks the control board on newer GE or KitchenAid models. Just a damp cloth and some baking soda usually do the trick.
- Better Air Quality: No more smoke alarms going off when you sear a steak.
- Even Radiation: Clean metal reflects heat; dirty metal traps it.
- Safety: Grease buildup is the number one cause of oven fires in American homes.
Regional US Cooking Habits and Oven Stress
Depending on where you live in the States, you might be asking your oven to do very different things.
In the South, we do a lot of slow-roasting and heavy baking—think biscuits and cornbread. These need a massive burst of bottom heat. In the Northeast, where kitchens are often smaller and draftier, your oven has to work harder to stay warm against a cold wall. I’ve noticed that in humid places like Florida, the “crust” on a loaf of bread forms differently than in a dry Nevada kitchen.
The Thanksgiving Stress Test
Thanksgiving is the ultimate showdown for oven hot spots. You have a giant turkey, a tray of stuffing, and maybe some sweet potatoes all fighting for space.
I’ve seen many “turkey tragedies” because people overcrowded the oven. When you put that many cold items in at once, the oven temperature crashes. The heating element stays on for 45 minutes straight just to catch up. This creates a massive hot spot directly above the element. If your stuffing is on the bottom rack, it will turn into a brick while the turkey stays raw.
- The Solution: Cook the sides ahead of time.
- Staggering: Let the turkey have the oven to itself for the last hour.
- Resting: Remember, a turkey can rest on the counter for 45 minutes and stay hot. This frees up the oven for everything else!
How to Calibrate Your Oven Like a Pro
If you’ve done the toast test and your thermometer says you’re off by 50 degrees, don’t panic. You don’t need a repairman yet.
Most modern ovens from brands like Samsung, LG, and Whirlpool have a “Calibration” or “Temperature Offset” mode in the settings. I discovered this years ago, and it saved me so much frustration. You can tell the computer, “Hey, when I say 350, I really mean 370.” It’s like giving your oven a pair of glasses so it can see clearly.
Finding the Hidden Menu
Every brand hides this menu differently. Sometimes it’s under “Settings,” and sometimes you have to hold down the “Bake” and “Broil” buttons at the same time.
Once you find it, you can usually adjust the temp up or down in 5-degree increments. I usually adjust mine by 10 degrees every year as the heating elements age. It’s a simple “digital” fix for a “physical” problem.
- Check the Manual: If you lost yours, just Google your model number + “calibration.”
- Be Patient: Make small changes. Don’t jump 30 degrees at once.
- Re-Test: Do another toast test after you calibrate to see if the zones have leveled out.
Dealing With Specific US Food Brands
We all have our favorite go-to’s in the freezer or pantry. Whether it’s a Digiorno pizza or a bag of Tyson chicken strips, these products are designed for “average” ovens. But your oven isn’t average.
I’ve found that many pre-packaged foods in the U.S. have instructions that are a bit too optimistic. They assume perfect heat. If I’m making a frozen pizza, I always put it on a preheated pizza stone or a heavy Nordic Ware sheet. If I just slide it onto the rack, the hot spots in my oven will burn the crust in one corner while the cheese in the middle isn’t even bubbly.
- Pillsbury Biscuits: These are the “canary in the coal mine.” If your oven has hot spots, these will show it immediately. Rotate them halfway!
- Tyson Chicken Wings: These need high heat and high airflow. If you crowd the pan, they get soggy. Use a wire rack on top of your baking sheet.
- Stouffer’s Lasagna: These are thick. They need to sit in the center of the oven, far away from the side walls, to cook through without burning the edges.
Final Thoughts: Making Peace With Your Oven
At the end of the day, no oven is a perfect science experiment. They are tools, and like any tool, they have quirks.
I’ve learned to love the “personality” of my kitchen. Once you know What Are Oven Hot Spots and How Do You Deal With Them, the stress goes away. You stop worrying about the “beeps” and start trusting your senses. You’ll know by the smell of the kitchen or the color of the crust when things are just right.
Cooking should be fun, not a fight with a metal box. Use your thermometers, rotate your pans, and don’t be afraid to move things around. You’re the chef, and you’re in charge
High-End “Pro” Ranges vs. Standard Home Units
I often get asked if spending $10,000 on a Wolf or Viking range “fixes” the hot spot problem. As someone who has cooked on both, the answer is: not exactly. High-end American ranges are built with more mass and better insulation. This means they hold heat like a tank, but they still have “zones.”
A high-end range often uses “Dual Verticross” convection. This means they have two fans instead of one. It creates a massive wind tunnel inside. While this is great for roasting a massive prime rib, it can actually create new hot spots if you aren’t careful. The air hits the back of the pan so hard it can blow the top off a delicate soufflé.
- The Weight Factor: Professional ranges have thicker grates and heavier doors. This stops heat from leaking into your kitchen.
- Precision: You can usually set these ovens to a specific degree, and they stay there.
- The Learning Curve: If you switch from a standard GE to a pro-style range, your cooking times will change. Don’t walk away the first time you bake!
Emergency Fixes: When the Hot Spot is Winning
We’ve all been there. You open the oven and realize the back of your tray is already dark brown while the front is raw. Don’t panic. You can still save dinner.
When I see a “runaway” hot spot, the first thing I do is “shield” the food. I grab a piece of Reynolds Wrap aluminum foil. I don’t cover the whole dish—I just “tent” the part that is browning too fast. This reflects the infrared heat away from the burnt spot while letting the rest of the dish catch up.
The Water Bath (Bain-Marie)
If you are cooking something very delicate, like a cheesecake or a custard, and your oven is being aggressive, use water.
I place my baking dish inside a larger roasting pan filled with an inch of hot water. Water cannot get hotter than 212°F. This creates a “safety zone” around your food. Even if your oven hits a 400-degree spike, the water keeps the sides of your dish at a gentle, steady temperature.
- Steam is Your Friend: The moisture also helps prevent the top of your food from cracking.
- Leveling: Make sure your oven rack is perfectly level so the water doesn’t spill.
- Safety: Always add the water after the pan is on the rack to avoid splashing yourself with boiling water.
The “Hush-Hush” Secret: Oven Stones and Bricks
If you don’t want to buy a fancy pizza stone, I’ll tell you an old chef’s trick. I’ve used this in rental houses with terrible, thin-walled ovens.
Go to a home improvement store like Home Depot and buy a few unglazed firebricks. They cost a couple of dollars each. Line the very bottom of your oven (if it’s electric) or the lowest rack with them. These bricks act as a massive thermal heat sink. They soak up the “raw” heat from the elements and release it slowly and evenly.
- Unglazed is Key: Never use glazed bricks; they can release fumes.
- Steady Air: They stop the “yo-yo” effect of the oven’s thermostat.
- Long-Term Fix: Once they are in, you can just leave them there forever.
Sensory Cooking: How to “Hear” and “Smell” Heat
As you get more experience, you won’t even need the “Toast Test.” You’ll start to sense What Are Oven Hot Spots and How Do You Deal With Them just by being in the room.
When I’m in the kitchen, I’m always listening. If I hear the oven “clicking” every two minutes, I know the thermostat is struggling. If I smell the sugary scent of cookies way too early, I know my top element is running hot. Your nose is often a better tool than a digital timer.
- The Scent of Caramel: If you smell browning only 5 minutes in, your oven is too hot.
- The Sound of the Fan: A rattling convection fan means uneven airflow.
- The “Feel” of the Handle: If the oven handle is hot to the touch, your door seal is failing.
Summary of Best Practices for the American Home Cook
Let’s wrap all this up into a simple checklist you can stick on your fridge. I want you to feel confident the next time you turn that dial.
I know it seems like a lot, but after a week, these things become habits. You’ll start rotating your pans without even thinking about it. You’ll wait that extra 15 minutes for the preheat because you know it matters. And your food—your beautiful, delicious food—will show the results.
- Buy a $10 Oven Thermometer: It’s the best investment you’ll ever make for your kitchen.
- The 30-Minute Rule: Give the metal walls time to get hot.
- Rotate at the 50% Mark: Set your timer for half the cooking time and spin that tray.
- Leave Breathing Room: Don’t let your pans touch the walls or each other.
- Trust Your Senses: If it looks done, it’s probably done, no matter what the recipe says.
A Final Note on Confidence
Every chef you see on TV has burnt something because of an oven hot spot. I’ve done it. The greatest pros have done it. The difference is just knowing how to adjust the next time. Don’t let a burnt batch of muffins ruin your day. Just move the rack, turn the pan, and keep cooking.
The Psychology of “Hot Spot Anxiety”
I’ve noticed that many home cooks get a bit of “oven stage fright.” You spend forty dollars on a prime rib from the local butcher, and suddenly, the fear of an uneven oven feels very real. I used to feel the same way when I was starting out. I’d stand by the oven window with a flashlight, watching the fat sizzle.
The secret to getting over this is realizing that most food is actually quite forgiving. A hot spot might make one side of your roast a little crispier, but it won’t ruin the meal unless you let it go too far. Understanding What Are Oven Hot Spots and How Do You Deal With Them isn’t about achieving lab-grade perfection. It’s about being the boss of your kitchen. If you see a problem, you have the tools to move the meat, shield the edges, or turn down the dial.
- Relax: Most “mistakes” are just extra flavor (we call it “char”).
- Stay Present: Don’t put something in the oven and go for a jog. Stay within earshot.
- Keep Notes: I keep a small notebook in my kitchen drawer. I wrote down “Back left is a flamethrower” three years ago, and I haven’t burnt a cake since.
Maintenance That Actually Matters
We talked about cleaning, but there are a few “under the hood” things that every U.S. homeowner should check once a year. Think of it like a 5,000-mile oil change for your kitchen.
If you have an electric range, pull the oven away from the wall (carefully!). You’d be surprised how much dust and pet hair can clog the cooling fans on the back. If those fans can’t pull in fresh air, the electronics inside get too hot. This can cause the thermostat to act like it’s “tripping,” leading to weird heat spikes and even more hot spots.
Checking the Rack Levels
This sounds silly, but take a literal level—the kind you use to hang pictures—and put it on your oven rack.
In older American houses, floors tend to settle. If your house has a slight tilt, your oven has a tilt. This means the liquid in your pans (like cake batter or oil) will pool on one side. The side with less liquid will cook faster, creating a “fake” hot spot.
- Adjust the Feet: Most ovens have screw-in legs. Use a wrench to level it out.
- Check Both Ways: Check the level from left-to-right and front-to-back.
- The Results: Perfectly level cakes and even oil distribution for your roasted potatoes.
Final Takeaway: The Chef’s Mindset
If there is one thing I want you to take away from my years of sweat and hot trays, it’s this: The oven works for you, not the other way around. You now know the physics of airflow. You know how to map your heat with a simple loaf of bread. You know why your Nordic Ware pans are better than the thin ones, and you know how to use a pizza stone as a heat battery. These aren’t just “tips”; they are the foundational skills of a professional cook.
When you understand your tools, the “magic” of a great meal becomes a repeatable process. You’ll find yourself cooking more often because the “mystery” of why things burn is gone. You’ll host that Thanksgiving dinner with a smile because you know exactly where to put the turkey and where to tuck the rolls.
One Last Actionable Step
Before you cook your next meal, do one thing for me. Just one.
Turn on your oven light and look at the floor of the oven. If it’s dirty, give it a quick wipe. If it’s clean, just stand there for a second and imagine the heat swirling around inside. Visualize the “hot zones” you found in your toast test. By simply being aware of the heat, you’ve already become a better cook than you were ten minutes ago.
- Step 1: Buy that thermometer.
- Step 2: Do the toast test this weekend.
- Step 3: Enjoy the best-cooked meal of your life.
I’m Mossaraof, and I’m always here to help you make sense of your kitchen. Happy cooking, and keep those trays rotating!
FAQs
What are oven hot spots and how do you deal with them at home?
Oven hot spots are areas that heat more than others. To deal with them, rotate pans, use the middle rack, and avoid crowding food so heat can move well.
How can I tell if my oven has hot spots?
If cookies brown fast on one side and stay pale on the other, you likely have hot spots. A simple bread test or oven thermometer can help confirm it.
Do oven hot spots affect baking and roasting?
Yes, oven hot spots can burn edges while centers stay soft. This matters most for cakes, cookies, and sheet-pan meals that need even heat to cook right.
Can rotating pans really fix oven hot spots?
Yes, turning pans halfway helps food cook more evenly. It moves food out of hot zones and reduces burning, especially in older gas or electric ovens.
Are oven hot spots common in U.S. home ovens?
Yes, many U.S. home ovens, even newer GE or Frigidaire models, can have hot spots. Small size, fan flow, and rack position all play a role.