Hey, I’m Mossaraof — a professional cook and food blogger. I still smile when I pull a hot dish from the oven and see golden, juicy chicken. If you want to learn How to Cook Chicken in a Ceramic Baking Dish, you are in the right place. I have tested this method in busy home kitchens and calm Sunday meal prep days.
A ceramic baking dish holds heat like a warm hug. It cooks chicken in the oven in a slow, even way. That means less stress and more flavor. I will show you simple oven baked chicken tips, safe bake times, and how to keep it moist every time.
We will talk about the best oven temp, how long to bake chicken, and why ceramic bakeware works so well. If you are new to baking, you can also read my guide called The Complete Guide to Using an Oven at Home to build strong basics. Let’s get started and make your next oven baked chicken simple, juicy, and full of flavor.
Why Ceramic Works So Well for Chicken
Let me start with what I’ve learned from countless meals. Ceramic dishes, like those from well-known brands like Le Creuset and Pyrex, hold heat better than any other material I’ve used. This means your chicken cooks more evenly, with less chance of burning or drying out. For me, the ceramic dish ensures that the chicken comes out golden on top and juicy in the middle.
- Even Heat Distribution: I’ve tried cooking chicken in metal pans, but ceramic really shines here. No more worrying about one side of the chicken being overdone while the other side is undercooked. The material itself holds heat, so it’s like having a mini oven inside your oven.
- Moisture Retention: If you’ve ever experienced dry chicken, you’ll appreciate how ceramic holds onto moisture, making your chicken breast or thighs come out succulent every time. I love how it helps keep the flavor locked in, especially when I’m cooking a whole bird.
Now, I know what you’re thinking. What about the cleanup? Ceramic is actually pretty low-maintenance. Most of the time, a quick rinse with warm water does the trick. And if you’ve ever had to scrub stubborn grease from a metal pan, you know just how much of a win this is.
Choosing the Right Chicken for Ceramic Cooking
Not all chicken is created equal, and when you’re working with ceramic, the type of chicken you choose can make a big difference. Over time, I’ve figured out which cuts work best in my ceramic baking dishes.
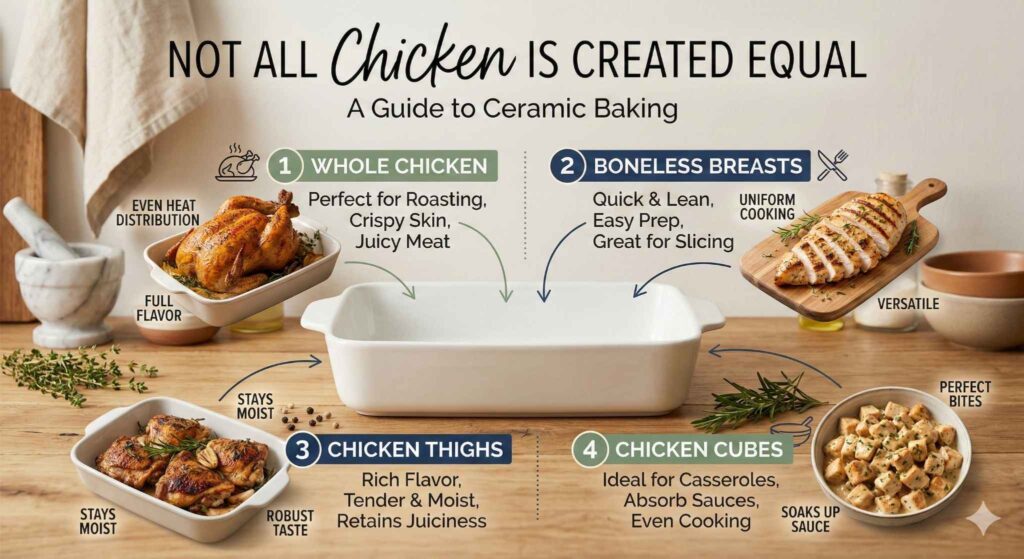
Here’s the rundown:
- Whole Chicken: If you ask me, roasting a whole chicken in a ceramic dish is one of life’s simple pleasures. It roasts beautifully with even heat, crisping up the skin while keeping the meat juicy. Plus, there’s something about the smell of roasted chicken filling the house, right?
- Boneless Chicken Breasts: This cut is a no-brainer for a quick, satisfying dinner. I usually opt for boneless skinless breasts for easy prep and quicker cooking times. Just season and throw them in.
- Chicken Thighs: I tend to reach for thighs when I want something with a bit more flavor and tenderness. The ceramic dish helps retain all that juicy goodness.
- Chicken Cubes (for casseroles): If you’re making a casserole or just need cubed chicken for a meal, ceramic is your friend. The chicken cooks evenly and soaks up any sauces you’re adding.
I’ve found that all of these cuts do best at the right temperature (around 375°F), but they each have a different cooking time, so I’ll dive into that in a bit. But for now, the key takeaway is that ceramic loves all kinds of chicken — it’s just a matter of knowing which one to pick for the job!
How to Cook Chicken in a Ceramic Baking Dish (Step-by-Step Guide)
I’m all about simplicity when it comes to cooking, especially on busy days when I don’t have the energy to deal with complicated recipes. That’s where the ceramic baking dish really comes in handy. It’s almost like a foolproof method for cooking chicken, and once you’ve tried it, I’m sure you’ll agree. Let me walk you through my step-by-step process for cooking chicken in ceramic, so you can get perfectly roasted or baked chicken every time.
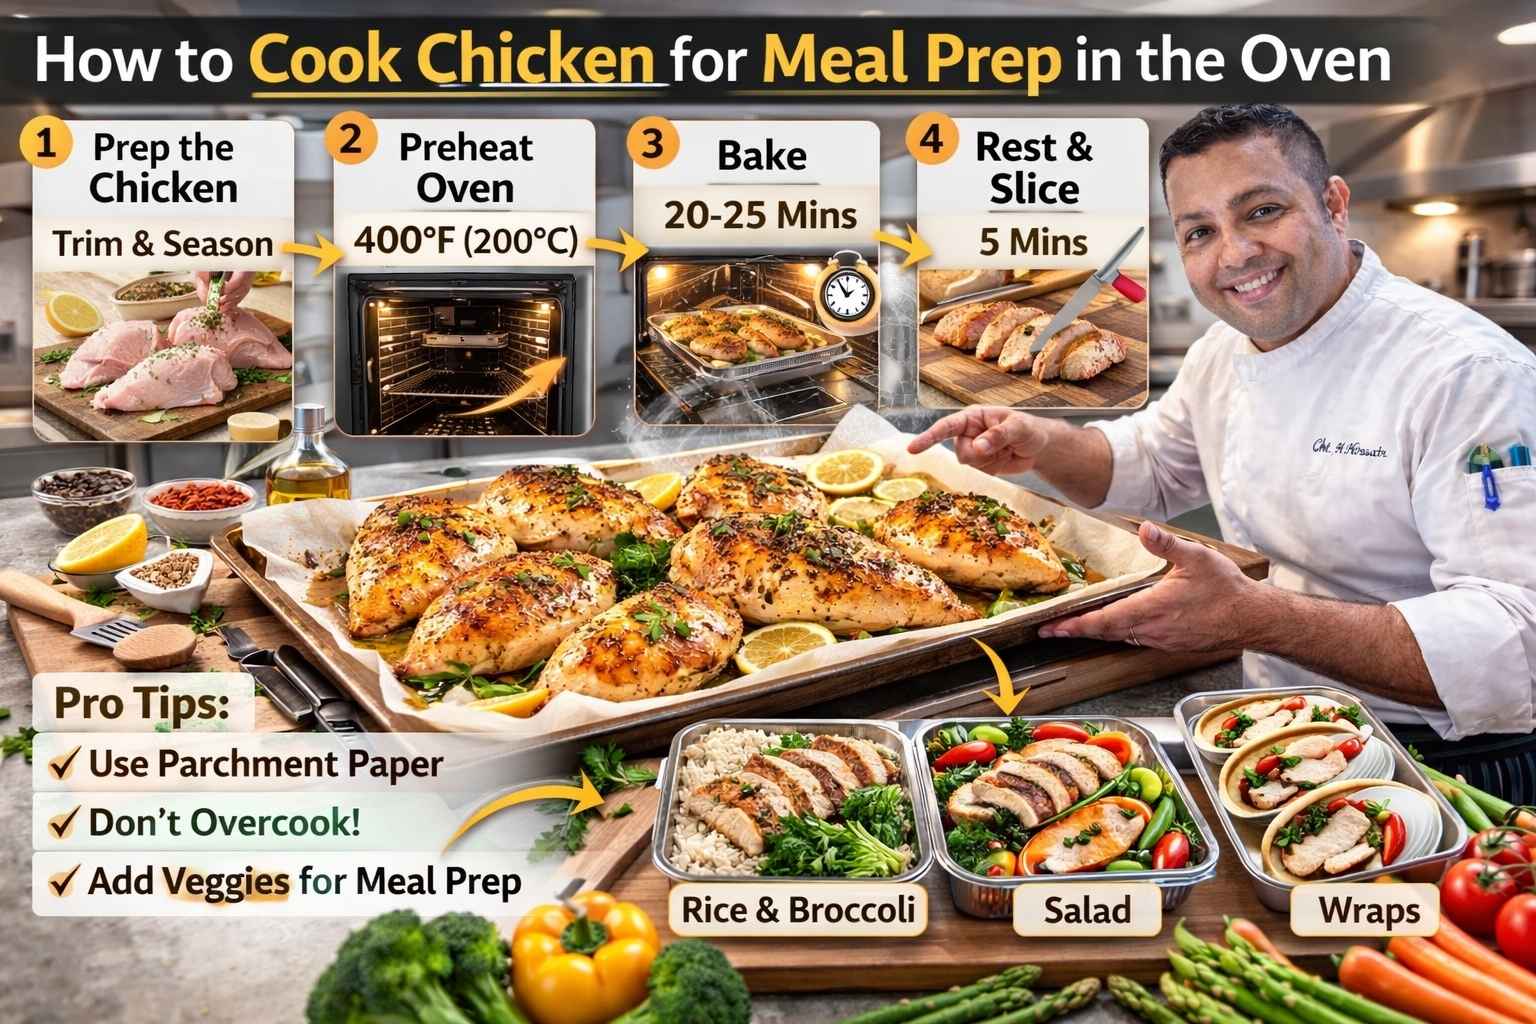
Step 1: Preheat Your Oven to the Right Temperature
This might seem like a no-brainer, but trust me, starting with the right temperature is key. I always preheat my oven to 375°F (190°C), which is just perfect for most chicken cuts, whether you’re roasting a whole bird or baking individual breasts. Ceramic dishes take a little while to heat up, but once they do, they maintain the temperature well. I usually give it about 10 minutes to fully preheat, so everything cooks evenly.
Step 2: Prepare Your Chicken (Seasoning and Searing)
I’m a big fan of seasoning, and chicken is one of those proteins that takes on flavors so well. Here’s how I prepare it:
- For a whole chicken: I rub olive oil all over the skin, then generously season with salt, pepper, garlic powder, and rosemary. Sometimes I even stuff the cavity with garlic cloves and lemon for an extra punch of flavor.
- For chicken breasts or thighs: I just drizzle some olive oil and season them with a simple combo of salt, pepper, and paprika. The paprika gives it that slight smokiness that pairs well with the crispy skin.
Here’s a little tip: if you want that golden-brown, crispy skin, you can sear the chicken in a hot skillet for a minute or two on each side before putting it into the ceramic dish. It’s not absolutely necessary, but it gives the chicken a beautiful, caramelized look.
Step 3: Place Your Chicken in the Ceramic Dish
Once your chicken is prepped and ready to go, it’s time to transfer it to the ceramic baking dish. Now, this is where I’ve made a few mistakes in the past — don’t overcrowd the dish! Giving each piece some room ensures the chicken cooks evenly. If you’re roasting a whole bird, I recommend placing it breast-side down at first; this helps the breast stay moist while the heat does its magic.
Step 4: Pop It in the Oven and Wait for the Magic
Here’s the fun part — watching the oven do its work. Depending on the cut you’re using, the cook time will vary. For me, I find that:
- Whole Chicken: Takes around 1 hour and 15 minutes, sometimes up to 1 hour and 30 minutes depending on the size. I like to check the internal temperature with a meat thermometer — it should reach 165°F (74°C) in the thickest part of the breast. If it’s not there yet, I leave it a bit longer.
- Chicken Breasts: These cook fast, around 20-25 minutes, especially if they’re boneless. I always recommend checking at the 20-minute mark to avoid overcooking.
- Chicken Thighs: I usually give these 40-45 minutes if they’re bone-in. They need more time to get that melt-in-your-mouth tenderness.
When I’m feeling extra fancy, I throw some vegetables in the dish as well. Potatoes, carrots, and onions roast beautifully alongside the chicken, and it’s all cooked in one dish — which means less mess for me!
Step 5: Check for Doneness (Don’t Forget the Thermometer!)
I can’t stress this enough — make sure to check the internal temperature. Chicken is the one thing I never risk undercooking or overcooking. When the thermometer hits 165°F (74°C), you know it’s done. If you’re cooking a whole chicken, I’ll often check both the breast and thigh areas to make sure it’s thoroughly cooked.
Step 6: Rest the Chicken Before Serving
After you pull your chicken out of the oven, don’t just dive in right away. Give it some time to rest for at least 5 minutes. This allows the juices to redistribute throughout the meat, making the chicken even juicier when you cut into it. Trust me, this step is worth it!
Why This Method Works So Well
Cooking chicken in a ceramic baking dish is easy, but the results are nothing short of impressive. The beauty of ceramic is in its ability to evenly distribute heat, which ensures your chicken cooks through without drying out. Plus, ceramic retains moisture, which is key when you’re cooking leaner cuts like chicken breast.
For those who prefer to follow the exact recipe, I’ve found that the consistent heat of ceramic works wonders for even the most delicate chicken cuts. So whether it’s a weeknight dinner or a family gathering, cooking chicken in a ceramic dish gives you perfect results every time. I don’t know about you, but I love that feeling of pulling a golden, succulent chicken out of the oven!
How Long to Cook Different Cuts of Chicken in a Ceramic Baking Dish
By now, you’re probably wondering exactly how long it takes to cook different cuts of chicken in a ceramic baking dish. I’ve learned through a lot of trial and error (and a few dry chicken dinners) that cook times vary depending on what part of the chicken you’re working with. But don’t worry, I’ve got you covered with some tried-and-true guidelines.
Whole Chicken (1 Hour 15 Minutes to 1 Hour 30 Minutes)
If you’re anything like me, you love roasting a whole chicken. The smell that fills the kitchen is just comforting. A whole chicken in a ceramic baking dish is great because the heat is distributed evenly, helping cook the meat while crisping the skin. Here’s what I do:
- Preheat the oven to 375°F (190°C).
- Place the chicken in the dish, skin side up, and roast for about 1 hour 15 minutes. Depending on the size of the bird, it could take up to 1 hour 30 minutes.
- Check the temperature: Insert a meat thermometer into the thickest part of the thigh. When it hits 165°F (74°C), you’re good to go.
I usually flip the chicken halfway through cooking to ensure even cooking, but ceramic is pretty good at getting everything done without flipping.
Boneless, Skinless Chicken Breasts (20-25 Minutes)
This is my go-to when I need something quick and satisfying. Boneless chicken breasts cook in about 20 to 25 minutes in a ceramic baking dish. They don’t need much attention — just season, throw them in the dish, and let the ceramic do its magic. Here’s my quick process:
- Preheat the oven to 375°F (190°C).
- Season the chicken breast. You can go as simple as salt and pepper, or add garlic, paprika, and some fresh herbs if you like.
- Place the chicken in the dish and bake for 20-25 minutes.
- Check the internal temperature: It should be 165°F (74°C).
I love how easy this is, and the chicken always comes out juicy without having to worry about it drying out.
Bone-In Chicken Thighs (40-45 Minutes)
When I’m craving something a little more flavorful, bone-in chicken thighs are my favorite. They need a little more time than the boneless cuts, but they’re definitely worth it. The skin gets crispy, and the meat stays juicy thanks to the heat retention of ceramic. Here’s what I do:
- Preheat your oven to 375°F (190°C).
- Add a little oil to your ceramic dish, then lay the thighs skin side up. You can season them with salt, pepper, garlic powder, and rosemary for a simple, flavorful dish.
- Bake for about 40-45 minutes, or until the internal temperature reaches 165°F (74°C).
The beauty of chicken thighs is that they’re more forgiving than breasts, so don’t worry if you leave them in a few extra minutes — they’ll still be juicy.
Chicken Drumsticks (35-40 Minutes)
Drumsticks are a fun option if you want something easy and great for meal prep. They’re incredibly flavorful, and the ceramic dish helps cook them evenly, so they come out tender and juicy. Here’s how I make them:
- Preheat the oven to 375°F (190°C).
- Coat the drumsticks in a little olive oil and your favorite seasonings. I like to use a dry rub with paprika, garlic powder, and a pinch of cayenne.
- Bake for about 35-40 minutes until they reach an internal temperature of 165°F (74°C).
Drumsticks are perfect for weeknight dinners or when you’re feeding a crowd.
Cubed Chicken (25-30 Minutes)
Sometimes I want to make a quick casserole or just cook up some cubed chicken for a salad or stir-fry. In a ceramic dish, cubed chicken cooks beautifully, and the sauce or seasoning you add really seeps in. Here’s what I do for cubed chicken:
- Preheat the oven to 375°F (190°C).
- Cut the chicken into bite-sized cubes and season generously. I often make a quick marinade with lemon, olive oil, garlic, and thyme.
- Bake for 25-30 minutes, depending on the size of the cubes and how much chicken you’re cooking.
The chicken cubes come out perfect for adding to salads, wraps, or just serving with a side of roasted vegetables.
Key Tips for Getting Perfectly Cooked Chicken
Over the years, I’ve figured out a few little tips that make cooking chicken in a ceramic dish even easier. These aren’t game-changers, but they’ll make sure everything goes smoothly.
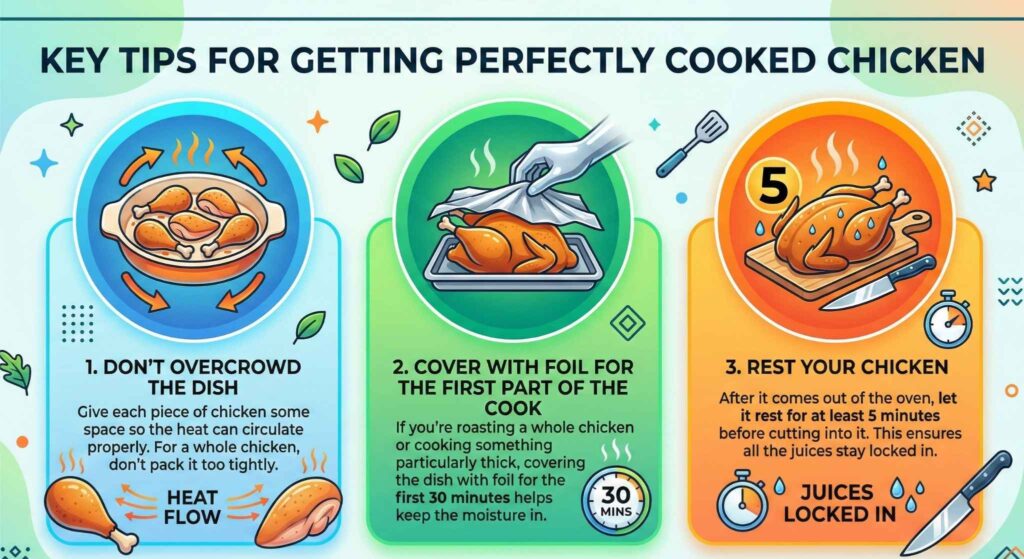
- Don’t overcrowd the dish: Give each piece of chicken some space so the heat can circulate properly. For a whole chicken, don’t pack it too tightly.
- Cover with foil for the first part of the cook: If you’re roasting a whole chicken or cooking something particularly thick, covering the dish with foil for the first 30 minutes helps keep the moisture in.
- Rest your chicken: After it comes out of the oven, let it rest for at least 5 minutes before cutting into it. This ensures all the juices stay locked in.
Why Ceramic is the Best Choice for Chicken
I know it’s tempting to use whatever baking dish is closest to you, but trust me, ceramic just works. Its heat retention and even cooking capabilities make it perfect for chicken. Whether you’re cooking a whole bird or just some thighs, ceramic dishes give you that golden, crispy skin and juicy meat every time.
And when it comes to the convenience of cleanup? You just can’t beat it. Most ceramic baking dishes are easy to clean and are usually dishwasher safe. This means you spend less time scrubbing away, and more time enjoying your meal.
Common Mistakes to Avoid When Cooking Chicken in a Ceramic Baking Dish
Even with the best kitchen tools, it’s easy to make a few mistakes that could mess up your perfectly cooked chicken. After years of experimenting in my kitchen, I’ve learned what to avoid when using a ceramic baking dish for chicken. Let me share some insights to make sure you don’t fall into the same traps I did!
Mistake 1: Overcrowding the Dish
One of the most common mistakes I see people make is trying to cook too much chicken at once. It’s tempting to toss everything in there and call it a day, but trust me, ceramic baking dishes need space to work their magic. If your chicken is too cramped, the heat won’t circulate properly, and you’ll end up with unevenly cooked meat.
For a whole chicken, you’re okay, but when cooking individual pieces like chicken breasts, thighs, or drumsticks, keep some space between them. I recommend leaving about an inch between each piece. This allows the heat to circulate, giving you that perfect golden-brown skin and juicy meat.
Mistake 2: Not Preheating the Oven
I used to skip the preheating step when I was in a rush, but it’s one of those small habits that makes a big difference. Ceramic dishes hold heat well, but they take a bit longer to get up to temperature. If you throw cold chicken into a cold oven, the dish won’t be as effective, and your chicken might not cook evenly.
I’ve learned that starting with a preheated oven is key. For chicken, I like to set my oven to 375°F (190°C), preheat for about 10 minutes, and then pop the chicken in. It makes all the difference in terms of even cooking.
Mistake 3: Forgetting to Check Internal Temperature
I can’t stress this enough: always, always check the internal temperature of your chicken. When I first started cooking chicken in ceramic dishes, I thought I could eyeball it, but I quickly learned that it’s better to be sure. Overcooking or undercooking chicken can lead to tough, dry meat or, worse, foodborne illness.
- For chicken breasts and thighs, the ideal internal temperature is 165°F (74°C).
- For a whole chicken, you’ll want to check both the breast and thigh. If they reach 165°F (74°C), it’s done.
A meat thermometer (like the one from ThermoWorks) is a small investment that will pay off in perfectly cooked chicken every time.
Mistake 4: Not Letting the Chicken Rest
I’ve made this mistake too many times — cutting into the chicken right after pulling it out of the oven. While it might seem tempting, letting your chicken rest is crucial. When you cook chicken, the juices move to the center of the meat. Cutting into it right away causes those juices to escape, leaving you with dry chicken.
- Let your chicken rest for at least 5 minutes before slicing or serving.
- For a whole chicken, I like to cover it with foil while it rests, keeping it warm.
I’ve learned that this small step makes a world of difference in keeping your chicken moist and flavorful.
Mistake 5: Cooking at Too High of a Temperature
Sometimes, I get a bit too eager and crank up the heat thinking it will cook faster. However, ceramic dishes work best when they can slowly cook the chicken at a moderate temperature. If you cook chicken at too high of a temperature, the outside can burn while the inside stays raw.
For most chicken cuts, 375°F (190°C) is the perfect sweet spot. It allows the chicken to cook through without drying out, while still achieving that nice, crispy skin.
Why These Mistakes Matter
Avoiding these mistakes can be the difference between a decent chicken dinner and a truly spectacular one. Cooking chicken in ceramic is an art — it’s about understanding how the heat works, what temperature to cook at, and giving your chicken the right amount of time to rest and reabsorb its juices.
When I first started cooking with ceramic, I wasn’t paying attention to these details, and I had more than a few dry, overcooked pieces of chicken. But once I made these adjustments, everything changed. Now, my chicken comes out perfect every time, and the ceramic dish makes it all so easy.
Mistake 6: Not Using the Right Size Ceramic Dish
Using a dish that’s too small or too large for your chicken can throw off the cooking time and heat distribution. A larger dish will cause the chicken to be spread out too thinly, drying out more quickly. On the other hand, if the dish is too small, the heat can’t circulate properly, leading to uneven cooking.
Here’s what I recommend:
- Choose a dish that fits your chicken comfortably but isn’t too big. For example, a 9×13-inch ceramic baking dish works great for most chickens, especially for roasting a whole bird or baking chicken breasts.
Mistake 7: Skipping the Rest of the Meal
Okay, this one isn’t necessarily a “mistake” in terms of cooking technique, but I’ve definitely fallen into the trap of focusing too much on the chicken and neglecting the sides. Ceramic dishes are perfect for adding vegetables or potatoes alongside your chicken. Not only does it save time (everything cooks in one dish), but the flavors from the chicken blend into the veggies, making them even tastier.
My personal favorite? Roasted potatoes, carrots, and onions. Toss them in a little olive oil, garlic, and salt, and throw them in with the chicken. The chicken juices soak into the vegetables, creating a flavorful, well-rounded meal.
How to Clean and Maintain Your Ceramic Baking Dish
Now that we’ve covered all the delicious details of cooking chicken in a ceramic baking dish, it’s time to talk about cleaning and maintaining your dish. I’ve been using ceramic baking dishes for years, and trust me, proper care can make them last for a long time. Plus, the last thing you want after cooking a great meal is to spend hours scrubbing away grease and grime.
Here’s what I’ve learned through trial and error when it comes to caring for my ceramic dishes.
Cleaning Ceramic Dishes: What Works for Me
Cleaning a ceramic baking dish is much easier than it sounds, especially if you follow a few simple steps to ensure it stays in great shape.
- Let It Cool First: I’ve made the mistake of trying to clean a hot ceramic dish right after pulling it from the oven, and let me tell you, it’s not a pleasant experience. Let the dish cool down before you even think about cleaning it. Sudden temperature changes can crack the ceramic, and I’ve had that happen before. Trust me, it’s not worth the risk.
- Gentle Scrubbing: For the most part, ceramic dishes can be cleaned with a soft sponge and warm, soapy water. I’ve found that using an abrasive scrubber can scratch the surface and ruin the finish, which I definitely want to avoid. If there’s stuck-on food, I let the dish soak in warm water for about 10-15 minutes to loosen things up. It’s a simple step that saves you from scrubbing forever.
- Dishwasher Safe (Most of the Time): Many high-quality ceramic dishes, like those from Le Creuset or Pyrex, are dishwasher-safe, but I prefer to hand wash them when possible. The dishwasher can sometimes dull the finish over time, especially with more delicate ceramic. If you do choose to use the dishwasher, make sure the dish is placed on the top rack to avoid high heat exposure.
Dealing with Stubborn Stains
Over time, especially with all those flavorful oils and seasonings, you may notice some stains on your ceramic baking dish. It happens! But don’t worry, there are a few tricks I’ve picked up to handle it:
- Baking Soda and Vinegar: This combo works wonders for stubborn stains. I sprinkle a generous amount of baking soda inside the dish and then pour some vinegar over it. It’ll fizz up, which is a good sign that it’s working. After about 10 minutes, I give it a gentle scrub with a soft sponge. The stains usually come right off.
- Use a Mild Abrasive Cleaner: If you have tough stains that won’t budge, I’ve found that a small amount of Bar Keepers Friend works well without being too harsh on the ceramic. Just make sure to rinse it thoroughly after using this cleaner.
How to Maintain Your Ceramic Baking Dish Over Time
Ceramic baking dishes, while durable, do need a little love to maintain their performance and appearance. After using them for a while, I’ve learned the importance of proper storage and occasional maintenance:
- Avoid Stacking Too Much: Ceramic can chip if it’s stacked with other heavy dishes on top of it. I try to store my dishes carefully, making sure there’s enough space between them. If I need to stack them, I place a soft cloth or paper towel between the dishes to prevent scratches.
- Keep It Dry: Moisture can cause ceramic dishes to degrade over time, so I always make sure to dry my dishes thoroughly before storing them. This is especially important if I’ve washed them by hand.
- Use a Dish Protector: For my nicer dishes, like my Le Creuset ceramic baker, I use a dish protector when storing them. These thin felt liners help prevent scratching and keep my dishes looking like new for years.
How to Fix Small Chips and Cracks
Though ceramic is tough, accidents happen. I’ve had my fair share of dropped dishes, and it’s never fun to find a chip or crack. Luckily, there are some simple fixes that can help prolong the life of your dish:
- Fixing Small Chips: If I notice a small chip, I usually don’t stress about it. However, if I’m concerned about it getting worse, I use a ceramic repair kit. These kits are designed to fill in chips and cracks, making them nearly invisible. After filling the chip, I let it dry thoroughly before using the dish again.
- Cracks: If a crack runs along the surface, it’s usually best to retire the dish. I’ve learned that cracks in ceramic can cause it to weaken, which might lead to more damage later. A cracked dish can also cause uneven cooking since the heat may not be distributed as well.
Why Ceramic Is Worth the Effort
In the long run, the effort of maintaining a ceramic baking dish is totally worth it. The quality of food it produces, especially when roasting chicken, is unmatched. It’s a reliable kitchen tool that, with a little care, can last for decades. And let’s be honest — there’s something elegant about serving food in a beautiful ceramic dish that just feels right.
Ceramic Baking Dish and U.S. Kitchens
In my experience, ceramic baking dishes are a staple in many U.S. kitchens. From California to New York, I’ve seen friends and family use them for everything from casseroles to roasting chicken. Ceramic has that versatility that makes it perfect for a range of dishes, no matter where you live or what your style of cooking is.
As a U.S.-based chef, I always keep in mind how regional kitchens and climates can affect the cooking process. For instance, in Florida’s humidity, ceramic baking dishes can take a little longer to heat up, but they also keep the food nice and moist, which is great for lean meats like chicken breasts. On the other hand, in dry climates like Arizona, ceramic helps retain moisture, making it a perfect choice for those who want juicy, flavorful chicken, even in a hot, dry kitchen.
Common Uses for Ceramic Baking Dishes Beyond Chicken
Now that you know how to cook chicken in a ceramic baking dish, let’s talk about the versatility of this kitchen staple. While chicken might be the first thing that comes to mind, ceramic dishes are perfect for a wide variety of meals. From casseroles to desserts, there’s so much you can do with these dishes.
I’ve spent countless hours experimenting with different types of dishes in my ceramic baking pans, and here are a few of my favorites. These recipes not only taste delicious but also show just how well ceramic holds up to different kinds of food.
1. Roasted Vegetables
Roasting vegetables in a ceramic baking dish is one of my favorite ways to use it outside of chicken. The even heat distribution ensures that every vegetable — from carrots to Brussels sprouts — comes out perfectly caramelized and tender.
- Prep: I simply chop up my vegetables (potatoes, carrots, bell peppers, zucchini, etc.) and toss them with olive oil, salt, pepper, and my favorite seasonings.
- Roast: I place them in the ceramic dish, making sure they’re spread out in an even layer, and roast at 375°F (190°C) for about 30–40 minutes.
- Pro Tip: Ceramic holds the heat so well, that I sometimes use the same dish for both the vegetables and chicken, cooking everything together for a full, easy meal. It saves time, and all the flavors blend beautifully.
2. Casseroles
Casseroles are one of those dishes that seem to have been made for ceramic dishes. The way the ingredients cook together — bubbling in the dish while getting a crisp top — is exactly what ceramic was designed for. Whether I’m making a classic mac and cheese or a potato gratin, ceramic provides the perfect setting for these comfort foods.
- Preparation: I love layering my casseroles, starting with a base of vegetables or pasta, followed by a rich sauce and topped with cheese or breadcrumbs.
- Baking: Depending on the casserole, I usually bake it at 350°F (175°C) for 30-45 minutes. I check that the edges are golden and bubbling, and I let it rest before serving to avoid burning my mouth on that cheesy topping.
Casseroles are also great for meal prep — I can make a big batch, store it in the fridge, and bake individual servings throughout the week.
3. Baked Pastas
I’ve been making baked pasta dishes for years, and my ceramic baking dish is absolutely perfect for this. The combination of pasta, sauce, cheese, and a little time in the oven results in a warm, cheesy, delicious dish that never fails to satisfy.
- Preparation: I cook the pasta al dente, mix it with tomato sauce, ricotta, and mozzarella, then top with Parmesan. Everything goes into the ceramic dish.
- Bake: I bake at 375°F (190°C) for about 25–30 minutes, until the top is bubbly and golden.
Ceramic’s heat retention makes it easy to get that perfect, slightly crisped top layer of cheese. Plus, it keeps the pasta warm long after you take it out of the oven, which is a huge bonus for serving.
4. Desserts (Like Crumbles or Cobblers)
You may be surprised to hear this, but ceramic baking dishes are also fantastic for baking desserts. I’ve made apple crumbles, peach cobblers, and even chocolate lava cakes in mine. The heat retention works wonders for desserts that need to cook evenly and rise beautifully.
- Fruit Crumbles: I love making fruit crumbles in my ceramic dish, especially in the summer when fruits like apples, peaches, and berries are in season. The ceramic retains enough heat to get that perfect bubbly filling while crisping up the topping.
- Bake: For a typical crumble, I’ll bake it at 375°F (190°C) for 30–40 minutes. The topping comes out golden and crispy, while the fruit filling stays soft and juicy.
5. Baking Bread
If you haven’t yet tried baking bread in a ceramic dish, you’re missing out. I started experimenting with bread a couple of years ago, and ceramic was my preferred method for baking artisan-style loaves. The dish gives the bread a nice crust while keeping the inside soft and airy.
- No-Knead Bread: I’ve had great success baking no-knead bread in my ceramic dish. After the dough rises, I simply place it in the preheated dish and bake for about 40 minutes at 450°F (232°C).
- Pro Tip: Using a Dutch oven style ceramic dish with a lid gives the bread that perfect, bakery-style crust by trapping steam during the first part of baking.
6. Cooking Casseroles and Gratins for Family Gatherings
Family gatherings call for hearty meals, and a big casserole or gratin always hits the spot. Ceramic baking dishes come in multiple sizes, which makes them perfect for large batches. Whether you’re making lasagna, broccoli cheese gratin, or a chicken and rice casserole, ceramic dishes give you the room you need for larger portions.
- Big Family Dinners: For special occasions, I’ll go for a 14×9-inch ceramic baking dish, which comfortably fits enough food for 8-10 people. It’s perfect for feeding a crowd and guarantees that everyone will get a bite of that crispy top layer.
Why Ceramic Works for So Many Types of Dishes
It all comes down to the way ceramic retains heat. This feature makes it ideal for a range of dishes that need steady, even cooking. When I first started cooking in ceramic, I thought it was just for roasting chicken, but now I can’t imagine my kitchen without it. From casseroles to bread and even desserts, ceramic dishes handle it all with ease.
Plus, there’s a convenience factor — not only does ceramic work well in the oven, but it looks great on the table, too. You can move it straight from oven to table and serve your meal in style.
Final Thoughts on Ceramic Baking Dishes in the U.S. Kitchen
As a U.S.-based chef, I’ve worked with plenty of different kitchen tools, but there’s something about ceramic that stands out. It’s affordable, durable, and versatile enough to work in any American kitchen, no matter the region or climate. Whether you’re cooking in a humid Florida kitchen or a dry Arizona home, ceramic ensures that your chicken, casseroles, and even desserts come out perfectly every time.