Hey, I’m Mossaraof — a professional cook and food blogger.
If you have ever wondered how to cook chicken for sandwiches in the oven and still keep it juicy, you are not alone. I used to dry it out all the time in my small Chicago apartment kitchen. After years of testing bake times, oven temps, and simple seasoning, I finally found a method that works every time.
In this guide, I will show you exactly how to cook chicken for sandwiches in the oven so it stays tender, easy to slice, and full of flavor. We will cover oven temperature, bake time, and how to keep the meat moist without fuss. If you want more oven basics, you can also check out my full guide, The Complete Guide to Using an Oven.
Let’s turn that plain chicken breast into the kind of oven baked chicken that makes your sandwich taste like it came from your favorite deli.
What You’ll Need to Get Started
The Tools of the Trade
Before we get into the cooking part, let’s talk tools. As much as I love cooking, I’m not one for complicated gadgets that take up valuable space in my kitchen. Here’s what I recommend using for cooking chicken for sandwiches:
- Baking Sheet or Pan: A good, sturdy pan is a must. I usually go for a baking sheet with raised edges, especially if I’m roasting whole pieces of chicken. The raised edge helps catch all the juices and keeps things tidy.
- Parchment Paper: Trust me on this one — it’ll save you from a sticky mess. It helps the chicken cook evenly without sticking to the pan, and cleanup is a breeze.
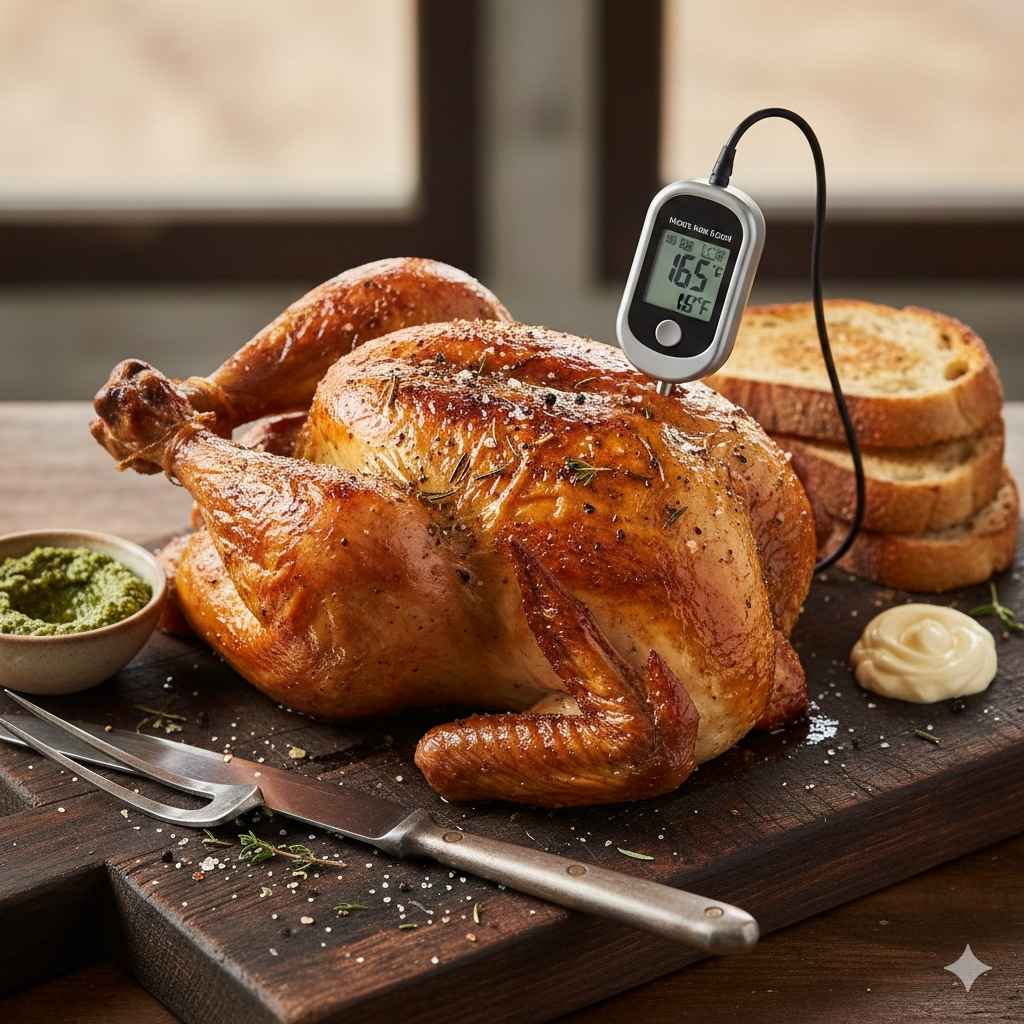
- Meat Thermometer: You can never be too careful with poultry. I keep a digital thermometer handy to make sure the chicken reaches that perfect 165°F.
You probably have most of these tools already, but if you’re cooking a whole chicken for sandwiches, consider using a roasting pan for even better results.
The Chicken You Should Use for Sandwiches
The Cut Matters
Now, if you’re asking, “What’s the best chicken for sandwiches?” Well, I’ve got a few favorites, and they all depend on your goals. Sometimes I crave crispy skin, sometimes I want something leaner. Here’s what I’ve learned:
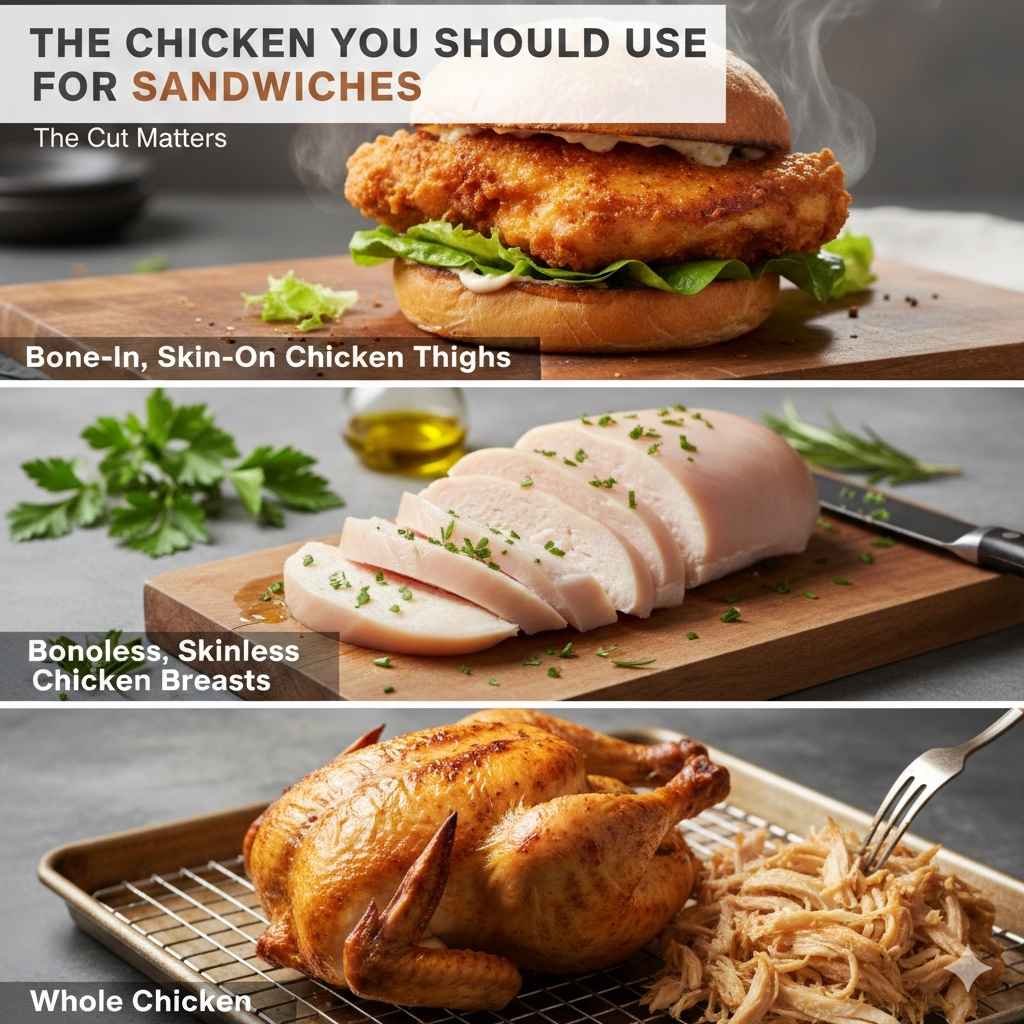
Bone-In, Skin-On Chicken Thighs
- Why I Love Them: These are hands down my favorite for sandwich chicken. The skin crisps up beautifully in the oven, and the meat stays juicy. They can handle being in the oven longer without drying out. Plus, they’re forgiving if you get a little distracted.
- Real-Life Tip: I’ve cooked these in both Florida heat and Chicago winters, and they’re always a hit. Whether it’s 90°F and humid or 10°F and freezing, the thighs hold up well in the oven and deliver great flavor every time.
Boneless, Skinless Chicken Breasts
- Why They’re Great: If you’re short on time or need something leaner, chicken breasts are the way to go. They cook faster and are easy to cut for sandwich-sized pieces. But, they can dry out if you’re not careful.
- Real-Life Tip: When cooking breasts, I like to add a touch of olive oil to keep them from drying out, especially when I’m preparing for a busy weekday lunch.
Whole Chicken
- Why It Works: Want to make a bunch of sandwiches at once? A whole chicken can be a great option. The skin gives it that crispiness, and you can shred it for sandwiches after it’s cooked.
- Real-Life Tip: If I’m doing a batch for the family, I’ll roast a whole chicken on a Sunday and use it for sandwiches all week. It’s a real time-saver.
Preparing the Chicken
Seasoning It Right
The best part of making chicken for sandwiches? The seasoning. And let me tell you, simple is often best. You don’t need a fancy marinade to get great flavor. I like to keep it straightforward, but full of flavor. Here’s my go-to:
- Salt and Pepper: These are the basics. It’s amazing how much flavor just a little salt and pepper can bring out in chicken.
- Garlic Powder: I put garlic powder on almost everything. It adds that savory depth to the chicken.
- Paprika: For a little smoky flavor and color.
Pro Tip: I rub the seasoning all over the chicken — on the skin if I’m using bone-in pieces, and on the meat itself if I’m using breasts.
Cooking Bone-In, Skin-On Chicken in the Oven
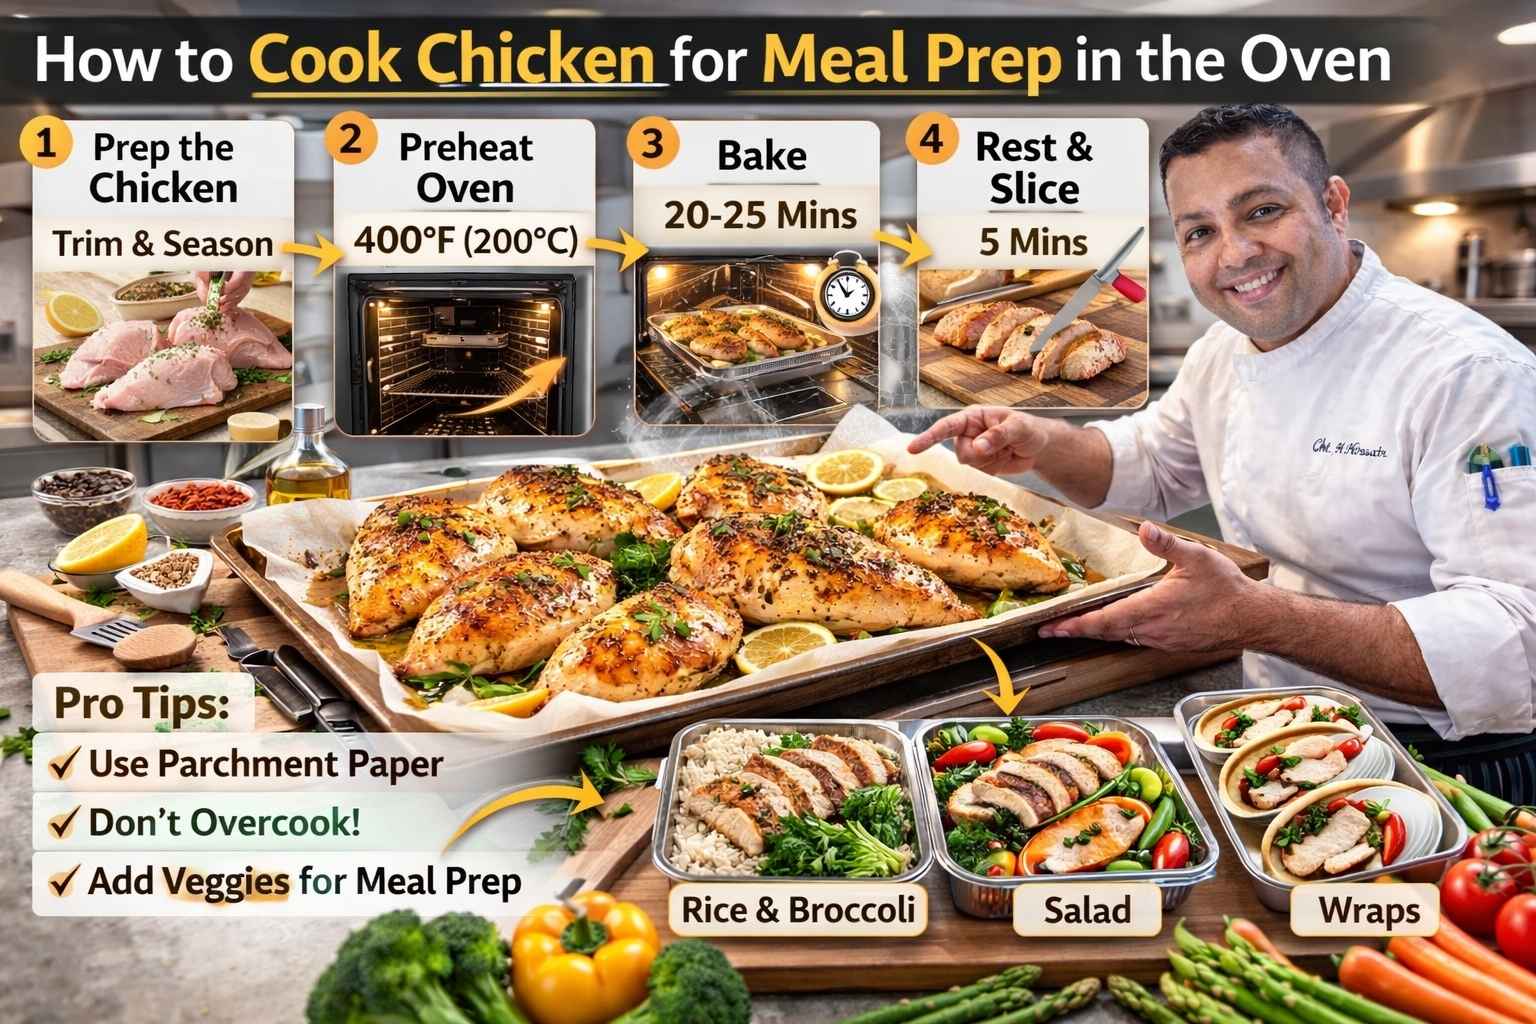
Step 1: Preheat the Oven
- Why It Matters: Getting your oven hot enough helps the chicken cook evenly. I preheat my oven to 400°F (204°C) for the perfect crispy skin.
Step 2: Place the Chicken on a Baking Sheet
- Here’s the Trick: I use a baking sheet lined with parchment paper for easier cleanup. Place the chicken skin-side up so it gets nice and crispy. Don’t crowd the pan — give it space to breathe.
Step 3: Roast the Chicken
- Cooking Time: Depending on the size of your chicken pieces, you’ll want to bake it for about 35-45 minutes. The skin should be golden brown, and the meat should reach an internal temperature of 165°F.
Pro Tip: I always check the chicken around 35 minutes. You can also use the back of a spoon to press gently on the chicken — if it gives easily, it’s done.
Step 4: Let It Rest
- Why Resting Matters: After you pull the chicken out of the oven, let it sit for about 5-10 minutes. This helps the juices redistribute, making it even juicier for your sandwich.
Cooking Boneless, Skinless Chicken Breasts
Step 1: Preheat the Oven
- Same as before, I preheat my oven to 400°F. Boneless breasts cook faster, but the same rule applies: we want crispy edges, but juicy meat.
Step 2: Add Olive Oil and Seasoning
- Why Oil?: Olive oil helps the chicken stay moist and gives it a nice golden color. I drizzle a little over the breasts, then sprinkle my seasoning mix.
Step 3: Bake the Breasts
- Cooking Time: Boneless breasts cook much faster than bone-in pieces. I bake them for 20-25 minutes, checking with a thermometer at 20 minutes to make sure they’ve reached 165°F.
Pro Tip: If you’re cooking chicken breasts in the winter (especially in places like Chicago), you might want to cover them with foil for the first 10 minutes. This keeps the moisture in during those dry months.
Assembling the Chicken Sandwich
Once your chicken is cooked, it’s time for the fun part — assembling the sandwich. Here’s how I like to do it:
- Bread: I usually go for soft brioche buns. They’re the perfect balance of fluff and structure. Toast them lightly in the oven for a little crunch.
- Toppings: Fresh lettuce, sliced tomato, and a dab of mayo are my go-to. But I also love adding pickles, avocado, or even a fried egg if I’m feeling extra.
- Sauce: For a little kick, I’ll make a spicy sriracha mayo or a tangy mustard sauce.
Pro Tip: Don’t forget a final sprinkle of salt and pepper on your sandwich. It’s the little things that make a big difference.
Cooking a Whole Chicken for Sandwiches
Step 1: Preheat the Oven to 375°F
When I cook a whole chicken for sandwiches, I usually go for a slightly lower temperature than I would for chicken thighs or breasts. This allows the chicken to cook more evenly and gives the skin time to crisp up without drying out the meat.
Step 2: Season the Chicken
A whole chicken is like a blank canvas. I rub it generously with salt, pepper, garlic powder, and a little bit of paprika. If I’m in the mood, I’ll throw in some fresh herbs — thyme or rosemary work great here. I also like to add a little bit of butter or olive oil to help with browning and moisture.
Real-Life Tip: If you’re in Florida and your kitchen is super humid, you might want to opt for a quick pat down with paper towels before seasoning. It helps the skin crisp up better.
Step 3: Roast the Chicken
- Cooking Time: Depending on the size of your chicken, it will take about 1 to 1.5 hours to cook at 375°F. The key is to keep an eye on the internal temperature. You want it to hit 165°F in the thickest part of the chicken (usually the breast or thigh). If you have a thermometer, this is the easiest way to tell when it’s done.
Pro Tip: I often flip the chicken halfway through cooking to get even browning, but that’s totally optional.
Step 4: Rest the Chicken
Once it’s done, let the chicken rest for about 15 minutes. This lets the juices redistribute, so when you slice it up, it stays juicy and tender for your sandwiches.
U.S. Insight: If you’re in a dry region like Arizona, you’ll find that the chicken can dry out quicker, so consider covering it loosely with foil while it rests to help retain some of the moisture.
Shredding the Chicken for Sandwiches
Shredding chicken is an easy way to make sure you have enough for a bunch of sandwiches without overstuffing each one. Plus, it’s perfect for a laid-back gathering.
Step 1: Let the Chicken Cool Slightly
I know, you’re eager to dig in, but give it just a few minutes to cool down. It’ll make shredding way easier.
Step 2: Shred the Chicken
To shred, I use two forks to pull apart the meat. If you’re dealing with bone-in chicken, it’s easy to remove the skin and bones. For boneless breasts, it’s even easier — just pull it apart until it’s in bite-sized pieces. This works great for making sandwiches, or even a salad if you’re in the mood for something lighter.
Pro Tip: If you’re short on time, you can use your stand mixer with the paddle attachment on low speed. It shreds the chicken in seconds, but I’ll admit — it’s not as satisfying as doing it by hand.
Step 3: Add Flavor
While you’ve got that chicken shredded, feel free to add some sauce. I usually toss mine in a bit of mayo, mustard, or a tangy barbecue sauce. But, if you’re feeling adventurous, try something like a chipotle mayo for a smoky kick. Add some chopped veggies like cucumbers or shredded lettuce for crunch.
Alternative Cooking Methods for Chicken Sandwiches
I know not everyone has the time or desire to roast chicken, especially on busy days. Thankfully, there are alternative methods to cook chicken that still produce a tasty result. Here are a couple of my favorites:
Using a Roaster Oven
If you’re cooking multiple sandwiches, a roaster oven can be a lifesaver. It’s a bit like a countertop version of a full-size oven but designed to heat up quickly and cook chicken more evenly.
Real-Life Tip: I use a roaster oven during the holidays when I don’t want to crowd my main oven. It’s especially useful if you’re cooking multiple chickens or batches of chicken at once.
Stovetop + Oven Combo
Sometimes, I like to sear the chicken on the stovetop first. It gives the skin a nice crispy texture before finishing it off in the oven.
- Sear the Chicken: Heat up some oil in a cast-iron skillet (I love my Lodge skillet) over medium-high heat. Once the pan is hot, sear the chicken for about 2-3 minutes on each side until it’s golden.
- Finish in the Oven: After searing, transfer the skillet to the preheated oven at 375°F to finish cooking for 10-20 minutes, depending on the size of the chicken. This method gives you the best of both worlds — crispy skin and juicy meat.
U.S. Insight: If you’re in a colder region like Chicago, searing in a cast-iron skillet is an excellent way to warm up your kitchen while still getting that perfect, crispy skin without turning on the oven for too long.
Tips for Perfect Chicken Sandwiches Every Time
By now, you’ve got the basics down, but here are a few bonus tips that I’ve learned in the kitchen over the years to make your chicken sandwiches stand out:
- Rest the Chicken After Cooking: Whether you’re roasting chicken thighs or breasts, don’t skip the resting period. I know it’s tempting to cut into it right away, but letting it rest will keep the meat juicy and tender.
- Use the Right Bread: I can’t tell you how many sandwiches I’ve made with the wrong bread. A soft but sturdy bun is key — nothing too flimsy. Brioche is my personal favorite, but a whole wheat bun adds a nice texture.
- Layering Makes a Difference: Layer your chicken carefully so that it doesn’t get all messy when you bite into it. Don’t overstuff the sandwich — it’s about balance. I like to add a little chicken, then some veggies, and top it off with sauce.
- Try Grilled Vegetables: If you’re looking to switch things up, try grilling or roasting some veggies like peppers, onions, or zucchini. They add flavor and a smoky depth to your sandwich.
Flavor Variations for Chicken Sandwiches
Sometimes, I get bored with the classic chicken sandwich, so I switch things up with different flavors. Here are a few variations I’ve tried:
- Spicy Buffalo Chicken: Toss your shredded chicken in buffalo sauce and top with a little ranch dressing and lettuce.
- BBQ Chicken: Mix the shredded chicken with barbecue sauce, and top with a slice of cheddar cheese.
- Crispy Chicken Parmesan: For a twist on the classic chicken parm, use your crispy oven-baked chicken in a sandwich with marinara sauce and melted mozzarella.
How to Make the Chicken Sandwiches Stand Out
Step 1: Choose the Right Toppings
Let’s be real—chicken sandwiches are all about the toppings. Sure, the chicken is important, but it’s the extras that can really take your sandwich to the next level. Here’s what I usually go for:
- Lettuce: Crisp iceberg lettuce is a classic, but I’ve found that arugula adds a nice peppery bite. If you’re in the mood for something a bit heartier, spinach works too.
- Tomato: A thick slice of juicy tomato adds moisture and a bit of sweetness. I prefer to buy tomatoes that are in-season, usually in the summer when they’re at their peak flavor.
- Cheese: If you’re into cheese, go for something that melts well like cheddar, Swiss, or provolone. I’ve used mozzarella before, but it can get a bit stringy for a sandwich unless you really melt it down.
Pro Tip: If I’m feeling indulgent, I’ll throw in some crispy bacon. It adds that perfect crunch and smoky flavor that pairs so well with chicken.
Step 2: Choose a Sauce
The sauce is the magic ingredient. Whether you’re opting for something creamy or tangy, the right sauce can elevate your sandwich from good to great. Here’s what I use:
- Mayonnaise: Classic and creamy. I like to add a little garlic powder or sriracha to give it a personal twist.
- Mustard: Dijon mustard is my go-to for a little sharpness, but honey mustard works too if you like a sweeter option.
- BBQ Sauce: If you’ve gone for a smoky BBQ chicken sandwich, don’t forget to drizzle some extra BBQ sauce on top. It adds a bit of moisture and gives the sandwich an extra punch.
Baking the Chicken Sandwiches for a Warm, Crispy Finish
Step 1: Toast the Buns
Here’s where I get a little extra. To add a bit of crispiness to your sandwich, I always toast the buns in the oven for a few minutes. This not only adds texture, but it helps prevent the bun from getting soggy, especially if you’ve added a bit of sauce.
- Preheat the oven to 350°F.
- Slice the buns in half and place them cut-side up on a baking sheet.
- Toast for about 5-7 minutes, or until the edges are golden brown. You’ll smell it when they’re ready.
Step 2: Assemble the Sandwich
Now comes the fun part! I start with a toasted bun, then add my chicken (whether it’s sliced breast or shredded thigh) right on top. From there, I layer on the toppings:
- Lettuce: I go with fresh, crisp leaves that add crunch.
- Tomato: A thick slice of ripe tomato is non-negotiable. The juiciness pairs perfectly with the tender chicken.
- Cheese: Melted cheese goes right on top of the hot chicken to create that gooey goodness.
- Sauce: I’ll spread my mayo or drizzle some BBQ sauce on the top bun.
Pro Tip: If you want to serve these sandwiches at a gathering, consider adding a skewer through the center to keep everything together. It’ll make each sandwich easier to handle, especially if you’ve loaded it up with toppings.
Serving Your Chicken Sandwiches
I’ve served chicken sandwiches in all kinds of settings, from casual weeknight dinners to summer barbecues. Depending on the occasion, I’ll switch up the sides and presentation:
- Fries: It’s hard to beat crispy fries alongside a chicken sandwich. Sweet potato fries or even baked fries work well.
- Coleslaw: A tangy, creamy coleslaw pairs so well with the crunch of the chicken and adds a refreshing bite.
- Pickles: I love the sharpness that pickles bring to a sandwich. I usually go for dill, but bread-and-butter pickles are a great sweet alternative.
- Simple Salad: If I want something lighter, I’ll serve my sandwich with a simple side salad with mixed greens and a lemon vinaigrette.
Real-Life Tip: One of my favorite things to do on a hot summer day (especially when it’s humid in Florida) is to serve these sandwiches with a side of chilled cucumber salad. It’s a nice refreshing contrast to the warm chicken sandwich.
Flavor Variations: Switch It Up
As much as I love the classic chicken sandwich, sometimes I get the itch to experiment with different flavors. Here are a few variations I’ve tried that I think you’ll love:
Spicy Chicken Sandwich
If you’re craving something with a little heat, try tossing your chicken in a spicy buffalo sauce or sriracha mayo before building your sandwich. The creamy mayo balances out the heat and adds richness to the sandwich.
- Add-Ons: Slice some jalapeños, or even drizzle a little ranch dressing to cool it down.
BBQ Chicken Sandwich
For a smoky twist, you can cook your chicken with BBQ sauce, and then drizzle more BBQ sauce on top when assembling the sandwich. I like to add some crispy bacon for an extra layer of flavor.
- Add-Ons: A slice of cheddar cheese or a handful of crispy onion rings adds to the BBQ theme.
Chicken Parmesan Sandwich
This is my ultimate comfort food version of the chicken sandwich. After baking your chicken, top it with marinara sauce and mozzarella cheese, and let it melt in the oven. Put it on a toasted bun and top it with fresh basil for a tasty twist on classic chicken parm.
- Add-Ons: Serve with a side of garlic bread for a full Italian-inspired meal.
Tips for Making Chicken Sandwiches for a Crowd
When I’m cooking for a group, I tend to stick to the basics: lots of chicken, plenty of toppings, and easy sides. Here are a few tips to make sure you have enough to go around:
Cook Multiple Pieces of Chicken
When you’re preparing chicken for sandwiches for a crowd, consider roasting multiple pieces of chicken at once. I’ll throw a couple of whole chickens in the oven, or roast up a few trays of thighs, depending on the number of people. You can also cook extra chicken and use leftovers the next day for chicken salads or wraps.
Make Ahead
If you’re making chicken sandwiches for a party, I suggest cooking the chicken the day before. You can shred it, store it in the fridge, and then quickly assemble the sandwiches the next day. It’s a huge time-saver, especially when you’re hosting.
Keep the Sandwiches Warm
When serving a large group, you can keep the sandwiches warm in the oven. Wrap them in foil and place them in a low-temperature oven (about 200°F) until you’re ready to serve.
Troubleshooting Common Issues When Cooking Chicken for Sandwiches
Why Is My Chicken Dry?
I’ve been there — you’re cooking chicken, the smell is amazing, but then you bite into it, and it’s dry. Ugh. It’s one of the most frustrating things, especially when you’re aiming for that perfect, juicy bite for your sandwich. But don’t worry, I’ve figured out a few reasons why it happens and how to fix it.
- Overcooking: The most common reason chicken dries out is overcooking. Chicken breasts, in particular, are prone to this. It’s easy to walk away from the oven, but check your chicken with a thermometer. When it hits 165°F, pull it out. Even a minute too long can make a difference.
- Lack of Moisture: If you’re using boneless chicken breasts, they can dry out more easily. That’s why I always drizzle them with a bit of olive oil before baking. If you’re cooking thighs, you’re less likely to encounter this problem because of the fat in the meat.
- Resting Time: Don’t skip the resting step. After the chicken comes out of the oven, let it sit for 5-10 minutes. This allows the juices to redistribute, making the chicken more tender and moist.
Why Does My Chicken Have Uneven Browning?
Sometimes, despite my best efforts, I end up with unevenly browned chicken, especially when I’m multitasking in the kitchen. I’ve learned that this could happen due to a couple of reasons:
- Oven Hot Spots: Every oven has its quirks. In my old apartment, I noticed my oven had a hot spot near the back. If I didn’t rotate my pan halfway through, I’d end up with some pieces overcooked while others were undercooked. I always try to rotate the pan about halfway through cooking, and I also make sure the chicken isn’t overcrowded on the baking sheet.
- Skin Side Down First: When baking skin-on chicken, I make sure the skin is facing up when I put it in the oven. This allows the skin to crisp up evenly, and the meat stays juicy underneath.
U.S. Tip: If you’re dealing with high humidity, like in Florida, your chicken might need a little more time to get that crispy skin. That’s because the moisture in the air can make it harder for the skin to brown. Don’t be afraid to let it cook for an extra 5 minutes if the skin is still soft.
My Favorite Chicken Sandwiches for Different Occasions
Weeknight Dinner: Classic Chicken Sandwich
After a long day of cooking, I love making something quick yet satisfying. My classic chicken sandwich comes together in just under 40 minutes. Here’s how I keep it simple but delicious:
- Chicken: I use boneless chicken breasts for speed.
- Seasoning: A simple rub of salt, pepper, and garlic powder.
- Sides: Sweet potato fries or a quick cucumber salad. A light meal, but hearty enough to fill me up after a busy day.
Weekend Gathering: BBQ Chicken Sandwiches
For those lazy weekends where I’ve got more time, I like to kick things up a notch with BBQ chicken sandwiches. Here’s how I make them:
- Chicken: I use bone-in thighs for extra flavor.
- Sauce: I slather the chicken in homemade BBQ sauce and bake it until it’s golden and crispy.
- Sides: Coleslaw and cornbread are my go-to sides for BBQ chicken sandwiches. It’s the perfect combo of smoky, crunchy, and creamy.
Pro Tip: If you’re serving a crowd, consider making a DIY sandwich bar. Let everyone build their own sandwiches with different toppings, sauces, and sides. It’s always a hit at parties.
Making Chicken Sandwiches for Meal Prep
As much as I love cooking fresh, I also love having meals ready to go for the week. Meal prepping chicken for sandwiches is one of the easiest and most satisfying things I do. Here’s how I approach it:
Step 1: Cook Extra Chicken
Whenever I cook chicken for sandwiches, I double the recipe. That way, I’ve got leftovers for the next couple of days. I’ll roast an extra batch of thighs or breasts and store them in the fridge for a quick sandwich whenever I need it.
Real-Life Tip: If you’re meal prepping for the week, consider keeping the cooked chicken in a separate container. That way, it stays fresh and doesn’t get soggy from any sauces or toppings.
Step 2: Prep the Sandwich Toppings
I’ll often chop lettuce, slice tomatoes, and prepare sauces ahead of time. Storing them in separate containers in the fridge makes it easy to grab and go when it’s time to assemble my sandwich.
Step 3: Assemble When Ready to Eat
When I’m ready to eat, I’ll grab the pre-cooked chicken, toast my bread, and throw everything together. It’s the perfect meal for busy days when I just don’t have time to cook.
Pro Tip: If you want to switch it up throughout the week, change up the toppings. Try using different types of bread (like whole grain, pita, or even a soft roll) or experiment with a new sauce (like spicy sriracha mayo or honey mustard).
Chicken Sandwich Variations for Specific Diets
I know everyone’s got different dietary needs, so here’s how I tweak my chicken sandwiches to fit different diets.
Gluten-Free Chicken Sandwich
For a gluten-free version, I simply swap out the regular bun for a gluten-free option. There are a lot of great gluten-free bread choices out there, and I’ve found that a soft, pillowy gluten-free bun works just as well as the regular ones.
Pro Tip: To avoid any potential cross-contamination, I use a separate cutting board and utensils when handling gluten-free ingredients.
Low-Carb Chicken Sandwich
If I’m trying to cut back on carbs, I’ll skip the bread altogether and wrap the chicken and toppings in lettuce leaves. It’s not quite the same as a sandwich, but it still satisfies that craving for something light and fresh.
Real-Life Tip: I’ll add a slice of avocado for some healthy fats, which makes the sandwich more filling and adds a creamy texture.
Dairy-Free Chicken Sandwich
To make the sandwich dairy-free, I skip the cheese and go for a tangy dairy-free mayo or a mustard-based sauce. The rest of the sandwich remains the same, but it still delivers plenty of flavor without the dairy.
Storing Leftover Chicken for Sandwiches
If you’ve cooked a batch of chicken and have leftovers (lucky you!), storing it properly is key to keeping it fresh for your next meal. Here’s how I store mine:
In the Fridge
- Storage Tip: Let the chicken cool completely before placing it in an airtight container. It will keep in the fridge for up to 3-4 days.
- Reheating Tip: To avoid drying it out, I reheat my chicken in the oven at 350°F for 10-15 minutes, or until it’s warmed through.
In the Freezer
- Storage Tip: If I’ve made a large batch, I’ll freeze the extra chicken for later. Wrap the chicken tightly in plastic wrap and aluminum foil before placing it in a freezer bag.
- Reheating Tip: To defrost, I’ll let it sit in the fridge overnight and then reheat in the oven the next day.
Chicken Sandwiches for Special Occasions
The Ultimate Chicken Sandwich for a Picnic
Picnics are one of my favorite occasions to enjoy a good sandwich, and there’s something about chicken sandwiches that make them a crowd favorite. Whether you’re gathering at the park with friends or having a backyard barbecue, a well-made chicken sandwich can take your picnic to the next level.
Here’s what I do for a picnic-perfect chicken sandwich:
- Use a Sturdier Bun: When packing sandwiches for a picnic, I choose a sturdier bread like a baguette or ciabatta. These hold up well without getting soggy, even with a bit of sauce.
- Make the Chicken Flavorful: For a picnic, I marinate the chicken ahead of time in a flavorful marinade. I’ll do something tangy like lemon, garlic, and olive oil for a simple flavor combo that complements fresh veggies.
- Toppings: I pack the lettuce, tomato, and pickles separately, and only add them to the sandwich right before eating. This keeps the bread from getting soggy.
- Wrap Carefully: When packing the sandwiches, I wrap them tightly in parchment paper or foil. It keeps everything in place and adds a little extra protection from the sun or any uninvited ants.
Real-Life Tip: Don’t forget a cooling pack for the sandwiches. I’ve made the mistake of packing them without one on a hot day, and, well, the chicken wasn’t as appetizing by the time I got to the park.
Chicken Sandwiches for Tailgating
When tailgating, you want something that’s easy to eat while standing up, cheering for your team, and juggling a drink. That’s why chicken sandwiches are my go-to tailgate food. They’re easy to assemble and pack, and they stay delicious even after a few hours. Here’s how I make sure they’re tailgate-ready:
- Mini Sandwiches: For tailgates, I make mini chicken sandwiches, or sliders, because they’re bite-sized and portable. I use the same method for cooking the chicken, but I cut it into smaller pieces so it’s easier to assemble and eat.
- Condiments on the Side: I pack the sauces and condiments separately so people can customize their sandwiches. This keeps the buns from getting soggy, especially if they’re sitting out for a while.
- Chicken Variety: To add variety and cater to different tastes, I’ll make a few different types of chicken: some with BBQ sauce, some with sriracha mayo, and some with a simple lemon-garlic seasoning. It gives everyone options to choose from.
Pro Tip: Keep the sandwiches in a cooler until you’re ready to serve them. That will keep the chicken fresh and prevent it from getting warm in the summer heat.
How to Make Your Chicken Sandwiches Healthier
Sometimes, I’m in the mood for something a little lighter. If you’re looking to make your chicken sandwiches healthier, here are a few swaps and additions that still pack a punch in flavor:
Use Whole Wheat or Grain Buns
I love a good soft brioche bun, but when I’m in the mood for something healthier, I opt for whole wheat or multigrain buns. These buns add fiber and a nutty flavor that pairs well with the chicken.
Real-Life Tip: I buy whole wheat buns from a local bakery to support small businesses, and I love the texture it adds to my sandwich.
Load Up on Veggies
The more veggies, the better! I love adding extra greens, like spinach or arugula, for that extra crunch. You can also pile on sliced cucumbers, bell peppers, or even shredded carrots. They add freshness and texture without weighing the sandwich down.
Skip the Mayo, Try Greek Yogurt
For a healthier take on creamy condiments, I swap out the mayo for Greek yogurt. It’s tangy, creamy, and packed with protein. If you want to give it a little flavor, add a squeeze of lemon juice or a dash of Dijon mustard.
Pro Tip: If you’re using Greek yogurt as a spread, don’t overdo it. A little goes a long way, and too much can make your sandwich feel heavy.
Bake Instead of Fry
I always recommend baking the chicken instead of frying it. It cuts down on oil and keeps the chicken lighter without sacrificing flavor or texture. Plus, baking is so much easier — less mess, less oil splatter.
How to Make Chicken Sandwiches Kid-Friendly
If you’ve got kids or you’re hosting a family gathering, chicken sandwiches are a great option because they’re customizable and easy to eat. But sometimes, you need to make them a bit more kid-friendly. Here are my top tips for satisfying even the pickiest eaters:
Go Simple with the Chicken
For younger kids, I’ll stick to basic seasoning — salt, pepper, and a little garlic powder. No need to get fancy with sauces or spices. I’ve found that a simple, well-cooked chicken breast or thigh is all they need.
Pro Tip: If your kids are picky about texture, cut the chicken into small pieces or even use chicken tenders. They’re easier to eat, and the kids love them.
Skip the Spicy Sauces
When I make chicken sandwiches for kids, I skip the spicy sauces and go for more familiar flavors. Creamy ranch, honey mustard, or just plain ketchup works wonders. And don’t forget that kids love dipping their sandwiches into sauces, so I’ll often serve a little cup of dipping sauce on the side.
Use Fun Sandwich Shapes
To make the sandwich a little more exciting, I’ll use cookie cutters to cut the sandwich into fun shapes, like stars or hearts. It’s a simple trick, but it makes the sandwiches more fun for kids to eat.
Real-Life Tip: If you’ve got kids in the house, let them help make their sandwiches. It’s a great way to get them involved in the kitchen and ensure they eat what they’ve made.
The Best Chicken for Your Sandwiches: Final Thoughts
After cooking chicken sandwiches in every possible way — from quick weeknight dinners to elaborate BBQ spreads for family gatherings — I can confidently say that oven-baked chicken is a reliable and delicious choice for any occasion. Whether you’re using chicken breasts, thighs, or even a whole chicken, the oven helps lock in moisture and develop rich, deep flavors.
The key is getting the right balance of seasoning, cooking time, and temperature. Once you’ve mastered that, you can customize your sandwich with different toppings, sauces, and bread to suit your tastes. Plus, with all the different cooking methods and flavor variations, you’ll never get bored.
Whether you’re making a classic chicken sandwich or experimenting with BBQ flavors, there’s no wrong way to go about it. Just remember to enjoy the process, and let your kitchen become a place for creativity, flavor, and, of course, a delicious sandwich.
FAQs
How to cook chicken for sandwiches in the oven without drying it out?
To cook chicken for sandwiches in the oven, bake at 375°F until it hits 165°F inside. Cover loosely with foil and rest 5 minutes. This keeps the meat juicy and easy to slice.
What temperature is best for oven baked chicken for sandwiches?
The best temp for oven baked chicken for sandwiches is 375°F. It cooks evenly and stays moist. Use a meat thermometer for safe, tender results every time.
How long to cook chicken breast for sandwiches in the oven?
Chicken breast for sandwiches takes 20 to 30 minutes at 375°F. Time depends on thickness. Always check for 165°F in the center before slicing.
Should I season chicken before baking for sandwiches?
Yes, season before baking. Salt, pepper, garlic powder, or paprika add flavor. A light brush of olive oil helps the chicken brown and stay soft.
Can I slice chicken right after baking for sandwiches?
Let baked chicken rest 5 to 10 minutes first. Resting keeps juices inside. Then slice thin for tender, juicy oven baked chicken sandwiches.