The smell of crisp chicken in the oven always takes me back to busy family nights in my kitchen. Today I want to share how to cook chicken croquettes in the oven, a simple way to get that golden crunch with less oil and less fuss. As a professional cook and food blogger, I’ve tested this oven-baked method many times, and it never fails to make soft, tasty croquettes with a light, crisp coat. If you want better oven results, my guide on The Complete Guide to Using an Oven at Home will help you get perfect heat every time.
In this guide, I’ll show you the easy steps, simple tips, and small tricks I use in my own kitchen when people ask me how to cook chicken croquettes in the oven. You will learn how to shape them, bake them, and keep them juicy inside. If you love easy comfort food with a clean oven method, you are in the right place. Let’s get started and bake some crispy croquettes together. 🍗✨
Table of Contents
ToggleWhy Bake Chicken Croquettes Instead of Frying Them?
Before I jump into the recipe, let me tell you why I swear by the oven method for chicken croquettes.
It wasn’t always this way. I used to fry them up in a pan, just like everyone else. But after a few burned fingers and a kitchen that smelled like oil for days, I realized that baking is the way to go. I love that I can pop them in the oven and focus on other things (like grabbing that second cup of coffee in peace). And let’s be real, cleaning up after frying is a nightmare. My old apartment’s tiny kitchen didn’t have the best ventilation, so every fry session turned into a greasy warzone.
Now, I bake them in the oven, and they turn out just as crispy, if not better. I can make a bigger batch with way less mess. Plus, using less oil means I’m not dealing with that heavy feeling after a meal.
Here’s what I’ve discovered over the years:
- No Grease: When you bake them, you can use a light spray of oil, which makes them just as crispy without the greasy aftermath.
- Even Cooking: The heat in an oven circulates more evenly, so you get a perfectly browned exterior and a juicy inside. No more unevenly cooked croquettes!
- Less Hands-On Time: No standing over the stove flipping croquettes. Just set them on a baking sheet, and let the oven do the work.
The Great Debate: Oven vs. Frying
If you’re anything like me, you probably love the crispy bite that comes from a fried croquette. But what I’ve found is that oven-baked croquettes give you the same golden crunch with a lot less effort. Sure, I love the crispy edges from a frying pan, but the oven method gives me an even crisp without the added fat.
It’s perfect for busy weeknights or meal prepping. Throw a batch of these in the oven and you’re ready to go!
Ingredients for Homemade Chicken Croquettes
Making chicken croquettes is one of those dishes I love because it’s incredibly customizable and easy. Over the years, I’ve learned that having the right balance of ingredients can make or break the croquette.
I’ve made these for dinner parties, after-school snacks, and even for busy meal prep. The key is to keep things simple yet flavorful. Most of the ingredients are things you probably already have in your pantry or fridge. Here’s what I use to make croquettes that are crispy on the outside and deliciously moist on the inside:
Classic Chicken Croquette Base
- Shredded Cooked Chicken: You can use leftover roast chicken, rotisserie chicken, or even cooked chicken breasts. Personally, I prefer using rotisserie chicken because it’s already packed with flavor and saves me time.
- Onion and Garlic: A small onion and some minced garlic are a must for that savory, aromatic base. I cook them in butter until they’re soft and sweet, releasing all their flavors.
- Butter and Flour: These are the building blocks for the creamy filling. The butter helps create a smooth roux (that’s a fancy chef term for the butter-flour mixture), and the flour thickens everything up into a nice base.
- Milk: I add a bit of milk to the roux to make it creamy and smooth. The milk helps bind everything together without making it too heavy. I usually go with whole milk, but you could swap it out for something lighter if you prefer.
Binding and Coating
- Eggs: I use two eggs in the mixture, which helps bind everything together. Then, I dip the croquettes in a light egg wash to help the breadcrumbs stick.
- Breadcrumbs (Panko or Regular): For the crispy crust, I use panko breadcrumbs. They’re light, crunchy, and create that extra crispy exterior I love. Regular breadcrumbs will work, but I highly recommend panko for the best texture.
- Seasoning: I keep it simple with salt, pepper, and a pinch of cayenne. Sometimes, I’ll throw in a bit of dried thyme or paprika for an extra kick, depending on what I’m in the mood for.
Optional Add-ins That I Love
- Cheese: I’ll throw in a handful of shredded cheddar or Swiss cheese if I’m feeling fancy. It adds a creamy richness inside the croquette.
- Fresh Herbs: Parsley is my go-to herb. It adds a burst of freshness and a bit of color.
- Veggies: You can get creative here. Some finely chopped celery or green onions add extra flavor and texture. If you want a more hearty version, add some mashed potatoes to the mix for a more filling croquette.
U.S. Pantry Brands I Use
- Hellmann’s Mayo: This brand is a staple in my kitchen. It’s creamy, not too tangy, and works beautifully in the croquette mixture.
- Progresso or 4C Breadcrumbs: I love these brands for their quality breadcrumbs. Progresso is a classic, and 4C’s panko gives me the crispy texture I need.
- Kirkland Chicken Stock: When I need a bit more chicken flavor in the mix, I’ll use a splash of chicken stock. Kirkland’s chicken stock (from Costco) is my go-to — it’s rich and full of flavor.
Step-by-Step: How to Make Chicken Croquettes in the Oven
Now that we’ve got all our ingredients ready, let’s get into the fun part — making the croquettes! Trust me, this process isn’t complicated. It’s just a little mixing, rolling, and baking. And the result? Pure crispy, savory goodness. Whether you’re making them for a family dinner or as a snack, this is the method that’s never let me down.
Step 1 — Make the Chicken Mixture
The first step is all about creating a creamy, flavorful base for the croquettes. This is where you can really get creative with flavors.
- Cook the onions and garlic: In a medium saucepan, melt about 2 tablespoons of butter over medium heat. Add the diced onion and minced garlic. Stir them around for a couple of minutes until they’re soft and fragrant. You want the onions to be golden, not browned, to avoid any bitterness.
- Make the roux: Add 3 tablespoons of flour to the pan. Stir continuously to make a roux (just a fancy word for flour and fat cooked together). Let the mixture cook for a minute to get rid of that raw flour taste.
- Add the milk: Slowly pour in 1 cup of milk, whisking as you go to avoid any lumps. Keep whisking until the mixture thickens and becomes a smooth paste. This will be the base that holds everything together.
- Add the chicken: Now, fold in your shredded chicken, making sure it’s evenly coated with the creamy mixture. Add salt, pepper, and any extra seasonings (like cayenne or paprika) to taste. I always taste it at this point to check if it needs more seasoning.
- Chill the mixture: Once the chicken mixture is ready, cover it and stick it in the fridge for at least 30 minutes. Chilling helps firm up the mixture, making it easier to shape into croquettes. Trust me, it makes a huge difference.
Step 2 — Shape and Coat the Croquettes
Now comes the fun part — shaping the croquettes! I always feel like a kid in a kitchen when I roll them into those little golden balls. Here’s how I do it:
- Scoop the mixture: Take a spoon (or an ice cream scooper if you’ve got one) and scoop about 1 tablespoon of the chicken mixture. Roll it into a ball or oval shape in your hands. I prefer oval-shaped croquettes because they hold together well and look a little more rustic.
- Set up a coating station: In a shallow dish, put about 1/2 cup of flour. In another bowl, beat one or two eggs. Then, place a generous amount of breadcrumbs (about 1-2 cups) in a third dish. This is the breading process, so make sure each croquette gets a good coating.
- Coat the croquettes: Roll each chicken ball first in the flour, then dip it into the egg, and finally coat it in the breadcrumbs. For extra crispiness, I double-coat mine — once through the egg and breadcrumbs, then back in for a second dip.
- Place on a baking sheet: As you coat each croquette, place them on a parchment-lined baking sheet. Be sure to leave a little space between them to ensure they cook evenly.
Step 3 — How to Bake Chicken Croquettes in the Oven
Once the croquettes are shaped and coated, it’s time for the oven magic.
- Preheat the oven: Set your oven to 400°F (200°C). If you’re using a convection oven, even better! The circulating air gives them an extra crispy finish.
- Spray with oil: To get that golden-brown crispiness, lightly spray the croquettes with cooking spray or drizzle them with a bit of olive oil. It helps them turn that perfect shade of golden brown while baking.
- Bake the croquettes: Put the baking sheet in the oven and bake for about 18–22 minutes. I recommend flipping them halfway through so they get nice and even on both sides. You’ll know they’re done when they’re golden and crispy all over.
- Final check: If you’re not sure if they’re done, just cut one open. The filling should be hot all the way through, and the outside should be crunchy. If they need a little more time, pop them back in for another 3-5 minutes.
My Go-To Oven Tools for Crispy Chicken Croquettes
As much as the ingredients matter, the right tools in the kitchen can make all the difference. I’ve spent a lot of time testing different pans and tools, trying to find the ones that help me get the crispiest, most evenly cooked chicken croquettes without a deep fryer. Trust me, it’s all about making the right choices in your kitchen gear. Here’s what I’ve learned over the years.
Best Pans for Baking Croquettes
When I first started baking croquettes, I used whatever baking sheet was lying around. But I quickly learned that not all baking sheets are created equal. To get the perfect crisp without overcooking the inside, the material of your baking sheet matters.
- Nordic Ware Aluminum Sheet Pans: These are my absolute go-to. They heat evenly and don’t warp in the oven, even after multiple uses. They’re a workhorse in my kitchen, and I trust them for everything from cookies to croquettes. If you don’t have one, I highly recommend it.
- USA Pan Perforated Sheet: This pan has perforated holes that help air circulate better around the croquettes. This results in a crispier texture, especially on the bottom. If you want that extra crunch, this one’s a great choice. It’s also non-stick, which makes cleanup super easy.
- Lodge Cast Iron Skillet (for toasting): Sometimes I finish my croquettes off in a hot skillet for a few seconds after they come out of the oven. It gives them an extra crunchy texture that’s hard to beat. The Lodge cast iron retains heat beautifully and makes for a great tool if you’re looking for that extra crisp.
Can You Use a Toaster Oven for Croquettes?
You might be wondering if a toaster oven can do the job, especially if you’re only making a small batch. Well, I’ve used my toaster oven plenty of times to make croquettes, and it does the job just fine — with a few adjustments.
- Yes, But Use the Right Setting: If you’re using a toaster oven, set it to convection bake if it has that setting. The fan helps distribute the heat evenly and gives you that perfect golden brown exterior. Just remember to keep an eye on them, as toaster ovens can heat up quickly.
- Breville Smart Oven Air: I’ve tried several toaster ovens, but the Breville Smart Oven Air is the one I always go back to. It’s got multiple settings, including an air fryer option, which can be handy if you want a super crispy exterior without deep frying. Set it to 375°F and bake for about 15–18 minutes, flipping halfway through.
Nonstick Spray vs. Brushed Oil
I used to go straight to my olive oil bottle and drizzle a bit over the croquettes before baking, but I found that spraying oil works better for an even coating.
- Nonstick Spray: I’ve tried a bunch of different sprays, but my favorite is Pam Olive Oil Spray. It gives an even coat without being too heavy. I lightly spray each croquette before baking to get that golden, crispy texture.
- Brushed Oil: If I’m feeling a bit fancy, I’ll brush on a bit of avocado oil instead. It’s a healthier option, and it has a high smoke point, making it perfect for baking at high temperatures. Just don’t go too heavy, or the croquettes will get soggy instead of crispy.
The Power of a Good Oven Thermometer
If you’re baking in an older oven, it’s essential to check your oven’s actual temperature against what you’ve set. I learned this the hard way when I burned a few batches of croquettes because my oven was running hotter than I thought.
- Oven Thermometer: I use a simple Taylor Precision Oven Thermometer to make sure my oven is accurate. It’s easy to use, inexpensive, and gives me peace of mind knowing my temperature is right. If your oven tends to overheat, this is a must-have tool to keep your croquettes from burning.
Silicone Baking Mats for Cleanup
I love using silicone baking mats because they make cleanup a breeze. No more scrubbing sticky bits off your baking sheet.
- Silpat Nonstick Baking Mat: This is my go-to when I’m baking anything that might stick. It’s reusable, durable, and ensures my croquettes don’t stick to the pan. Plus, it’s much easier to clean than parchment paper, which can get soggy with all the oil.
How to Make Crispy Chicken Croquettes in Oven Without Frying
I get it — when you think of croquettes, the first thing that probably comes to mind is deep-frying them to get that golden, crispy crust. But after years of making these little bites, I’ve learned that baking them in the oven is not only easier, but it can also give you the same crispy texture without all the extra grease.
Let me share a few tricks I’ve picked up that take these croquettes from “okay” to “wow” in terms of crispiness. And no, we’re not going to deep-fry them in oil. Here’s how I make sure they come out perfectly crispy from the oven.
Use Panko Instead of Fine Breadcrumbs
Okay, I’m going to be honest here — if you’re using regular breadcrumbs, you might be missing out on the best texture. Panko is a game-changer. It’s light, airy, and gives a much crunchier result. Here’s why I swear by it:
- Light and Crispy: Panko breadcrumbs are coarser and larger than regular ones, which gives you a crunchier, airier coating. This helps create that perfect crisp without the need for frying.
- Better Coverage: The larger flakes cover the croquettes better and more evenly, so you get a full, consistent crunch all around.
I always use Kikkoman Panko Bread Crumbs or Ian’s Panko for this. They’re my go-to U.S. brands, and I’ve found they give me the best results.
Chill the Mixture First
Here’s a trick I learned the hard way — if you don’t chill your chicken mixture before you shape the croquettes, they’ll fall apart when you try to bake them. The mixture needs to firm up in the fridge to hold its shape better.
- Why Chill?: When the mixture is cold, it firms up, making it easier to scoop and shape. It also helps the breadcrumbs stick better during the coating process. If you skip this step, you’ll likely end up with croquettes that are too soft and don’t hold together well.
- Time for Chilling: Aim to chill the mixture for at least 30 minutes. You could also chill them for an hour if you’ve got the time. I usually prepare the mixture in the morning and shape the croquettes right before dinner.
Spray or Drizzle Oil Generously
Here’s another secret to getting that golden, crispy texture: don’t skimp on the oil. Now, I’m not telling you to drown the croquettes in oil, but you definitely need to coat them lightly.
- Oil for Crispiness: I like to use a cooking spray to lightly coat the croquettes. It’s an even way to add just the right amount of oil without overdoing it. A quick spritz before baking is all you need for that golden brown crunch.
- Avocado Oil: If I want to get a little fancy, I’ll drizzle a bit of avocado oil over them before baking. It’s a healthier fat with a high smoke point, so it’s perfect for getting a crispy exterior without compromising flavor.
Bake at a High Temperature (400°F is Perfect)
High heat is the key to getting that perfect crisp. I bake my croquettes at 400°F. This temperature allows the outside to crisp up quickly while keeping the inside warm and tender.
- Why Not Lower?: If you bake at a lower temperature, the croquettes might turn out soft instead of crispy. Plus, they could dry out, which isn’t what we want. The higher heat locks in moisture and crisps up the breading beautifully.
Flip for Even Crisping
I know you’re eager to get those croquettes in your belly, but I recommend flipping them halfway through the baking process. This ensures both sides get equally golden and crispy.
- How Long to Bake?: Bake your croquettes for about 18–22 minutes at 400°F. After about 10 minutes, carefully flip them to make sure they’re evenly browned. If you’re making a big batch, keep an eye on them — some might cook faster than others depending on their size.
Frozen Chicken Croquettes: How to Bake Them Right
Sometimes, life gets busy. I know that feeling when you want a quick snack or meal, but you don’t have time to make everything from scratch. That’s when frozen chicken croquettes come in handy. They’re perfect for those days when you just want something crispy and comforting without the hassle.
The best part? You can get that same crispy, golden crust from frozen croquettes in the oven. Here’s how I bake them so they come out just as good as homemade.
Brands I’ve Tried (U.S. Grocery Stores)
I’ve tried my fair share of frozen chicken croquettes over the years, and while homemade is always best, some frozen options come pretty close to the real deal. Here are a few brands I trust:
- Stouffer’s: Their chicken croquettes are always a solid choice. The texture isn’t too dense, and the filling is flavorful. Plus, they’re usually easy to find at most major grocery stores.
- Publix and Wegmans: Both of these stores have their own house-brand frozen chicken croquettes. I find that these tend to have a lighter, more delicate breading compared to other frozen brands, which is great if you’re craving a crispy snack.
- Marie Callender’s: They offer frozen croquettes as part of their comfort food line. While the taste is pretty good, the texture can sometimes be a bit soft, so I’ve learned to bake them at a slightly higher temperature for extra crispness.
If you have a favorite local or national brand, feel free to use it. But if you’re new to frozen croquettes, these options are a great place to start.
How Long to Bake Frozen Chicken Croquettes
One of the most common questions I get asked is, “How long do frozen chicken croquettes take to cook in the oven?” The answer is straightforward, but there are a few tricks to get them just right.
- Preheat the oven: I always start by preheating my oven to 425°F (220°C). This higher temperature helps get the croquettes crispy and golden. If you’re using a convection oven, that’s even better! The air circulation helps crisp up the outside faster.
- Bake Directly from Frozen: There’s no need to thaw the croquettes. Just pull them straight from the freezer and place them on a baking sheet. This helps maintain their shape and ensures they cook evenly.
- Bake Time: Frozen chicken croquettes generally take about 25–28 minutes in the oven. However, I recommend flipping them halfway through the cooking time (around 12-14 minutes) to get an even golden crust on both sides.
- Check for Crispiness: After 25 minutes, I like to check one croquette by cutting it in half. The inside should be hot and the crust should be crispy. If they’re not as golden as I like, I’ll pop them back in for another 3-5 minutes.
Toaster Oven Tips for Frozen Croquettes
If you’re using a toaster oven, which I do when I’m only making a small batch, there are a couple of tweaks to keep in mind:
- Use Convection Mode: Set your toaster oven to convection bake (if it has that setting). The fan will circulate the hot air around the croquettes, helping them crisp up better than just regular bake mode.
- Don’t Overcrowd: I make sure to space out the croquettes on the toaster oven tray so the air circulates around them. If you overcrowd them, they might steam instead of getting crispy.
- Cooking Time: For toaster ovens, I generally bake at 375°F for about 15–18 minutes, flipping halfway. It’s quicker, so keep an eye on them!
My Favorite Dips and Sides for Oven-Baked Chicken Croquettes
What’s a chicken croquette without a delicious dip or a side to go with it? I don’t know about you, but I can’t imagine eating these crispy little bites without something to complement them. Over the years, I’ve tried a bunch of different sides and sauces, but these are the ones I always come back to. They’re simple, tasty, and, most importantly, they take these croquettes to the next level.
Garlic Aioli
Let’s start with the classic dip I can’t get enough of: garlic aioli. This creamy, garlicky goodness pairs perfectly with the crispy texture of croquettes. It’s easy to make, and once you try it, you’ll never want to dip your croquettes in anything else.
- How to Make Garlic Aioli:
- Combine 1/2 cup of mayonnaise, 1 tablespoon of lemon juice, and 1 clove of garlic (minced).
- Add a pinch of salt and pepper to taste.
- Whisk everything together until it’s nice and smooth.
If you’re in a rush, you can just use store-bought mayo and add garlic powder, but making it fresh is always worth it. The creamy aioli complements the crispy croquettes perfectly.
Spicy Honey Mustard
If you like a little heat with your croquettes, this spicy honey mustard is your new best friend. The sweetness of the honey and the tanginess of the mustard balance each other out, with just enough spice to keep things interesting.
- How to Make Spicy Honey Mustard:
- Mix 1/4 cup of Dijon mustard, 2 tablespoons of honey, and 1/2 teaspoon of cayenne pepper (or more if you like it spicy).
- Stir well until everything is blended.
- I like to let it sit for 10-15 minutes for the flavors to meld together.
This dipping sauce adds a punch of flavor that elevates the croquettes, and it’s so easy to make.
Chipotle Ranch
For those who love a creamy dip with a bit of smokiness, chipotle ranch is the way to go. It has a great balance of creamy, smoky, and a little bit of heat — perfect for pairing with croquettes.
- How to Make Chipotle Ranch:
- Mix 1/2 cup of ranch dressing with 1-2 tablespoons of chipotle in adobo sauce (depending on how spicy you like it).
- Stir in a squeeze of lime and a pinch of paprika for extra flavor.
It’s smoky, creamy, and has just the right amount of kick. I make this often, and it’s a crowd-pleaser every time.
U.S.-Inspired Sides
Now that we’ve covered the dips, let’s talk about some sides that go hand-in-hand with croquettes. You know how much I love a balanced plate, so here are a few sides that I always pair with my oven-baked croquettes.
Mashed Potatoes with Roasted Garlic
I’ll be honest — I make mashed potatoes a lot. But when I want to step it up, I roast some garlic and mix it in. The creamy potatoes paired with the crispy croquettes are just unbeatable.
- How to Make Roasted Garlic Mashed Potatoes:
- Roast 2-3 garlic cloves in olive oil at 375°F for 20-25 minutes until soft.
- Boil 2 lbs of potatoes until tender, then mash them with the roasted garlic, butter, and a bit of cream.
- Add salt and pepper to taste.
The garlic gives the mashed potatoes a depth of flavor that pairs perfectly with the mildness of the croquettes. Plus, it’s a U.S. classic that never fails.
Coleslaw with Apple Cider Vinegar
For a lighter side that brings a bit of tanginess to balance out the richness of the croquettes, I love making coleslaw with apple cider vinegar. It’s refreshing and crunchy, making it the perfect side dish.
- How to Make Coleslaw with Apple Cider Vinegar:
- Shred cabbage and carrots and toss them together.
- In a bowl, whisk together 1/4 cup apple cider vinegar, 1 tablespoon of Dijon mustard, 1 tablespoon of honey, and a pinch of salt and pepper.
- Pour the dressing over the vegetables and toss to coat. Let it sit in the fridge for 30 minutes to let the flavors come together.
The vinegar cuts through the richness of the croquettes, adding a nice balance to the meal. This side is also great if you’re preparing a big meal ahead of time — it holds up well in the fridge.
Roasted Vegetables
When I’m looking for a side that’s healthy and easy, I always turn to roasted vegetables. Whether it’s broccoli, carrots, or Brussels sprouts, roasting vegetables brings out their natural sweetness and pairs perfectly with crispy croquettes.
- How to Roast Vegetables:
- Toss your favorite veggies in olive oil, garlic, salt, and pepper.
- Roast at 400°F for 20-25 minutes, flipping halfway through, until they’re golden and tender.
This side is not only delicious, but it’s also an easy way to add some veggies to your plate. Plus, you can prep everything in advance and throw it in the oven while the croquettes bake.
Reheating Leftover Chicken Croquettes in the Oven
Now, I don’t know about you, but sometimes I make more chicken croquettes than I can eat in one sitting. And while they’re amazing fresh out of the oven, I’ve learned that they can still be pretty darn good when reheated — as long as you know the tricks. No soggy croquettes here!
If you’ve ever tried reheating croquettes in the microwave, you know it’s a disaster waiting to happen. They come out soggy and limp — definitely not the crispy texture we’re after. But the oven? The oven’s your best friend when it comes to reheating croquettes. Here’s how I make sure they stay crispy and delicious, even on round two.
How to Reheat Croquettes Without Losing Crispiness
Reheating croquettes in the oven is the key to keeping that satisfying crunch. Here’s the process I follow to bring my leftover croquettes back to life:
- Preheat Your Oven: Start by preheating your oven to 375°F. This temperature is high enough to get the croquettes crispy without overcooking the inside.
- Use a Baking Sheet: Line a baking sheet with parchment paper or a silicone mat to prevent sticking and ensure even heating. I like to make sure the croquettes aren’t crowded, so they get that golden crisp all around. This also allows air to circulate around them for a better result.
- Spray Lightly with Oil: Just like when you bake them fresh, I lightly spray the croquettes with oil or give them a quick drizzle. This helps revive that crispy texture.
- Reheat for 10–12 Minutes: Place your leftover croquettes in the oven and heat them for about 10–12 minutes. If you’ve got a larger batch, or if they’re especially thick, you might need a few extra minutes, but keep an eye on them. You’ll know they’re ready when they’re heated all the way through and the outside is golden and crispy.
- Flip Halfway: If you’re reheating a larger batch, I suggest flipping them halfway through to ensure even crisping on both sides.
Toaster Oven Reheat Trick
If you’ve got a toaster oven, it’s a great option for reheating a smaller batch of croquettes. It works just as well as the regular oven but in less time. Here’s my trick for toaster oven reheating:
- Set the Toaster Oven to Convection Bake: If your toaster oven has a convection setting, use it. The fan circulates the heat and helps crisp the croquettes up evenly, just like when they were freshly baked.
- Temperature and Time: Set your toaster oven to 375°F and bake for 8–10 minutes, flipping them halfway through. The small, efficient space in the toaster oven works wonders for getting them extra crispy.
Avoid the Microwave!
I’ve tried microwaving leftover croquettes in a pinch, but it’s never a good idea. The microwave can’t give you that crispy texture we all love — instead, you get a soggy mess. If you don’t have time to use the oven, here’s what I suggest:
- Quick Fix: If you’re in a real rush and just need to warm them up fast, try microwaving them covered with a damp paper towel for about 30–40 seconds to prevent them from drying out. Then, pop them under a broiler for 1-2 minutes to crisp them up. It’s a quick cheat, but it works in a pinch.
Common Mistakes When Baking Chicken Croquettes
I’ve made almost every mistake in the book when it comes to baking chicken croquettes — and I’ve learned from each one. If you’re like me, you don’t just want something that tastes good, you want it to be perfect. So, let me save you some time and share a few things to avoid when making these crispy little bites. These are the mistakes I’ve made (and some you can learn from):
Mistake #1: Skipping the Chill Step
I can’t tell you how many times I’ve skipped chilling the mixture, thinking I could get away with it. Let me tell you: don’t do it. When you skip this step, the croquettes are more likely to fall apart in the oven, and the breadcrumbs won’t stick as well.
- Why You Should Chill the Mixture: Chilling the chicken mixture helps it firm up, making it easier to shape into croquettes. It also keeps everything from falling apart when it’s time to coat them in breadcrumbs.
- What Happened to Me: I learned this lesson the hard way when I tried to make a batch without chilling them. They ended up being a crumbly mess, and I had to redo everything. Now, I always chill the mixture for 30 minutes minimum.
Mistake #2: Using the Wrong Breading
Not all breadcrumbs are created equal, and using regular breadcrumbs instead of panko can seriously affect the crispiness. Panko breadcrumbs are light, airy, and give that extra crunch we all love.
- Why Panko Works: Panko is coarser and larger than regular breadcrumbs, so it creates a lighter, crispier crust that holds up better in the oven.
- What Happened to Me: Early on, I used regular breadcrumbs thinking it wouldn’t make a difference. The result? A much denser and less crispy texture. Panko is a game-changer, and I highly recommend it if you want that perfect crunch.
Mistake #3: Not Preheating the Oven
I get it — sometimes you’re in a rush. But trust me, preheating the oven is essential. If you toss your croquettes in an unheated oven, you’ll end up with uneven cooking and, worse, soggy croquettes.
- Why Preheating Matters: Preheating helps the croquettes cook evenly from the moment they hit the pan. If your oven is too cold, the coating can get mushy before it has a chance to crisp up.
- What Happened to Me: A few times, I didn’t wait for the oven to preheat and tossed them in early. The result was an uneven texture — some parts were soggy, and others were overcooked. Now, I make sure my oven is fully preheated to 400°F before I even think about putting the croquettes in.
Mistake #4: Overcrowding the Baking Sheet
I’ve definitely tried to fit too many croquettes on a baking sheet in one go, thinking I could speed things up. But this is another mistake you’ll want to avoid.
- Why Overcrowding is a No-No: When croquettes are too close together, they steam instead of getting crispy. If the air can’t circulate around them, the result is soft, soggy croquettes instead of that golden, crispy exterior.
- What Happened to Me: I remember cramming them onto one baking sheet, only to pull out a batch of limp croquettes that had no crunch whatsoever. Now, I make sure they have a little breathing room — I’ll either cook in batches or use multiple sheets.
Mistake #5: Not Using Enough Oil
Some people think using less oil is healthier, but here’s the thing: you need enough oil to get that crispy, golden exterior. If you go too light on the oil, the breadcrumbs won’t crisp up the way you want.
- Why Oil is Important: A light spritz or drizzle of oil before baking helps the breadcrumbs get golden and crisp without being greasy. It’s all about balance.
- What Happened to Me: I’ve skimped on the oil in the past to avoid the calories, but I ended up with dry croquettes that lacked the satisfying crunch. I now always use a good spray of olive oil or avocado oil to get that perfect golden finish.
Final Thoughts from a Real Kitchen
Making chicken croquettes in the oven has become one of my favorite go-to meals. Over the years, I’ve tested and tweaked every step to perfect that golden, crispy exterior and juicy interior — and it’s paid off. If you’ve followed along so far, you’re already on the path to mastering these delicious bites.
I used to be intimidated by the thought of making croquettes, especially since they’re often fried. But the oven method has completely changed the game for me. I get all the crunch with none of the mess. And now, whenever I crave something crispy, I don’t hesitate to grab some shredded chicken, toss a few ingredients together, and bake my croquettes.
Here’s what I’ve learned over the years:
- You don’t need to deep-fry: Baking in the oven is quicker, cleaner, and gives you just as much crispy satisfaction. Once I made that switch, I never looked back.
- Simple ingredients go a long way: You don’t need to complicate things. Shredded chicken, a few pantry staples, and a sprinkle of seasonings are all you need for that classic croquette flavor.
- The little details matter: Chilling the mixture, using panko breadcrumbs, and making sure your oven is preheated — these small steps make a huge difference in the final result. Don’t skip them!
- Leftovers are just as good: Don’t worry if you have leftover croquettes. Reheating them in the oven gives them that same crispy texture you loved the first time. It’s a win-win.
So, whether you’re cooking for a crowd, prepping meals for the week, or just making a quick snack, these oven-baked chicken croquettes will never disappoint. They’ve become a staple in my kitchen, and I know they’ll be a hit in yours too.
FAQs: How to Cook Chicken Croquettes in the Oven
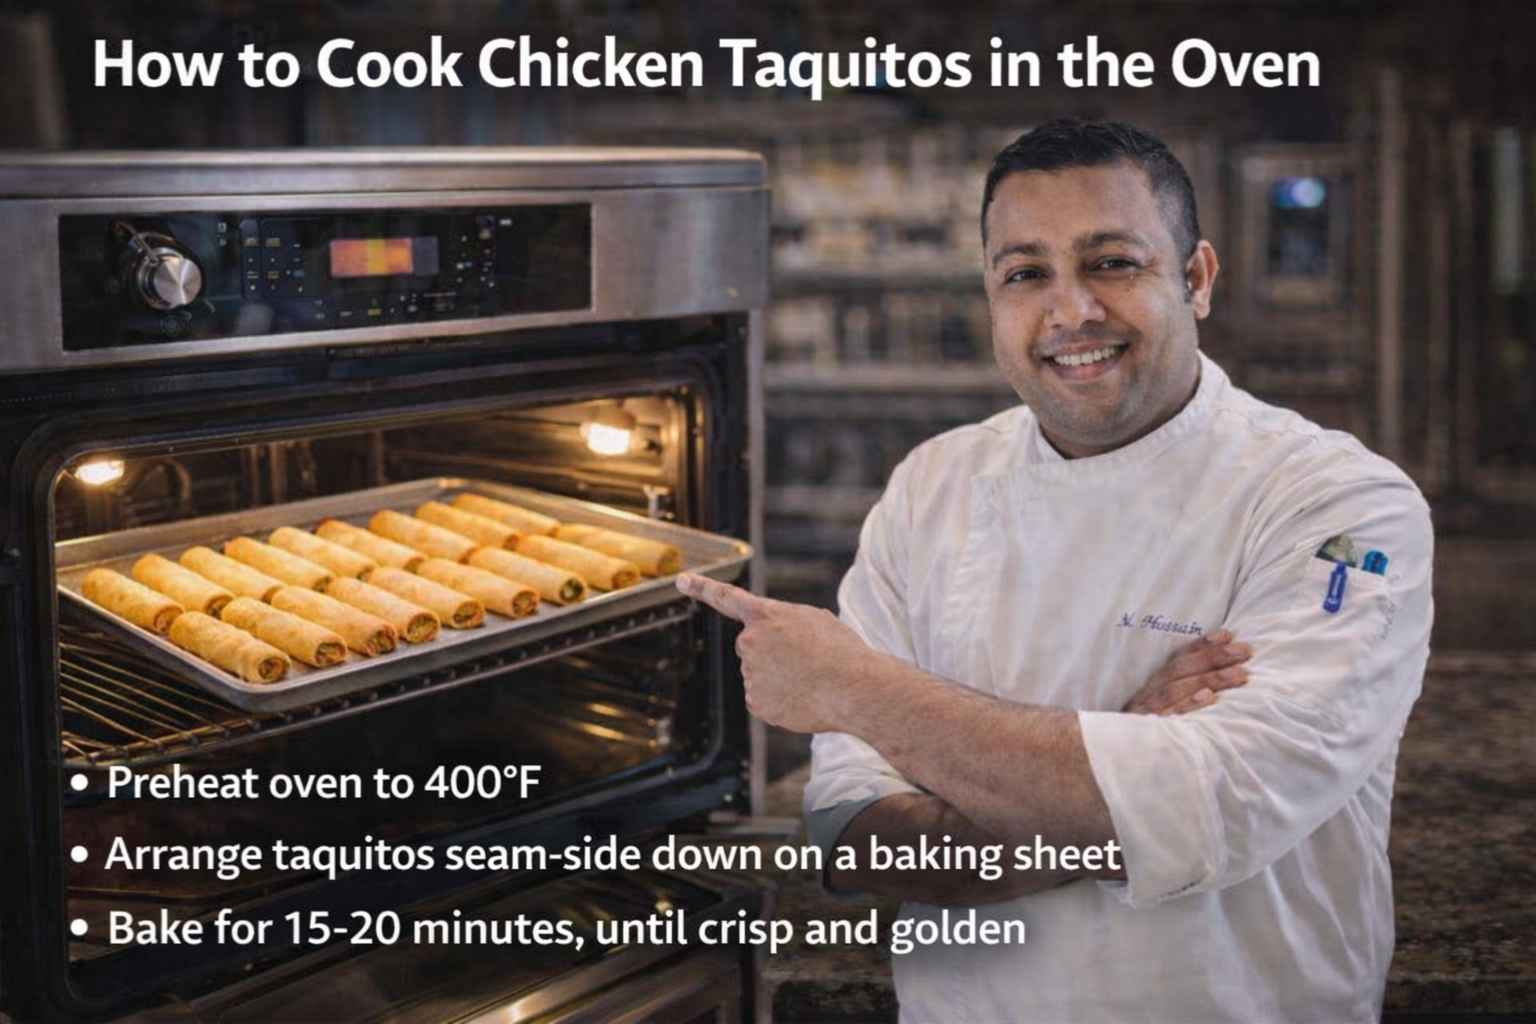
How to cook chicken croquettes in the oven without frying?
Place breaded croquettes on a lined baking tray. Bake at 400°F (200°C) for about 15–20 minutes. Turn once so they cook evenly and get a crisp, golden crust.
What temperature is best for chicken croquettes in the oven?
The best oven temperature is 400°F (200°C). This heat helps chicken croquettes cook fast and turn crisp outside while staying soft and juicy inside.
How long should chicken croquettes bake in the oven?
Most chicken croquettes bake in 15–20 minutes. Flip them halfway through so both sides brown well and cook evenly in the oven.
Can I make crispy chicken croquettes in the oven?
Yes. Brush the croquettes lightly with oil before baking. This simple step helps oven-baked chicken croquettes turn crisp and golden without deep frying.
Can you cook frozen chicken croquettes in the oven?
Yes, you can bake frozen chicken croquettes in the oven. Cook them at 400°F (200°C) for about 20–25 minutes until hot inside and crisp outside.