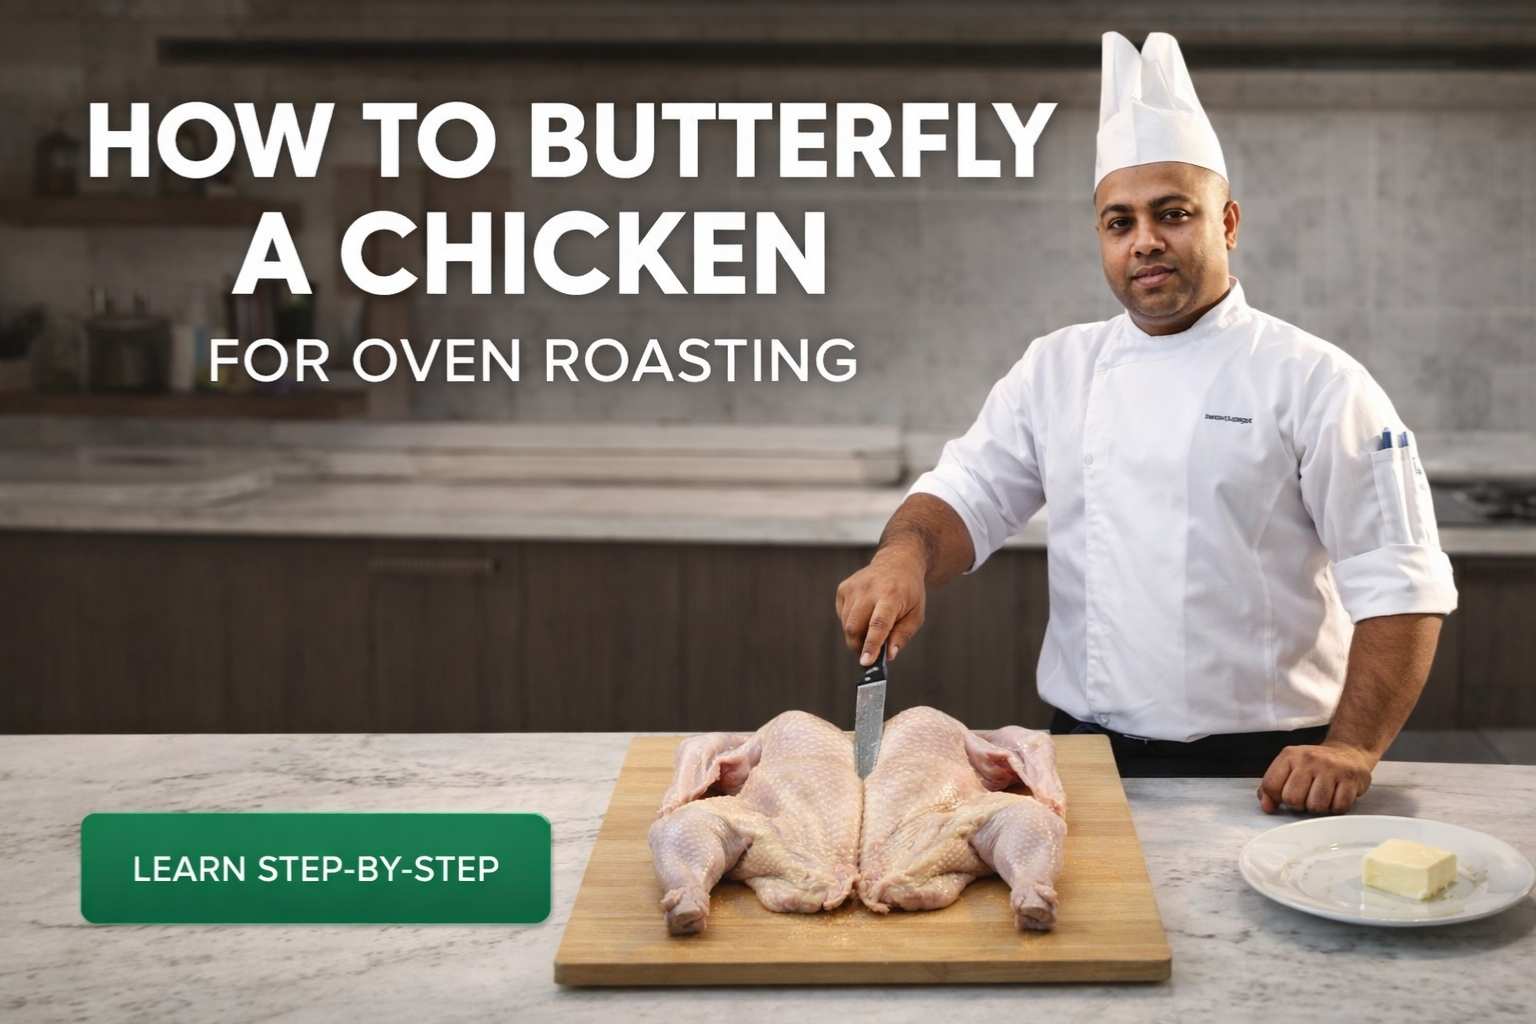
I still remember the first time I learned How to Butterfly a Chicken for Oven Roasting. It felt like opening a secret door in the kitchen. The bird cooked faster, the skin turned crisp, and the flavor went deep. If you love simple oven meals, this trick will change the way you roast chicken.
As a cook and food blogger, I use this method all the time. How to Butterfly a Chicken for Oven Roasting helps the chicken cook evenly and stay juicy. It is one of the easiest ways to get that golden, crispy roast we all crave. If you are new to oven cooking, you may also enjoy my guide, The Complete Guide to Using an Oven at Home.
In this guide, I will show you the simple steps to butterfly a whole chicken. You will learn why chefs love this method and how it improves oven roasting. Grab a pair of kitchen shears and come cook with me. By the end, you will roast chicken like a pro.
Table of Contents
ToggleWhy I Started Butterflying My Chicken Instead of Roasting It Whole
I didn’t grow up butterflying chicken. To be honest, I didn’t even know what the word meant until a couple of years ago.
It all started on a Sunday. I was hosting dinner for a few friends — nothing fancy. Just a whole roasted chicken, some rosemary potatoes, and those mini green beans I love tossing with garlic butter. I had everything timed out, or so I thought.
The skin looked golden. The timer beeped. I let it rest like a pro. Then I carved into the bird… and my heart sank.
The thighs were pink-pink. Like, “I-hope-no-one-gets-sick” pink.
Meanwhile, the breast meat was already on the dry side. Everyone at the table was polite about it. Smiled. Nibbled. One of my friends quietly dipped a piece into the wine glass “by accident.”
I felt like crawling under the table.
The Google Search That Changed Everything
That night, I was determined to figure out what went wrong. The chicken had been in for over 90 minutes! I ended up deep-diving into cooking forums, and one term kept popping up:
“Spatchcocking” or “butterflying” a chicken.
I watched a few quick videos. One chef, with hands like mine — callused, stained, practical — just cut out the backbone like it was nothing. Flattened the bird. Roasted it in under an hour. Juicy, golden, even browning. Looked like magic.
So, next weekend, I tried it.
My First Attempt — in a Tiny Chicago Oven
I had just moved into a small apartment in Chicago. The kitchen was barely bigger than my pantry back home in Florida. But that didn’t stop me. I grabbed some kitchen shears from Target, laid the bird breast-side down on my $10 cutting board, and went for it.
Was it perfect? No.
- I cut slightly crooked and nicked a wing.
- My baking sheet was a little too small, so juices spilled.
- I forgot to dry the skin, so it steamed more than crisped.
But guess what? It cooked evenly. The thighs were juicy. The breast was juicy. And I didn’t have to nervously stab the thermometer 14 times.
Why I Switched — And Never Looked Back
Now, I butterfly nearly every chicken I roast in the oven.
- It cooks faster.
- It cooks evenly — huge deal in gas ovens, which run hot on one side.
- The skin actually crisps up, especially when I use my convection setting.
Whether I’m roasting in a full-size Frigidaire oven or my Breville countertop one in the summer, butterflying just works.
And it’s not about showing off technique. It’s about making dinner smoother, faster, and way less stressful.
What Is Butterflying (a.k.a. Spatchcocking) a Chicken?
When I first heard the term “butterfly a chicken,” I imagined something fancy — like folding napkins into swan shapes or slicing vegetables into flowers. Turns out, it’s much more useful. And not fancy at all.
Butterflying (or spatchcocking, depending on who you ask) is basically the shortcut I wish I’d learned years ago. It’s a smart, no-fuss way to roast a whole chicken flat — so it cooks faster, browns better, and doesn’t leave you guessing if the thighs are done.
It’s Like Opening a Book — But With a Chicken
Here’s the simplest way I explain it now:
Butterflying means cutting the chicken’s backbone out so you can flatten it like a book.
Once you remove the backbone, you just press down on the breastbone to break it slightly. That lets the bird lay flat on your baking sheet or roasting tray. No more “tower of chicken” where the breasts cook fast and the legs lag behind.
I usually hear folks call it spatchcocking in BBQ circles or Southern kitchens. In culinary school, they called it butterflying. It’s the same thing. Just sounds fancier in French.
Why Butterflying Is a Game-Changer for Oven Roasting
Most U.S. ovens — especially the electric ones in apartments — don’t circulate heat super evenly. Butterflying solves that.
When the chicken is flat:
- The legs and thighs are exposed to more heat.
- The breast isn’t towering over everything else.
- Hot air hits the skin everywhere, not just the top.
That’s especially helpful in older gas ovens where one side runs hotter. I had one in Phoenix — chicken would brown on one side and stay pale on the other unless I rotated the pan like I was spinning a pizza.
It’s Also a Space-Saver
This matters more than people think.
When you butterfly the chicken, it fits easier on:
- Sheet pans (I use a 13×18 half sheet)
- Lodge cast iron griddles
- Even countertop ovens like the Breville Smart Oven Air
I’ve even roasted half a butterflied chicken in my friend’s camper oven while on a road trip through Utah. It fit perfectly, and we ate like kings under the stars.
Wait — Is It Safe to Cut Through Bones?
Yes. I was a little hesitant the first time too.
But once I started using kitchen shears (and not a dull knife), it felt easy. The bones along the spine are soft enough to snip through, and once it’s out, the rest is simple.
I save the backbone for broth or freeze it in a bag labeled “soup gold.”
Tools I Use to Butterfly a Chicken Easily
You don’t need a chef’s toolkit to butterfly a chicken. I’ve done it in beach house rentals, my first college apartment, even at a friend’s cabin in Vermont where the cutting board was basically a pizza box.
But there are a few tools that make the job way smoother — and safer.
Kitchen Shears > Knives. Every Time.
I learned this the hard way.
The first time I tried to butterfly a chicken with a chef’s knife, I ended up sawing, slipping, and almost slicing my thumb. Not fun.
Now, I only use sturdy kitchen shears. Here’s what works best for me:
- OXO Good Grips or Henckels shears — strong enough to cut through bone, but still comfy in the hand.
- Look for shears with a serrated edge — they grip slippery skin better.
- I avoid plastic-handled ones from dollar stores. They usually jam at the joint.
If you cook chicken more than once a month, good shears are worth it. I use mine for spatchcocking, cutting herbs, trimming parchment, everything.
Cutting Board That Doesn’t Slide Around
I’ve had a chicken squirt right off a smooth board once. Total mess. Lesson learned.
Now I always do one of two things:
- Use a cutting board with rubber grips on the bottom (mine’s from OXO).
- Or lay a damp paper towel or dishcloth under the board to keep it from moving.
And if I’m dealing with a big bird, I go for a larger board — 15×20 if I’ve got the space. Gives me elbow room.
Paper Towels and Disposable Gloves
I keep a roll of paper towels nearby whenever I butterfly chicken. They help with:
- Drying the skin before cutting (less slippery)
- Wiping the shears if they get messy mid-cut
- Quick cleanup without cross-contaminating the sink
When I’m prepping chicken in summer — especially in Florida — I’ll wear nitrile gloves. Raw chicken juice + humidity = bacteria party. Gloves help keep it clean.
Optional: Boning Knife (If You’re Feeling Fancy)
Sometimes I want the breastbone removed too — like when I’m doing a more formal roast or cutting it into quarters later.
A boning knife or small paring knife helps with:
- Loosening cartilage near the center
- Popping out the keel bone cleanly
But 9 times out of 10, I skip this and leave the breastbone in. The chicken still lays flat and roasts beautifully.
Sheet Pan + Cooling Rack Combo (Bonus Tip)
Once the bird is butterflied, I place it on a rack set over a foil-lined sheet pan. That way:
- Hot air flows underneath
- Skin stays crisp, even underneath
- Clean-up is way easier
If you’ve ever scraped baked-on chicken fat off your pan with a spoon, you’ll appreciate this.
Step-by-Step: How I Butterfly a Chicken for Oven Roasting
Here’s the honest truth — the first time I tried to butterfly a chicken, I fumbled. I wasn’t sure which side the backbone was on (I know, I know). I cut halfway, panicked, and ended up with a lopsided bird.
But now? I can do it with one hand on my coffee and the other on the shears. It’s become second nature — and I’m going to walk you through exactly how I do it at home.
No fluff. No chef-y jargon. Just what works.
Step 1: Pat the Chicken Dry
Before I do anything, I take the chicken out of the fridge and let it sit for 20–30 minutes on the counter. This helps it cook evenly — not straight from icy cold to blazing oven.
Then I:
- Remove packaging, giblets, anything hiding inside.
- Use paper towels to pat it dry — especially the skin and cavity.
Dry skin gives me better grip with the shears and leads to better browning later.
Step 2: Place the Chicken Breast-Side Down
This tripped me up at first.
You want the chicken lying breast-side down, back facing up. That way, the backbone is exposed and easy to cut.
I make sure the neck side is closest to me — easier for the first cut.
Pro tip: If you’re not sure which side is which, the wings will be tucked under the breast — use that as your guide.
Step 3: Cut Along One Side of the Backbone
Time for the shears.
- I start from the tail end (where the butt is) and snip up one side of the backbone, all the way to the neck.
- You’ll hear light cracking — that’s normal.
- I keep the shears close to the spine so I don’t accidentally slice into the thigh meat.
It doesn’t have to be perfect. Sometimes my line’s a little wavy. Still works.
Step 4: Repeat on the Other Side
Now I go down the other side of the backbone to fully remove it.
Once it’s out, I either:
- Toss it in a zip bag for future broth, or
- Roast it right alongside the chicken for snacks (it gets crispy!)
Step 5: Flip It Over and Press Down
Here comes the satisfying part.
- I flip the chicken breast-side up, legs splayed out.
- Then I press down firmly on the center of the breastbone until it cracks.
You’ll feel a little “pop” — that’s what you want. It means the bird will lay nice and flat.
Sometimes, if I’m being stubborn or the bird’s big, I’ll use both hands and lean my weight into it.
Step 6: Trim and Tuck
Last touches before seasoning:
- I tuck the wing tips underneath so they don’t burn in the oven.
- I trim off any excess fat or loose skin near the tail.
- If there’s still moisture on the skin, I give it another gentle pat.
Now it’s ready for dry brine, rub, or straight to the oven.
How I Season and Prep a Butterflied Chicken
Once the chicken is butterflied, the real fun starts — seasoning. This part is personal for me. What I use depends on the day, the weather, or what’s sitting on my counter. But I do follow a few core steps every single time. They help lock in flavor and make sure the skin crisps up just right in the oven.
My Favorite Spice Rubs for Oven Roasting
I’ve tried dozens over the years — dry rubs, wet marinades, bottled seasonings. But here are the ones that hit every time:
My basic go-to mix:
- 2 tsp smoked paprika
- 1.5 tsp garlic powder
- 1.5 tsp onion powder
- 1 tsp kosher salt
- 1 tsp black pepper
- ½ tsp dried thyme or rosemary
Sometimes I’ll add:
- A pinch of cayenne for heat
- Lemon zest for brightness (especially in spring or early summer)
When I’m roasting for company, I often rub some butter mixed with herbs under the skin. Not necessary — but it makes the meat extra juicy, and it smells amazing.
Dry Skin = Crispy Skin
This one changed the game for me.
After seasoning, I don’t oil the skin. I used to — thinking olive oil would help it brown. But I found that oil can actually prevent true crisping in a regular oven (especially at lower temps).
Instead, I:
- Pat the skin dry again if needed
- Press the spice rub firmly into the skin with dry hands
If I’m prepping ahead, I’ll cover the chicken and let it rest in the fridge for a few hours or overnight. That dry brine effect helps tighten the skin and pull flavor in deeper.
My Thoughts on Marinades
I don’t usually marinate butterflied chicken for roasting.
Why? Because:
- Wet marinades make the skin soggy
- They tend to burn in a high oven
- I find dry seasonings give better control
But — if I do marinate (say, for a yogurt-based tandoori-style roast), I always wipe off the excess before baking and add a fresh dry rub on top. That gives you the flavor without the mushy skin.
When I Prep Ahead
If I know I’ll be busy the next day, I’ll butterfly and season the chicken the night before. It rests on a rack, uncovered, in the fridge. That:
- Dries the skin
- Deepens the flavor
- Makes dinner feel easy after a long workday
Just remember to take it out of the fridge 30 minutes before roasting, or you’ll end up with uneven cooking — cold bones, hot skin. I learned that the hard way on a rainy Tuesday.
How to Cook a Butterflied Chicken in the Oven
Now that our chicken is butterflied and perfectly seasoned, it’s time to get it in the oven. This is where the magic happens — the skin crisps, the meat stays juicy, and your kitchen starts smelling like a Sunday feast.
Best Oven Temperature for Butterflied Chicken
I’ve tried all sorts of temps over the years. My rule of thumb now:
- 425°F for regular ovens — this gives the skin a great golden color without drying the meat.
- 400°F for convection ovens — the fan circulates heat, so a slightly lower temp avoids over-browning.
I’ve also done it in a gas oven in Miami. Gas can run hotter on one side, so I rotate the pan halfway through. Even small ovens like my Breville countertop version handle this beautifully if you leave the chicken flat.
Rack Position and Pan Choice
I always place the chicken on:
- A rack over a baking sheet — lets hot air circulate underneath for even cooking.
- Foil-lined sheet pans for easy cleanup.
- Sometimes a cast iron roasting pan (I love Lodge or Staub) if I want deeper roasting flavor.
Rack height matters too. I usually roast on the middle rack so heat isn’t too close to the top element. This keeps the wings from burning while letting the thighs cook fully.
How Long to Cook a Butterflied Chicken in the Oven
Timing varies by weight, but here’s my go-to guide for a 3.5–4 lb chicken:
- Conventional oven: 40–50 minutes
- Convection oven: 35–45 minutes
I always check internal temperature:
- Breast: 160–165°F
- Thigh: 175°F
I’ve learned the hard way that oven timers are helpful but never perfect — every oven is different. I keep a digital thermometer in the bird to make sure it’s juicy and safe.
Tips for Even Cooking
- Rotate the pan halfway if your oven has hot spots.
- Tuck the wing tips under the bird — prevents burning.
- Don’t overcrowd the pan — air needs space to circulate around the chicken.
Let It Rest Before Carving
After the chicken is out, I tent it loosely with foil for 10–15 minutes. This:
- Redistributes the juices
- Keeps the breast from drying out
- Maintains that perfectly crisp skin
Once I carve it, the thighs and breasts are juicy, tender, and ready for whatever side I’ve whipped up.
How to Cook a Spatchcock Chicken in a Convection Oven
If you’ve got a convection oven — like a Breville Smart Oven Air or a full-size Whirlpool convection — you’re in for a treat. Cooking a butterflied (spatchcock) chicken in convection is my favorite method for crispy skin and evenly roasted meat.
It’s faster, cleaner, and honestly a little magical compared to conventional roasting.
Why Convection Changes the Game
Convection ovens have a fan that circulates hot air around the chicken. Here’s what I notice:
- Skin crisps more evenly, top and bottom.
- Thighs and breasts finish at the same time — no guessing.
- The oven heats faster, so total cook time drops by 5–10 minutes.
I first realized this in my Arizona kitchen last summer. With 100°F outside and the oven cranked, my old Frigidaire electric made the whole apartment feel like a sauna. Convection saved me both time and sweat.
My Convection Oven Setup
Here’s how I do it at home:
- Preheat the oven to 400°F.
- Place a rack over a foil-lined sheet pan. Elevating the chicken lets air flow under the bird.
- Lay the butterflied chicken breast-side up. Make sure the wings are tucked.
- Slide it into the middle rack for even browning.
I like to check on it halfway. The first time I tried convection, I skipped rotation and the skin on one side browned faster. Lesson learned: a quick 90° turn fixes hot spot issues.
Adjusted Cooking Time
In my experience:
- 3.5–4 lb chicken: 35–45 minutes
- Check internal temps: Breast 160–165°F, Thigh 175°F
Even with convection, I still use a thermometer. I’ve seen beautiful golden-brown skin and a breast that’s slightly undercooked — no bueno. Convection speeds cooking, but it doesn’t replace safety checks.
Tips for Perfect Convection Roasts
- Let the chicken rest at room temp for 30 minutes before roasting. Cold birds can cook unevenly.
- Don’t cover with foil while cooking — the circulating air is what crisps the skin.
- If wings or legs start browning too fast, tent them lightly for a few minutes.
I’ve roasted in small U.S. kitchens, big suburban ovens, even on countertop convection units — this method works anywhere. The chicken comes out juicy, tender, and evenly browned every time.
Mistakes I’ve Made — So You Don’t Have To
I’ve roasted more chickens than I can count, and believe me — I’ve made plenty of mistakes. Some were minor, some were embarrassing. Sharing them here so you can avoid the same traps.
Even as a pro cook, the oven can humble you.
Cooking Cold Chicken Straight From the Fridge
One Tuesday, I was running late and shoved a cold chicken straight into the oven.
- Result: crispy skin on top, ice-cold thighs underneath.
- Lesson: let it sit 20–30 minutes at room temp before roasting. Cold bones cook slower, skin cooks faster.
Forgetting to Tuck Wing Tips
Early on, I ignored this step. By the time the bird was done:
- Wing tips were charred black.
- The smell? Smoke alarm-worthy.
- The taste? Bitter and unpleasant.
Now, I always fold wings under the body. Small step, huge difference.
Cutting the Wrong Way
First few times, I panicked and cut near the breast instead of along the backbone.
- Bird ended up lopsided.
- One leg partially detached.
- Lesson: always start on the backbone side — it’s stronger and easier to remove.
Using a Too-Small Pan
Nothing ruins an otherwise perfect roast like a cramped pan.
- Air can’t circulate, so bottom steams instead of roasts.
- Skin stays soft instead of crisping.
- Pro tip: leave 1–2 inches around the chicken on all sides.
Overcrowding With Sides
I once roasted carrots and potatoes on the same pan as a butterflied bird.
- Carrots steamed.
- Potatoes burned in some spots, pale in others.
- Now I either roast sides separately or use a second sheet pan.
Not Using a Thermometer
I’ve relied on oven timers too many times.
- Result: overcooked breasts, undercooked thighs.
- Solution: a digital thermometer is your best friend.
- Breast 160–165°F, Thigh 175°F — it’s foolproof.
These mistakes taught me patience and precision. Every botched roast made me a better spatchcock chef.
What I Serve with Oven-Roasted Butterflied Chicken
Butterflying a chicken isn’t just about faster cooking — it’s about creating a full meal that’s effortless and flavorful. After all, the sides matter just as much as the bird itself. Over the years, I’ve developed a few go-to pairings that make dinner satisfying without overcomplicating prep.
Crispy Potatoes Roasted in the Same Pan
I almost always throw potatoes on the same sheet pan as the chicken.
- Cut into wedges or small cubes
- Season with salt, pepper, and a little smoked paprika
- Let them soak up chicken drippings
Nothing beats pulling the pan from the oven and seeing golden potatoes with crispy edges. In my Chicago apartment, even my tiny Breville oven managed this beautifully.
Roasted Carrots or Brussels Sprouts
Vegetables are easy to toss on a separate pan or alongside the chicken if there’s room.
- I add them halfway through to avoid burning
- A little olive oil and garlic works wonders
- Finish with a pinch of salt and fresh herbs
In Florida summer, I sometimes roast carrots in the convection oven to save energy and heat — the fan keeps the air circulating and the skin crisp.
Lemon-Dill Yogurt Sauce
I like something cold to contrast the hot, crisp chicken.
- Mix plain Greek yogurt with fresh dill and a squeeze of lemon
- Add a pinch of salt and garlic powder
- Serve as a dipping sauce or drizzle over slices
It’s refreshing, light, and balances the richness of the roasted bird. I use this a lot when entertaining friends in the suburbs — it looks fancy without fuss.
Crusty Bread or Garlic Rice
Depending on the day:
- Crusty bread is perfect for soaking up juices
- Garlic rice works well for weeknight dinners when I want something quick and comforting
I’ve even served butterflied chicken with roasted sweet potatoes in New England, pairing the sweet and savory flavors with a drizzle of herb butter. It’s simple but feels elevated.
Quick Tips from My Experience
Rotate pans if using multiple trays — convection helps, but hot spots exist.
Let sides cook at their own pace, but don’t forget about timing.
Use same sheet pan for small veggies to save dishes.
Should You Try This in a Small Apartment Oven?
I’ve roasted butterflied chickens in all kinds of kitchens — from spacious suburban setups to tiny Chicago apartments where the oven is basically a glorified toaster. Let me tell you, it works, but there are a few things you need to keep in mind.
Even if you live in a small space, you can get crispy skin and juicy meat without filling your kitchen with heat or smoke.
What Works in a Countertop Oven
- Mini ovens like the Breville Smart Oven Air or Ninja Foodi handle butterflied chickens surprisingly well.
- You may need to halve the bird if it’s too big for the tray.
- Always use a rack so air circulates under the chicken — otherwise, the bottom can steam instead of roast.
I did this once in a cramped RV kitchen while traveling through Utah. Chicken came out perfectly golden and the tiny convection fan saved the day.
Summer Cooking Without Roasting the Apartment
In hotter months, especially in places like Florida or Arizona, your oven can quickly turn your apartment into a sauna. Here’s how I manage:
- Preheat the oven quickly and only when ready to cook
- Use convection if available — it reduces cooking time
- Open a window or turn on a vent fan to pull out heat
Even in a tiny kitchen, I’ve had a full butterflied chicken roast in under 45 minutes without making the whole room unbearable.
My Weeknight Dinner Strategy
Butterflied chickens are a weeknight hero. Here’s my approach:
- Butterfly the chicken in the morning
- Season or dry brine, then refrigerate
- Roast it after work — dinner in under an hour
- Pair with a quick side like roasted potatoes or a salad
It saves time, keeps the meat juicy, and makes weeknight cooking feel manageable — even in apartments with small ovens.
Final Thoughts — Why I Keep Coming Back to This Method
After years of experimenting with roasting chickens, I can say with confidence: butterflying is my go-to method. It’s not just a “chef trick” — it’s practical, reliable, and makes dinner feel effortless, no matter the oven or the season.
It’s My Weeknight Hero
I’ve cooked butterflied chickens after long days at work, in small city apartments, and even while traveling.
- Quick cooking: 35–50 minutes, depending on oven size and convection use.
- Even doneness: thighs and breasts finish at the same time.
- Juicy meat: skin crisps, meat stays moist.
For me, this method has replaced the guesswork that comes with roasting whole birds.
Great for Guests — Looks Fancy, Feels Easy
I’ve hosted friends with minimal prep time:
- Sliced perfectly roasted chicken on a platter
- Golden skin, juicy meat — everyone impressed
- Minimal cleanup thanks to sheet pans and foil-lined trays
Even in small apartments or summer kitchens, it feels like a restaurant-worthy roast without stress.
Works in All U.S. Oven Types
From gas ovens in Miami to electric ones in Chicago and convection countertop units in Arizona, butterflying adapts.
- Gas ovens: watch for hot spots, rotate pan halfway
- Electric ovens: middle rack, higher temp works best
- Convection: lower temp, faster cook, evenly browned skin
No matter the setup, the result is reliably crisp and juicy.
Makes Me Feel Like a Pro — Even in a Messy Apron
There’s something satisfying about flattening a bird, seasoning it, and knowing it will come out perfect.
- Slight imperfections in the kitchen? Doesn’t matter.
- Cracks in the breastbone? Adds character.
- Slightly wobbly wings? Still perfectly roasted.
Butterflying has made me a more confident cook, and I love sharing that with anyone willing to try it.
FAQs: How to Butterfly a Chicken for Oven Roasting
How do I butterfly a chicken for oven roasting?
To butterfly a chicken for oven roasting, use shears to cut out the backbone. Press the breast bone to lay it flat. This helps it cook fast and stay very moist.
Why should I butterfly a chicken for oven roasting?
When you butterfly a chicken for oven roasting, the meat cooks evenly. The skin gets extra crisp in the heat. It is a great way to save time and get a juicy bird.
What tools do I need for this cooking method?
You just need sharp kitchen shears and a flat pan. Use the shears to cut the bone out with ease. A good pan helps the heat reach all parts of the bird for a top meal.
Can I cook the bird at a high heat once flat?
Yes, you can. A flat bird can take high heat well. This makes the skin brown and crisp while the meat stays soft. It is the best way to roast a whole bird fast.
Does a butterflied chicken taste better?
Many think so! Since it lays flat, you can season every part. The heat hits the meat from all sides. This locks in the juice and gives you a bold, rich taste in each bite.