
Hey, I’m Mossaraof — a professional cook and food blogger.
Some nights, you just want dinner on one pan and less mess in the sink. That is why I love How to Bake Chicken on a Sheet Pan. It is simple, fast, and full of flavor. One tray goes in, and a full meal comes out.
I have tested this method in small city kitchens and hot summer homes where the oven feels like a space heater. Over the years, I learned how to bake chicken breasts at 400F, how long to cook chicken on a sheet pan, and how to get crisp edges without dry meat. A good sheet pan chicken dinner is like a calm friend. It makes life easier.
In this guide, I will show you step by step how to season chicken, add fresh veggies, and bake it right on one tray. You will learn easy timing tips and safe oven temps. If you are new to baking, you can also read my full guide here The Complete Guide to Using an Oven https://oveninsights.com/the-complete-guide-to-using-an-oven-at-home/.
Let’s turn your sheet pan into your best kitchen tool and make juicy oven baked chicken tonight.
The Magic of One Pan Meals
It’s not just about saving time, although that’s certainly a perk. It’s the simplicity of it. Throw some chicken on a sheet pan, season it, and let the oven do the heavy lifting. No crazy steps. No need to babysit a frying pan.
One of my go-to weeknight dinners is a simple how to cook chicken thighs in a pan and oven combo. The chicken comes out crispy on the outside, juicy on the inside, and all in one pan. Add some veggies, and you’ve got yourself a full meal without multiple pots and pans. It’s easy, and honestly, it feels like a little magic every time.
The U.S. Oven and Sheet Pan Love Affair
Now, living in different parts of the U.S. has taught me a thing or two about ovens. In Florida, I had an old, stubborn gas oven that I had to adjust the temperature on constantly. In Arizona, the dry heat made everything cook faster than I expected. Here in Chicago, well, the oven still tries to burn everything, but I’ve learned to trust my trusty Pyrex® glass baking dishes and an oven thermometer.
What’s amazing about sheet pan cooking, though, is it adapts. It’s as versatile as your oven. Whether you have a brand-new GE or a quirky Frigidaire, sheet pan chicken works because of its simplicity. It doesn’t demand too much precision, and you can count on it coming out well, even if your oven has its own unique “personality.”
Preparing the Perfect Chicken for Your Sheet Pan
When it comes to cooking chicken on a sheet pan, preparation is key. I’m not a fan of over-complicating things, but getting the chicken just right can make all the difference in texture and flavor. Let’s break down how I choose my cuts, season them, and get them ready for their oven debut.
Choosing the Right Chicken Cuts
The beauty of sheet pan chicken is its versatility — you can cook just about any cut. But some work better than others depending on the texture you’re aiming for.
Here’s how I approach it:
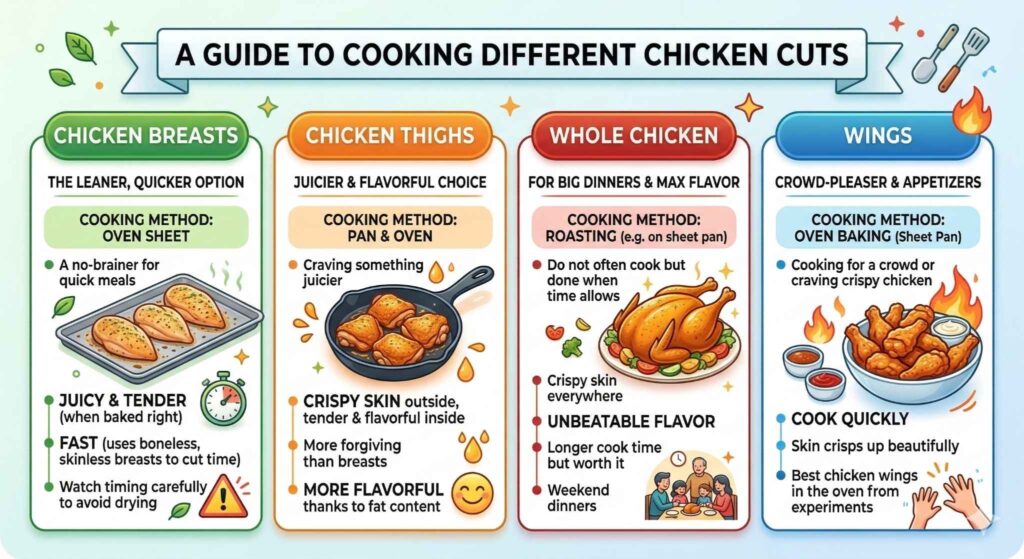
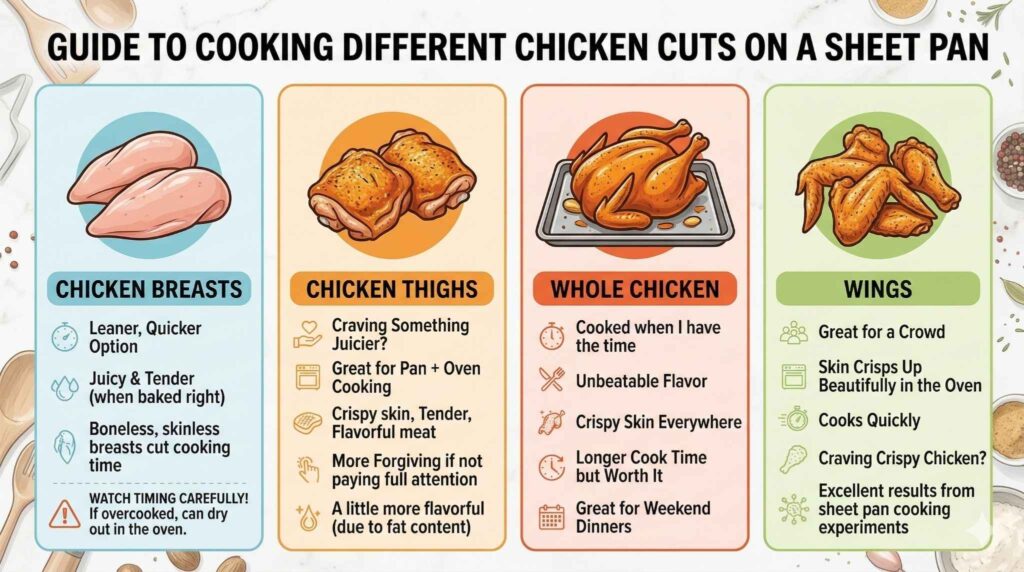
- Chicken Breasts: For a leaner, quicker option, how to cook chicken breast in oven sheet is a no-brainer. You’ll get a juicy, tender piece of chicken when baked right. I usually go for boneless, skinless breasts to cut down on cooking time. It’s fast, but you’ve got to watch the timing carefully. If overcooked, chicken breast can dry out in the oven.
- Chicken Thighs: If I’m craving something juicier, chicken thighs are my go-to. I love them for how to cook chicken thighs in a pan and oven. They come out with crispy skin on the outside and tender, flavorful meat inside. Thighs are more forgiving than breasts, especially if I’m not paying full attention. They’re also a little more flavorful thanks to the fat content.
- Whole Chicken: I’ll be honest, I don’t often cook a whole chicken on a sheet pan, but it’s definitely something I’ve done when I have the time. The advantage? You get crispy skin everywhere, and the flavor is unbeatable. It’s a bit of a longer cook time but worth it for the weekend dinners.
- Wings: If I’m cooking for a crowd or craving some crispy chicken, wings always hit the spot. They cook quickly, and the skin crisps up beautifully in the oven. I’ve had some of the best chicken wings in the oven from my sheet pan cooking experiments.
Seasoning for Maximum Flavor
I’ve learned over the years that seasoning is where I can really make a dish stand out, even with simple chicken. You don’t need anything fancy — just some basic spices that you likely already have in your pantry.
Here’s my go-to blend:
- Olive oil: It helps the seasoning stick and gives the chicken a nice golden color.
- Garlic powder: I put this in everything. It adds a savory depth.
- Smoked paprika: Just a bit for that smoky flavor.
- Salt & pepper: To taste, of course.
- Lemon zest (sometimes): I love the freshness it adds, especially for chicken breasts.
I drizzle olive oil over the chicken, then sprinkle the seasonings on both sides. If I’m feeling fancy, I’ll marinate the chicken for 30 minutes to an hour. But honestly, I’ve cooked plenty of delicious sheet pan chicken without marinating, especially when I’m short on time.
Prepping Your Chicken Like a Pro
- How long to cook chicken breast in oven pan: When I cook chicken breast, I set the oven to 375°F and bake for about 20-25 minutes, depending on the size. That’s my sweet spot for juicy, tender chicken without drying it out.
- Searing Before Baking: When I have the time, I’ll pan-sear the chicken before baking. This helps to lock in the flavor and get a nice, crispy texture on the outside. I’ll heat some oil in a skillet on medium-high heat, sear the chicken for about 2–3 minutes on each side, then transfer it to the sheet pan to finish in the oven. It’s a little extra effort, but the result is worth it — especially for skinless chicken breasts.
- How to make chicken not stick to pan in oven: One of the worst things is when the chicken sticks to the pan, especially after all that seasoning. I’ve learned the hard way that a good non-stick spray or a sheet of parchment paper goes a long way. I’ll line my sheet pan with parchment paper for easy cleanup and to prevent sticking. It also helps the chicken cook evenly, since the parchment paper allows the heat to circulate better than foil.
Sheet Pan Cooking Techniques I Use for the Best Results
Cooking chicken on a sheet pan isn’t just about throwing it in the oven and hoping for the best. There are a few techniques I’ve developed over the years that make the process smoother and ensure everything comes out tasting like it was made by a pro — even if I’m just winging it on a busy weeknight.
The Importance of Preheating Your Oven
I can’t stress this enough: preheating your oven is key. I’ve been guilty of tossing food in before the oven is fully up to temp, and it always leads to uneven cooking. Preheating ensures that the chicken cooks evenly, and it helps get that perfect crispiness — especially on chicken skin.
When I’m baking chicken on a sheet pan, I set the oven to 375°F (for breasts) or 400°F (for thighs and wings). I always give the oven at least 10 minutes to preheat before sliding in my pan. It might seem like a small thing, but I’ve noticed a big difference in how evenly the chicken cooks, and it helps avoid that frustrating “undercooked in the middle” problem.
Layering for Even Cooking
One of the best things about sheet pan cooking is how efficient it is, but spacing out your chicken is important. I’ve learned the hard way that overcrowding the pan leads to uneven cooking. The chicken releases juice and creates steam, and if everything is too close together, you get soggy, unevenly cooked chicken.
Here’s how I like to arrange everything:
- I lay the chicken pieces out in a single layer, making sure there’s space between each piece. This allows air to circulate, ensuring even cooking and that nice golden color on all sides.
- If I’m adding veggies (carrots, potatoes, etc.), I keep them separate from the chicken — but also give them space. I might place the veggies around the chicken, but I never pile them on top.
If the chicken pieces are crowded, they’ll end up steaming instead of roasting, and that’s a big no-no when you’re aiming for that crispy skin or golden-brown crust. This is especially true for how to cook chicken wings in the oven. You want to see the crispy edges, not mushy skin.
Timing Is Everything
The tricky part of sheet pan cooking is timing — getting the chicken cooked just right while ensuring the veggies don’t overcook or burn. It’s a balancing act, but with some practice, you’ll know exactly when to take each part out.
Here’s how I do it:
- For chicken breasts: I usually bake them at 375°F for 20–25 minutes. If they’re thick, I’ll add a few extra minutes. I’ve found that covering the chicken with foil for the first 15 minutes helps lock in moisture, then I uncover it for the last 10 minutes to get that beautiful golden top.
- For chicken thighs: I bake these at 400°F for 30–35 minutes, depending on the size. They’re a bit more forgiving than chicken breasts, so I don’t worry too much if they go a few minutes over — they just get juicier.
- For wings: These go into the oven at 400°F for 25–30 minutes. The skin crisps up beautifully, and the meat stays juicy. If I’m feeling fancy, I’ll broil them for the last 2 minutes for an extra crispy finish.
Using Convection for Even Cooking
If you have a convection oven, you’re in luck. I’ve baked sheet pan chicken in both regular and convection ovens, and while they both work well, convection gives me a faster, more even result. The fan circulates the heat, helping the chicken cook more evenly and quickly.
- How to cook chicken in convection oven sear pan: I’ve learned that a convection oven requires a slightly lower temperature than a regular one, so I usually drop it by 20°F. I also reduce the cook time by about 5 minutes. The fan ensures the chicken cooks evenly and stays crispier, especially on the skin.
I always check the chicken towards the end of cooking by cutting into the thickest part and making sure the juices run clear. That’s my go-to trick for knowing it’s done without the fuss of a thermometer.
Avoiding Common Sheet Pan Mistakes
Here are a few mistakes I’ve made (and learned from) over the years:
- Overcrowding the pan: Like I said before, this is a big mistake. If you crowd the pan, the chicken doesn’t roast — it steams. The skin gets soggy, and that crispy texture is lost.
- Not using enough oil or fat: I used to skip the oil to make it a “healthier” option. Big mistake! A bit of oil or cooking spray helps the chicken brown and prevents it from sticking to the pan. I also use a cast-iron pan sometimes, and the seasoning helps with this, but for sheet pan chicken, I prefer something like parchment paper or non-stick spray.
- Ignoring the vegetables: If you’re adding veggies, don’t forget about them! Veggies like potatoes or carrots need a little extra time, so I usually start those first or cut them into smaller pieces to get them to cook at the same pace as the chicken.
Troubleshooting Common Sheet Pan Issues (And How I Solve Them)
Even with all the tips and tricks I’ve learned over the years, things don’t always go perfectly. Whether it’s dry chicken, food sticking to the pan, or uneven cooking, I’ve faced it all. But don’t worry — I’ve figured out solutions along the way.
Dry Chicken – Here’s Why It Happens and How to Fix It
We’ve all been there: You’re looking forward to juicy, tender chicken, and then it comes out of the oven a little… well, dry. It’s one of the most common complaints I hear about baking chicken on a sheet pan, but fortunately, it’s avoidable.
Here’s why dry chicken happens:
- Overcooking: The most common reason for dry chicken is simply cooking it for too long. The longer you leave it in the oven, the more moisture escapes. Even chicken thighs, which are more forgiving, can dry out if you bake them too long.
- Not enough fat: Chicken breast, in particular, is lean, so it can dry out quickly in the oven without some added fat or moisture. That’s why I always drizzle a little olive oil or melted butter on top of my chicken before baking.
How I fix it:
- Use a meat thermometer: For perfectly cooked chicken, I recommend using a meat thermometer to make sure it’s done but not overcooked. I aim for 165°F in the thickest part of the chicken.
- Cover it with foil for part of the cooking time: When I bake chicken breasts, I’ll often cover the pan with foil for the first 15–20 minutes. This helps trap moisture. I uncover it in the last 10 minutes to get that crispy texture on the outside.
For extra juicy chicken, I’ll also baste it halfway through the cook time with its own juices or some extra marinade.
Chicken Sticking to the Pan
There’s nothing more frustrating than pulling a perfectly cooked sheet pan chicken out of the oven only to find it stuck to the pan. It can tear the skin or make it hard to get a clean serving.
Here’s why it happens:
- Lack of fat or oil: If you forget to oil the pan or use enough fat on the chicken, things are bound to stick.
- Using the wrong pan: Some pans just aren’t non-stick, and even parchment paper can sometimes fail if it’s not used correctly.
How I fix it:
- Use parchment paper or foil: I swear by parchment paper for sheet pan cooking. Not only does it prevent sticking, but it makes cleanup a breeze. Just make sure to lay the parchment paper flat so the chicken doesn’t touch the pan.
- Non-stick spray: I always lightly spray my pans with non-stick spray (even if I’m using parchment paper) to ensure the chicken comes off easily.
- Don’t forget the oil: Drizzling olive oil or vegetable oil over the chicken is crucial. It adds flavor and creates a barrier between the chicken and the pan, preventing it from sticking.
For extra crispy skin, I also like to sear the chicken in a skillet before placing it on the sheet pan. This not only helps seal in the juices but also gives the chicken a head start on getting that perfect golden brown.
Uneven Cooking
I’ve had my fair share of unevenly cooked chicken — it’s frustrating when one side is perfectly done, and the other is raw. The cause? It’s usually poor air circulation or overcrowding.
Why it happens:
- Crowding the pan: If the chicken pieces are too close together, they’ll trap steam and moisture, which can lead to soggy, uneven cooking.
- Inconsistent oven heat: All ovens are a little different. Some spots cook faster than others (hello, hot spots). So, one piece of chicken might get cooked faster than the others.
How I fix it:
- Space out the chicken: I always make sure the chicken is spread out evenly on the pan, with plenty of room for the heat to circulate around each piece. If I’m baking multiple pieces, I’ll use two sheet pans to avoid overcrowding.
- Rotate the pan halfway through: When I bake chicken on a sheet pan, I always rotate the pan halfway through the cooking time. This ensures even cooking on both sides, especially if you’re dealing with an oven that has hot spots.
- Use a convection oven: If you have a convection oven, use it. The fan circulates the heat more evenly, so you get better results. Just remember to lower the cooking temperature by 20°F if you’re using convection, as it cooks more efficiently.
Underseasoned Chicken
I’ve been guilty of not seasoning enough when I’m in a rush. That’s one of the fastest ways to make your chicken feel bland and dry. But seasoning doesn’t just mean sprinkling salt and pepper — it’s about layering flavors.
Why it happens:
- Not enough seasoning: A little salt and pepper can go a long way, but it’s not enough to bring out the chicken’s flavor. When you’re baking chicken, you need to go beyond the basics.
- Lack of marination: I don’t always have time to marinate, but when I do, it really makes a difference in flavor. Even a quick 30-minute marinade can infuse the chicken with much-needed moisture and depth.
How I fix it:
- Season generously: I use a good amount of salt and pepper, but I also add garlic powder, smoked paprika, and sometimes even a bit of cayenne pepper for heat. Don’t be shy with the spices.
- Use a marinade or dry rub: If I’ve got a little more time, I marinate the chicken for at least 30 minutes. You don’t need to go overboard — a simple lemon-garlic marinade works wonders. When I’m short on time, I’ll use a dry rub. It’s quick, easy, and still packs a punch of flavor.
Creative Twists to Try When Baking Chicken on a Sheet Pan
Sheet pan chicken is a classic for a reason, but sometimes I crave a little variety. It’s easy to get into a routine, but there are so many ways to get creative with your chicken while keeping things simple and delicious. Whether you’re adding veggies, playing with marinades, or switching up the protein entirely, these twists are guaranteed to shake things up in the best way.
Adding Vegetables and Sides Directly on the Sheet Pan
One of the reasons I love sheet pan meals is the ability to cook everything in one place. That means I can add vegetables alongside my chicken, and it all roasts together, taking on the flavors of the seasoning and juices from the chicken.
Here’s how I do it:
- Potatoes: I always keep baby potatoes or Yukon Golds on hand. They roast beautifully on the sheet pan and soak up the flavors from the chicken. I cut them into wedges, season them with olive oil, garlic, rosemary, and a touch of salt, and they cook alongside the chicken for a full meal.
- Carrots and Brussels Sprouts: These two veggies are my go-to when I need something easy. I’ll halve the Brussels sprouts and toss them with a bit of oil and seasoning before laying them on the sheet pan next to the chicken. The natural sweetness from the roasted carrots adds a nice contrast to the savory chicken.
- Broccoli and Cauliflower: These vegetables are super quick to cook and are great for adding some greens to the meal. I’ll drizzle them with olive oil and lemon juice and roast them until they’re just tender and slightly crispy on the edges.
The key to layering your vegetables and chicken on the same sheet pan is timing. I always cut my veggies into uniform pieces to ensure they cook evenly with the chicken. Potatoes take a bit longer than, say, broccoli, so I might add those a few minutes earlier.
Using Different Marinades for a Flavor Explosion
Marinades can completely change the flavor profile of your sheet pan chicken, and the best part is, they don’t need hours to work their magic. I’ve made a lot of how to cook chicken breasts in oven sheet dishes with just a quick marinade, and the result is always impressive.
Here are a few marinades I love:
- Lemon-Garlic Marinade: A simple but powerful combo. I mix fresh lemon juice, minced garlic, olive oil, and a pinch of salt. It’s perfect for how long to cook chicken breast in oven pan, and the acidity from the lemon helps tenderize the meat.
- Honey Mustard Marinade: This one’s a crowd-pleaser. I mix Dijon mustard, honey, olive oil, and a splash of apple cider vinegar. It’s tangy, sweet, and perfect for chicken thighs or breasts.
- Cajun Spice Marinade: When I’m craving something with a kick, I mix cajun seasoning, paprika, garlic, and olive oil. This marinade gives the chicken an amazing depth of flavor and a nice bit of heat without being overwhelming. It works wonders on how to cook chicken thighs in a pan and oven, giving that golden crispy skin.
- Soy Sauce and Ginger Marinade: This one’s perfect for when I want an Asian-inspired dish. Soy sauce, sesame oil, grated ginger, and a little honey create a rich marinade that makes the chicken juicy and flavorful. It’s a great option when I’m serving it with rice or stir-fried veggies.
These marinades work best with chicken that’s been in the fridge for 30 minutes to an hour. If I’m short on time, I’ll just give it a quick coat and let it sit while I prep the pan.
Going Beyond Chicken – Other Protein Options
While chicken is always my go-to, there are days when I want to shake things up and try different proteins on the sheet pan. I’ve had success with a variety of meats and even some non-traditional options.
- Pork Chops: How to cook pork chops on a sheet pan is surprisingly easy. I season them just like chicken (salt, pepper, garlic, and a little rosemary) and bake at the same temperature. They turn out juicy, with crispy edges, and they pair perfectly with the veggies on the pan.
- Salmon: This is a great option for a quick dinner. I’ll toss salmon fillets on the sheet pan with some olive oil, lemon zest, and fresh herbs. It cooks fast — about 15 minutes at 375°F — and the result is flaky, flavorful fish that pairs well with roasted vegetables.
- Shrimp: If I’m craving something lighter, I’ll make a sheet pan shrimp dinner. I season shrimp with garlic, lemon, olive oil, and a little chili flake for heat. These only need about 10-12 minutes in the oven and can be paired with any vegetable I have on hand. I like to use a slightly higher temperature, 400°F, to get the shrimp perfectly cooked without them turning rubbery.
- Vegetarian Options: I’ve also made sheet pan “chicken” using cauliflower or tofu for a plant-based twist. Tofu gets crispy and golden when baked at 400°F, and cauliflower takes on a nice flavor when tossed with a spice blend. It’s an excellent option when I want to serve a vegetarian or vegan meal.
How to Serve and Store Your Perfect Sheet Pan Chicken
Once your sheet pan chicken is perfectly roasted and golden, it’s time to think about how to serve and store it. The beauty of sheet pan cooking is that it’s a complete meal, so whether you’re serving it to your family, prepping for the week, or saving leftovers for later, there’s always a way to keep things easy.
Plating and Serving
One of the reasons I love sheet pan meals is the ease of serving. There’s no need to transfer everything to a fancy dish (though you can if you’re feeling extra).
- Serve Straight from the Sheet Pan: This is my go-to move. If I’m making dinner for my family, I place the entire sheet pan on the table. Everyone can grab a piece of chicken and load up on the roasted veggies, potatoes, or whatever else I’ve thrown on there. It’s casual, and no one has to wait for me to plate everything individually.
- Side Dishes: Even though sheet pan chicken already comes with vegetables, I sometimes add a quick side. Some of my favorites include:
- A simple green salad with a lemony vinaigrette to balance out the savory chicken.
- Rice or quinoa if I want something hearty. A quick sautéed garlic rice works wonders, or I’ll sometimes use leftover rice from a previous meal.
- Garlic bread or toasted rolls for a little extra indulgence.
- For Guests: If I’m serving sheet pan chicken for a casual dinner with friends or family, I’ll add a few more sides to make it feel more like a feast. Fresh corn on the cob or a fresh tomato salad goes perfectly with roasted chicken.
When I serve sheet pan chicken, I always make sure to have a few sauce options on the side. Whether it’s a creamy ranch dressing, a little BBQ sauce, or even sriracha mayo, it lets everyone customize their meal. A little extra flavor never hurts.
Storing Leftovers
Sheet pan chicken is perfect for meal prep, and it stores really well for a couple of days. Here’s how I keep it fresh, even after the meal is over.
- In the Fridge: Leftovers can be stored in airtight containers in the fridge for 3 to 4 days. I usually separate the chicken from any veggies I’ve roasted, just to keep everything from getting soggy. But honestly, a little moisture from the chicken can add flavor to the veggies when I reheat them.
- Reheating in the Oven: I don’t mind reheating leftovers because I’ve figured out a method that keeps everything moist and tasty. Here’s what I do:
- Preheat the oven to 325°F.
- Place the leftover chicken and veggies on a sheet pan (or a smaller baking dish if I don’t have enough for a full sheet pan).
- Cover with foil and bake for 15-20 minutes, or until heated through. This prevents it from drying out and gives the chicken a chance to stay juicy.
- If you want to get some of that crispiness back (especially for skin-on chicken), uncover the pan during the last 5 minutes.
- In the Freezer: If I’ve made a huge batch and want to save some for later, I’ll freeze the leftovers. I portion the chicken and veggies into separate freezer-safe containers or bags and store them for up to 3 months. Just make sure to label everything with the date so you don’t forget what’s in there.
When I’m ready to eat, I’ll thaw it overnight in the fridge and reheat it the same way as I do with fresh leftovers. The chicken still comes out flavorful and juicy after freezing, but I always recommend eating it within 2-3 months for the best taste.
Reheating Just One Piece of Chicken?
When I only have a few pieces of chicken leftover, I want a quick and easy way to reheat just one or two servings without drying it out. Here’s what I do:
- Toaster Oven: This is my go-to for reheating a single piece of chicken. I place it in the toaster oven at 325°F for 10-12 minutes. The heat is just right for keeping the chicken moist without making it tough.
- Microwave (When I’m in a Rush): If I’m in a hurry, I’ll microwave it. But I don’t just throw it in — I cover it with a damp paper towel to lock in moisture. 30-60 seconds depending on how big the piece is usually works, but I try to avoid going over that, so it doesn’t dry out.
- Cast-Iron Skillet (For Crispiness): When I want a crispy outside, I’ll reheat my chicken in a cast-iron skillet. I add just a little oil, heat it on medium, and cook the chicken for about 3-4 minutes on each side. The result? The skin gets crispy again, and the meat stays juicy inside.
Final Thoughts – Why I’ll Always Bake Chicken on a Sheet Pan
At the end of the day, no matter how many new cooking gadgets I try or fancy recipes I test out, sheet pan chicken will always have a special place in my kitchen. There’s something magical about how simple, delicious, and satisfying it is — and I’m willing to bet that most home cooks feel the same way.
The Simplicity and Versatility of Sheet Pan Cooking
I’ve had days where I just don’t feel like cooking, but sheet pan chicken comes to the rescue. It’s the kind of meal that requires minimal effort but still gives me that comforting, full-plate satisfaction. Whether I’m using how to cook chicken thighs in a pan and oven or just tossing a few chicken breasts on the sheet pan, it’s always a win.
What I really love about cooking chicken on a sheet pan is that it’s versatile. You can switch up the vegetables, change the seasoning, or even try a different protein — and it’ll still work. It’s about learning the fundamentals and knowing when to throw in a twist (like my go-to honey mustard marinade or switching up the veggies). I can customize it to match whatever mood I’m in, and it always comes out tasting like a winner.
Real Life in the Kitchen
I’ve cooked sheet pan chicken on so many occasions — from busy weeknights when I’m barely hanging on, to Sunday meals when I’m feeling more relaxed and want to get creative with the seasoning. Each time, the experience is different, but the outcome is always comforting. And when the family gathers around the table, no one’s complaining about the meal.
The truth is, it’s those little wins in the kitchen — like the perfect sheet pan dinner — that make me love cooking. It’s not about making fancy, complicated dishes; it’s about making something simple, filling, and easy that everyone enjoys.
Even when I’m having a hectic day, or when the weather in my region (like a cold Chicago winter) makes me crave something hearty, sheet pan chicken is always there. It’s the kind of meal that feels like home, no matter where I am.
The Joy of Easy Clean-Up
One last thing I love about baking chicken on a sheet pan: the clean-up is a breeze. I used to dread washing a mountain of pots and pans, but with sheet pan cooking, there’s only one pan and sometimes a few utensils. No mess, no fuss. Just a quick rinse, and I’m done.
FAQs: How to Bake Chicken on a Sheet Pan
What temperature is best for How to Bake Chicken on a Sheet Pan?
For How to Bake Chicken on a Sheet Pan, set your oven to 400F. This heat cooks fast and keeps the meat juicy. It also helps veggies roast with crisp edges.
How long does it take to bake chicken on a sheet pan?
Most sheet pan chicken breasts bake in 20 to 25 minutes at 400F. Cook until the center hits 165F. Always check with a meat thermometer for safe results.
Can I cook vegetables with sheet pan chicken?
Yes, sheet pan chicken and veggies cook well together. Cut veggies like broccoli or carrots small so they roast at the same rate as the chicken.
How do I keep sheet pan chicken from drying out?
Brush the chicken with oil and do not overcook it. Bake at 400F and rest it for five minutes after. This keeps sheet pan chicken tender and full of juice.
Do I need to flip chicken when baking on a sheet pan?
No, you do not need to flip it for How to Bake Chicken on a Sheet Pan. The oven heat cooks both sides well. For more color, you can broil for one minute at the end.