Hey, I’m Mossaraof — a professional cook and food blogger.
I used to think glass pans were tricky. The first time I tried How to Bake Chicken in a Glass Pan, I worried it would dry out. But when I saw that clear dish hold in heat like a warm hug, I was sold. If you have ever asked how long to bake chicken in a glass dish or what oven temp works best, you are in the right place.
I have tested this in humid Florida heat and cold Midwest winters. I have baked chicken breasts, thighs, and even meal prep trays in glass bakeware. Over time, I learned the sweet spot for oven temperature, cook time, and safe internal temp. A glass pan cooks a bit different than metal, and that small detail matters.
In this guide, I will show you how to get juicy baked chicken with simple steps and clear timing. We will talk about oven temperature, cook time, and why glass holds heat longer. If you want to master your oven with ease, check out my pillar post, The Complete Guide to Using an Oven. Now let’s bake chicken in a glass pan the right way and make it tender every time.
Why a Glass Pan Works So Well for Baking Chicken
Before I dive into the “how-to,” let me tell you why I love using a glass pan. When I first started using it, I wasn’t sure what to expect. I’d always relied on metal pans or even roasting trays. But glass? It turned out to be an unsung hero in my kitchen.
Even Heat Distribution
The beauty of a glass pan is how evenly it distributes heat. There’s nothing worse than pulling out a pan and realizing that some pieces of chicken are overcooked while others are raw. With glass, that rarely happens. It heats up evenly, making sure every piece gets that perfect golden-brown crispiness I love.
Non-Reactive Surface
When I use a glass pan, I know that it won’t react with any marinades or seasonings I add. If I use a little lemon or vinegar-based marinade, there’s no metallic taste, unlike with some metal pans. The glass keeps everything tasting pure and fresh, which is essential when I’m trying to bring out the natural flavors of the chicken.
Clear and Easy Monitoring
I have a love-hate relationship with my oven. I always seem to open the door at the wrong moment, losing heat and making the cooking process take longer. With a glass pan, I can check on my chicken without opening the oven door. The transparency of the pan lets me peek inside and see how things are going without losing any precious heat.
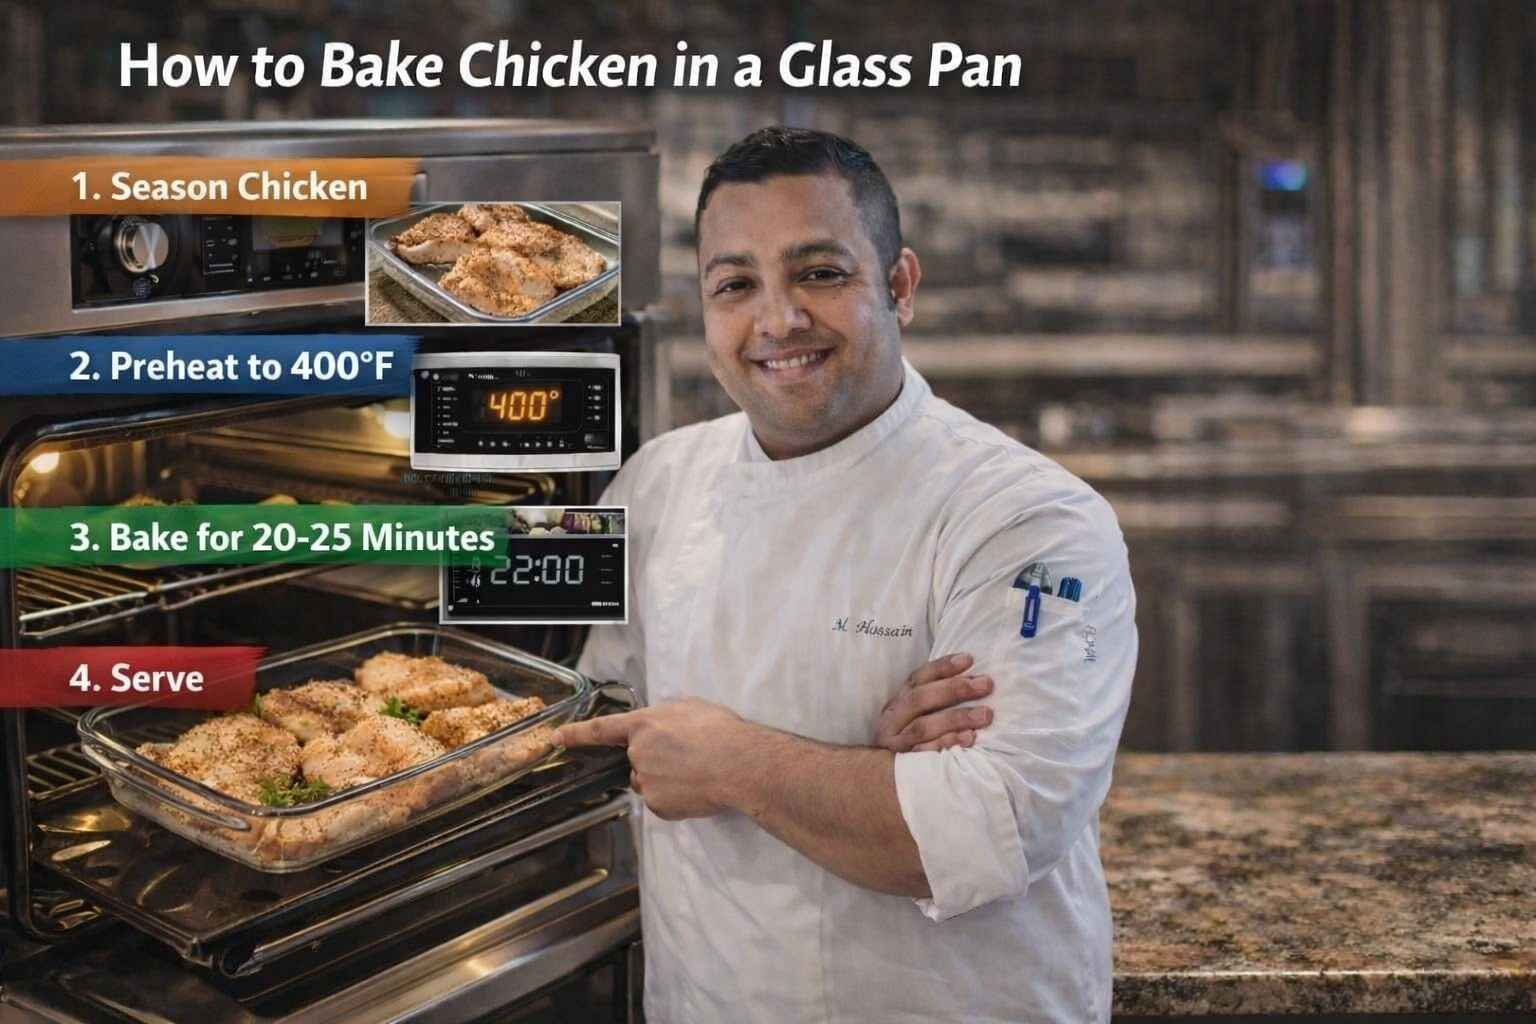
How to Cook Chicken in a Glass Pan: My Foolproof Method
I’ve made plenty of chicken recipes in my glass pan, but there’s one method I always come back to. Here’s how I do it, step by step.
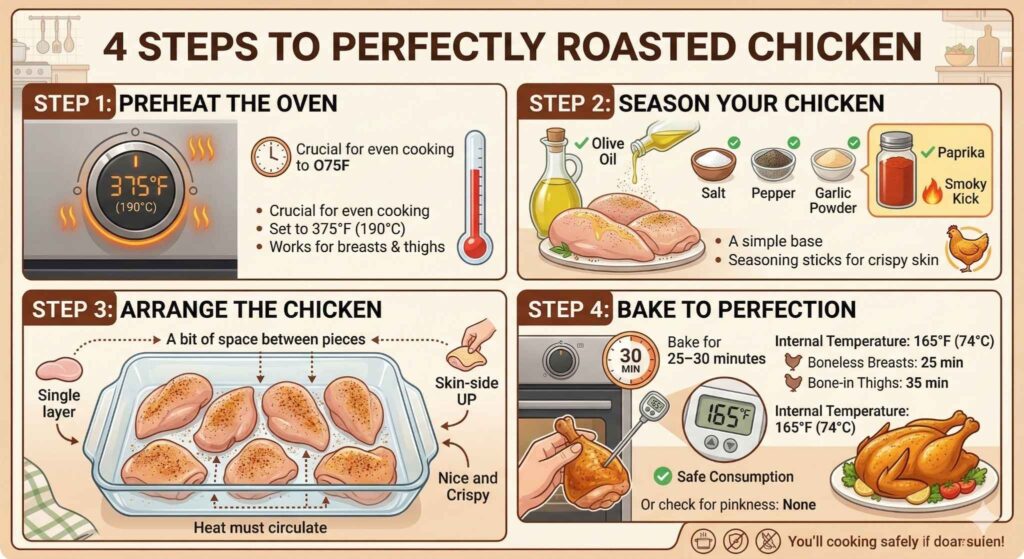
Step 1: Preheat the Oven
This might seem like a no-brainer, but I’ve found that preheating is crucial for getting that even cook. I always set my oven to 375°F (190°C), which works perfectly for both chicken breasts and thighs. It’s hot enough to roast the chicken to perfection without drying it out.
Step 2: Season Your Chicken
I like to keep it simple. A little olive oil, salt, pepper, and garlic powder go a long way. But I’ll also toss in some paprika for a little smoky kick, especially when I’m craving extra flavor. The best part about cooking chicken this way is that the seasoning sticks well, and it helps create a nice crispy skin as it roasts.
Step 3: Arrange the Chicken
I usually arrange the chicken in a single layer in the glass pan. This is a huge tip I learned the hard way—crowding the pan means uneven cooking. Make sure there’s a bit of space between each piece so that the heat can circulate around them. I’ve also found that it helps to place skin-side up so the skin gets nice and crispy.
Step 4: Bake to Perfection
Pop the glass pan into the oven and bake for 25–30 minutes. The exact time depends on the size of the chicken pieces. For boneless breasts, I usually stick to 25 minutes, but bone-in thighs might take closer to 35 minutes. The key is checking the internal temperature, which should reach 165°F (74°C) for safe consumption. You can use a meat thermometer, but I like to just cut into the thickest part and check for any pinkness. If there’s none, I know it’s ready.
How Long to Bake Chicken in a Glass Pan?
This is one of the questions I get asked most often, and I totally get it—everyone wants to know the exact time so they don’t end up with dry or undercooked chicken. Here’s my breakdown:
- Boneless, Skinless Chicken Breasts: Bake for 20–25 minutes at 375°F (190°C). They cook fast, so keep an eye on them. I like to check at 20 minutes, then add a few more minutes if needed.
- Bone-In Chicken Thighs: These take a bit longer. I usually bake them for 30–35 minutes at 375°F (190°C), flipping halfway through to get that even crispy texture on both sides.
- Whole Chicken: If I’m roasting a whole chicken, it’ll take about 1 hour to 1 hour 15 minutes at 375°F (190°C). It’s a great way to cook a whole chicken without the hassle of a rotisserie.
Pro Tip:
Use a meat thermometer to check the internal temperature. Trust me, it makes all the difference. There’s nothing worse than undercooked chicken, and the thermometer helps guarantee it’s safe and perfectly cooked.
How to Prevent Chicken from Sticking to the Glass Pan
I’ve had my share of frustrations with chicken sticking to the pan, especially when I first started cooking with glass. But I’ve learned a few tricks to prevent it. Here’s what works for me:
- Use a Light Coating of Oil or Butter
Before placing the chicken in the pan, I always coat the pan with a little oil or butter. It helps create a barrier between the chicken and the glass, so nothing sticks. - Use Parchment Paper
If I’m feeling extra cautious, I line the bottom of the glass pan with parchment paper. It’s a great way to ensure that nothing sticks, and it makes cleanup a breeze.
The Beauty of Glass Pans for Chicken: Why I Keep Coming Back
At the end of the day, I always go back to my glass pan for roasting chicken because of the results. The chicken is always juicy and flavorful, and I don’t have to worry about cleaning a complicated pan afterward. It’s quick, simple, and reliable—just what I need after a long day in the kitchen.
How to Cook Chicken Breast in a Glass Dish
When it comes to cooking chicken breast, I’ve found that glass pans are especially useful. The even heat distribution and transparency of the pan make it easy to check on the chicken without opening the oven door. Here’s how I’ve perfected cooking chicken breasts in a glass dish:
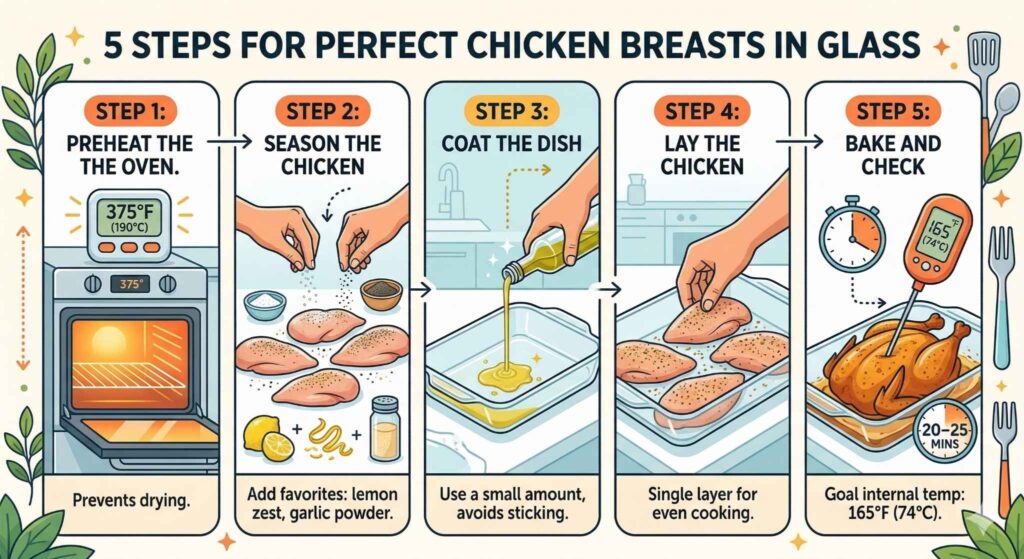
Steps for Perfect Chicken Breasts in Glass:
- Step 1: Preheat the oven to 375°F (190°C). This temperature works best for cooking chicken breasts without drying them out.
- Step 2: Season your chicken breasts with salt, pepper, and any other spices you like. Sometimes, I throw in a little lemon zest for brightness or some garlic powder for that savory kick.
- Step 3: Drizzle a small amount of olive oil in the glass dish, just enough to coat the bottom lightly. This keeps the chicken from sticking and gives it a nice finish.
- Step 4: Place the chicken in the dish, making sure the pieces aren’t overcrowded. I like to spread them out in a single layer for even cooking.
- Step 5: Bake for 20–25 minutes, depending on the thickness of your chicken breasts. At 25 minutes, I check the internal temperature—165°F (74°C) is my goal.
Pro Tip:
If you want that perfect juicy chicken breast, cover it with foil during the first 15 minutes of cooking. This traps moisture, then remove the foil for the last few minutes to let the skin crisp up.
How to Cook Chicken Legs in a Glass Pan
Chicken legs, whether drumsticks or thighs, are one of my favorite cuts to cook in a glass pan. They’re affordable, flavorful, and with the right method, they come out incredibly tender. Here’s my method:
Steps for Cooking Chicken Legs in Glass:
- Step 1: Preheat your oven to 375°F (190°C). This is the sweet spot for cooking chicken legs—hot enough to cook the meat through but not too hot to dry them out.
- Step 2: Season the chicken legs. I like to keep it simple with olive oil, salt, pepper, and paprika. Sometimes I’ll add a dash of cayenne for a bit of heat, especially if I’m in the mood for spicy chicken.
- Step 3: Arrange the chicken legs in the glass pan. If the legs are too close together, they might not cook evenly, so try to give them a little space.
- Step 4: Bake for 30-35 minutes, flipping halfway through to ensure even cooking and crispy skin on both sides. Make sure to check the internal temperature, aiming for 165°F (74°C).
Pro Tip:
If you want the skin extra crispy, broil the chicken for the last 5 minutes. Just keep a close eye on it to prevent burning!
How to Roast a Whole Chicken in a Glass Pan
Roasting a whole chicken in a glass pan is one of the easiest ways to get a golden-brown, crispy-skinned bird without the need for a rotisserie. Here’s my go-to method for roasting a whole chicken:
Steps for Roasting a Whole Chicken in Glass:
- Step 1: Preheat your oven to 375°F (190°C). This temperature works great for getting that crispy skin while keeping the chicken moist inside.
- Step 2: Prepare the chicken. I rub the skin with olive oil, then season it generously with salt, pepper, garlic powder, and thyme. Sometimes I stuff the cavity with lemon slices and garlic cloves for extra flavor.
- Step 3: Place the chicken in the glass pan, breast side up. You don’t need to add any extra liquid—just let the chicken cook in its own juices.
- Step 4: Roast for about 1 to 1.5 hours, depending on the size of the chicken. A 4-pound bird usually takes around 1 hour 15 minutes to cook through. Always check the internal temperature in the thickest part of the thigh—it should read 165°F (74°C).
Pro Tip:
I love to baste the chicken halfway through to keep it juicy, but it’s not necessary. If you’re in a rush, just let it cook without opening the oven. The glass pan keeps the moisture locked in, so you won’t end up with dry chicken.
How to Cook Chicken in a Glass Pan for Meal Prep
One of the best things about cooking chicken in a glass pan is that it’s perfect for meal prepping. I’m always looking for ways to make meals ahead of time, especially with a busy schedule, and chicken is a great option. Here’s how I use my glass pan to cook chicken in bulk:
Steps for Meal Prep Chicken in Glass:
- Step 1: Preheat the oven to 375°F (190°C). I usually cook 4-6 chicken breasts or thighs at a time to last through the week.
- Step 2: Season the chicken well with your favorite spices. I tend to use a simple mix of olive oil, garlic, lemon, salt, and pepper. Sometimes, I’ll marinate it overnight if I have the time.
- Step 3: Arrange the chicken in a single layer in the glass pan, ensuring they’re spaced out a bit for even cooking.
- Step 4: Bake for 25-30 minutes, checking the internal temperature. If you’re cooking multiple pieces, you may need to add an extra 5 minutes.
Pro Tip:
Once the chicken is done, I let it cool before storing it in airtight containers in the fridge. It stays fresh for up to 4 days, and I can easily use it for salads, wraps, or even a quick stir-fry later in the week.
How to Keep Chicken from Sticking to the Glass Pan
Sticking chicken can be a frustrating problem, especially when you’re trying to make a clean meal with minimal mess. I’ve learned a few tricks to keep everything from sticking to my glass pan:
Tips for Preventing Sticking:
- Use a Light Coating of Oil or Butter
I always rub a thin layer of olive oil or melted butter in the pan before adding the chicken. This creates a barrier and helps prevent sticking. - Consider Parchment Paper
If I’m feeling extra cautious, I line the bottom of the pan with parchment paper. This makes cleanup a breeze and ensures that nothing sticks.
Pro Tip:
If you do find yourself with some stuck bits after cooking, a little warm water and soap can do wonders. Let the glass pan soak for 10-15 minutes, and the residue will come off with minimal scrubbing.
How Long to Roast Chicken Legs in an Oven Pan
Roasting chicken legs in a glass pan gives you that crispy skin and juicy meat, but it’s essential to get the timing right. I’ve learned that cooking times can vary depending on the size of the legs and your oven, so here’s my go-to method:
- Step 1: Preheat your oven to 375°F (190°C).
- Step 2: Season the chicken legs with your favorite spices and arrange them in a glass pan.
- Step 3: Roast for 30-35 minutes, flipping halfway through. For even cooking, make sure the legs aren’t overcrowded.
Pro Tip:
For extra crispy chicken legs, I broil them for the last 5 minutes of cooking. It gives them that perfect golden-brown color and texture.
Common Mistakes to Avoid When Baking Chicken in a Glass Pan
When I first started baking chicken in a glass pan, I made a few rookie mistakes. Over time, I’ve learned what works and what doesn’t, so I want to share those lessons with you. Trust me, avoiding these pitfalls will save you time and frustration.
1. Overcrowding the Pan
This was a huge mistake I made when I was cooking multiple pieces of chicken. At first, I thought I could just shove everything into the pan and it would cook fine. But, nope! When the chicken pieces are too close together, they steam rather than roast, which leaves you with soggy chicken rather than crispy, golden goodness.
- The Fix: Always give your chicken a little space. If you’re cooking a lot, consider using two pans or cooking in batches. It’s worth the extra time to get that crispy skin.
2. Not Adjusting the Cooking Time
Glass pans heat up quickly, so cooking times can be a little different from what you might be used to with a metal pan. I’ve learned the hard way that cooking chicken at the same time and temperature as in a regular metal pan can sometimes overcook the outside while leaving the inside raw.
- The Fix: Keep an eye on the chicken and use a meat thermometer. For chicken breasts, I check at the 20-minute mark. Bone-in thighs usually take about 30-35 minutes. Just make sure to check the internal temperature—165°F (74°C) is your goal.
3. Not Using Enough Fat
Chicken breasts, especially, can dry out quickly if they’re not properly coated. I made this mistake a few times when I tried to cut down on fat. The result was dry, bland chicken that no one wanted to eat.
- The Fix: I always coat the chicken with olive oil or butter before cooking. It helps lock in moisture, adds flavor, and creates that delicious golden crust.
How to Add Extra Flavor When Baking Chicken in a Glass Pan
One of the great things about using a glass pan is that it enhances the flavors of your seasonings. If you’re looking for a little extra punch, here are a few tricks I use to elevate my baked chicken:
1. Marinate the Chicken
Marinating chicken before baking is a game-changer. I usually let the chicken marinate for at least 30 minutes, but if I have the time, I’ll leave it overnight. The longer it marinates, the more flavorful it becomes.
- My Go-To Marinade: A mix of olive oil, lemon juice, garlic, and herbs like rosemary or thyme. I also love adding a dash of Dijon mustard for a little kick. It’s simple, but it makes the chicken taste amazing every time.
2. Use Fresh Herbs
I can’t stress this enough: fresh herbs make a huge difference. I love adding rosemary, thyme, and oregano when roasting chicken. The smell that fills the kitchen is unbeatable. Plus, fresh herbs give the chicken a more vibrant, aromatic flavor than dried herbs.
- How I Use Herbs: I stuff the chicken cavity with fresh herbs when I roast a whole chicken, and I sprinkle them on top of chicken breasts or thighs for extra flavor.
3. Add Citrus for Brightness
If you want a burst of fresh flavor, squeeze some lemon or orange juice over the chicken before baking. I’ve tried this with both lemon and orange, and both work wonders.
- Why It Works: The acidity from the citrus cuts through the richness of the chicken, giving it a refreshing flavor. I also like to add a few slices of lemon or orange to the pan itself while the chicken bakes. It infuses the meat with citrusy goodness.
How to Roast Chicken Legs in a Glass Pan for Maximum Flavor
Chicken legs are one of my favorites to bake in a glass pan. They’re easy to prep, and they hold up well to long cooking times without drying out. Here’s my method for getting juicy, flavorful chicken legs every time.
Step-by-Step for Perfect Roasted Chicken Legs:
- Step 1: Preheat your oven to 375°F (190°C).
- Step 2: Season the chicken legs with olive oil, salt, pepper, and whatever spices you like. I tend to go with garlic, paprika, and thyme. Sometimes, I’ll even toss in a bit of cayenne pepper if I want some heat.
- Step 3: Place the chicken legs in a single layer in the glass pan. This gives them plenty of room to cook evenly and get crispy.
- Step 4: Roast for 30-35 minutes, flipping halfway through. I always check the internal temperature to ensure they’ve reached 165°F (74°C).
Pro Tip:
If you want the skin extra crispy, turn on the broiler for the last 5 minutes of cooking. Just keep an eye on them so they don’t burn. The broiler really gives the skin that perfect, crispy finish.
How to Cook Chicken in a Glass Pan for Family Dinners
When I’m cooking for a crowd, I love using a glass pan because it holds more chicken and retains heat well. Whether it’s a Sunday dinner or a weeknight meal, this method works wonders for cooking multiple pieces of chicken at once.
Batch Cooking with Glass Pans
- Step 1: Preheat the oven to 375°F (190°C).
- Step 2: Arrange the chicken in the glass pan, making sure there’s a little space between each piece. This ensures even cooking.
- Step 3: If you’re cooking a whole chicken and multiple pieces, I recommend using two pans or cooking them in shifts.
Meal Prep Tip:
I often cook a big batch of chicken on Sundays and store the leftovers for lunches or quick dinners during the week. The glass pan makes it easy to keep the chicken moist and flavorful throughout the week.
How to Cook Pan-Seared Chicken and Finish in the Oven
This method is perfect when you want that beautiful sear on the outside while keeping the chicken juicy on the inside. It’s a technique I’ve used many times for both chicken breasts and thighs, and it’s a total game-changer.
Pan-Seared Chicken Steps:
- Step 1: Heat some oil in a skillet over medium-high heat. You want the oil to be hot before adding the chicken.
- Step 2: Sear the chicken for 2-3 minutes on each side until it gets that golden brown color.
- Step 3: Transfer the chicken to your preheated glass pan and bake at 375°F (190°C) for 10-15 minutes, depending on the thickness of the chicken.
Pro Tip:
The beauty of this method is that you get the best of both worlds—crispy skin and tender meat. I love doing this when I’m in the mood for something a little extra special, but still easy to make.
How to Keep Chicken Moist When Baking in a Glass Pan
Keeping chicken juicy while achieving that crispy outer layer can sometimes feel like a delicate balance. But after lots of trial and error, I’ve discovered a few techniques to keep chicken moist and flavorful when baking it in a glass pan.
1. Use a Meat Thermometer
This little tool has been a lifesaver for me. The best way to ensure your chicken stays moist is to avoid overcooking it. A meat thermometer is key in achieving that perfect, safe-to-eat internal temperature of 165°F (74°C).
- Pro Tip: Insert the thermometer into the thickest part of the chicken. For chicken breasts, check the center. For thighs or drumsticks, the thick part of the thigh should read 165°F.
2. Baste the Chicken
Basting chicken while it cooks helps to keep it juicy. I like to spoon some of the pan juices over the chicken halfway through cooking. This locks in moisture and adds flavor.
- My Go-To Baste: I typically baste with a little olive oil or melted butter mixed with garlic and lemon juice. It gives the chicken a wonderful flavor that really complements the seasoning.
3. Don’t Overcrowd the Pan
This is crucial—if you cram too many pieces into the glass pan, the chicken steams instead of roasting. This can cause the meat to get soggy and prevent that crispy skin from forming.
- The Fix: Always cook in batches if necessary. I know it can be tempting to cook a whole bunch of chicken at once, but trust me, giving each piece room to breathe makes all the difference.
How to Make Chicken Crispy in a Glass Pan
There’s something about that perfect crispy skin that makes baked chicken feel extra special. While glass pans are great for even cooking, they can sometimes leave the skin less crispy than a metal pan. But with these tips, you can achieve that golden brown, crispy finish.
1. Use High Heat Towards the End
When I want my chicken skin to be extra crispy, I turn up the oven temperature for the last 5 minutes of baking. This high heat helps crisp up the skin while finishing the cooking process.
- Pro Tip: Try increasing the temperature to 400°F (200°C) for the last few minutes, but keep a close eye on it to avoid burning.
2. Broil the Chicken for the Final Touch
Broiling is a fantastic way to get that final crisp. I’ll often pop the chicken under the broiler for 2-3 minutes after it’s cooked. The direct heat from the broiler works wonders for the skin, creating that perfect crispy texture.
- My Personal Experience: I’ll usually broil the chicken for the last 2-3 minutes, but always keep the oven door cracked slightly to monitor it. The glass pan reflects the heat, making the skin even crispier.
How to Cook Pan-Fried Chicken in the Oven (With a Glass Pan)
Sometimes, I don’t have time for deep frying, but I still want the crispy, flavorful texture that comes with fried chicken. That’s where cooking pan-fried chicken in the oven comes in. Here’s how I do it using a glass pan:
Steps for Pan-Fried Chicken Finished in the Oven:
- Step 1: Start by heating a small amount of oil in a skillet over medium-high heat. I use just enough oil to coat the bottom of the pan—this helps the chicken get a nice sear.
- Step 2: Sear the chicken for 2-3 minutes per side until golden brown. It doesn’t need to be cooked through at this stage—just get that nice crispy exterior.
- Step 3: Transfer the chicken to a preheated glass pan, and bake at 375°F (190°C) for 10-15 minutes, depending on the size of the chicken pieces.
Pro Tip:
The key here is getting a good sear before baking. The glass pan helps finish the cooking evenly, while the searing ensures that delicious crispy crust.
How to Make Chicken in a Glass Pan for Busy Weeknights
One of the reasons I love cooking chicken in a glass pan is how easy it is to prepare and clean up. On busy weeknights when I don’t have a lot of time, I rely on this method to get a delicious, home-cooked meal on the table without a lot of effort.
Quick and Simple Weeknight Chicken
- Step 1: Preheat your oven to 375°F (190°C).
- Step 2: Season your chicken with your favorite spices (I usually keep it simple with salt, pepper, garlic powder, and paprika).
- Step 3: Coat the glass pan with olive oil or spray it with non-stick cooking spray.
- Step 4: Place the chicken in the pan and bake for 20-25 minutes for boneless chicken breasts or 30-35 minutes for bone-in thighs.
The Beauty of Meal Prep
- I often cook extra chicken when I make this, knowing I can use the leftovers for salads, wraps, or a quick stir-fry the next day. Using a glass pan means I can easily transfer the cooked chicken into containers and store it for later without worrying about the food sticking.
How Long to Roast Chicken Legs in a Glass Pan
Roasting chicken legs in a glass pan is an easy, foolproof way to get crispy skin and juicy meat. The method is simple, but the results are so satisfying. Here’s how I do it:
Steps for Roasting Chicken Legs:
- Step 1: Preheat your oven to 375°F (190°C).
- Step 2: Season the chicken legs with your favorite spices. I like to keep it simple with salt, pepper, garlic, and a little bit of smoked paprika.
- Step 3: Arrange the legs in a glass pan, making sure there’s some space between them so the air can circulate.
- Step 4: Roast for 30-35 minutes, flipping halfway through.
Pro Tip:
If you want your chicken legs extra crispy, place them under the broiler for the last 5 minutes of cooking. Just keep a close eye on them so they don’t burn.
The Versatility of Glass Pans: Why I Always Choose Them for Chicken
After years of cooking with various pans, I always come back to my glass pans for chicken. They are versatile, affordable, and incredibly reliable. Whether I’m roasting, baking, or finishing off my chicken in the oven, glass pans give me the consistent results I crave.
- Affordable and Durable: Glass pans are a one-time investment that will last for years. No need to worry about scratches or rust like with metal pans.
- Perfect for Small to Medium Meals: While they’re not ideal for cooking large batches, glass pans are perfect for family dinners or weeknight meals.
How to Cook Chicken in a Glass Pan for Family Gatherings
When it comes to feeding a group, I love the simplicity of using a glass pan. It’s perfect for large portions of chicken without taking up too much space in the oven, and the results are always fantastic. Here’s how I make it work for family dinners or holiday gatherings:
Steps for Cooking Chicken for a Crowd:
- Step 1: Preheat the oven to 375°F (190°C). Since I’m usually cooking multiple pieces of chicken, I like to get the oven nice and hot before I start.
- Step 2: Season the chicken generously with your favorite spices. I’m a big fan of adding a little heat with chili powder or cayenne, balanced with some sweetness from brown sugar or honey. It adds a nice contrast to the savory chicken.
- Step 3: Arrange the chicken in a glass pan. I prefer a larger glass pan to cook several pieces at once. If I’m cooking multiple cuts (breasts, thighs, and wings), I separate them in the pan so each gets the appropriate cook time.
- Step 4: Bake for 30-40 minutes, depending on the size of the chicken. For a large batch, I check the internal temperature to make sure it hits 165°F (74°C). This gives me peace of mind that everything is cooked through.
Pro Tip:
If you’re cooking a variety of chicken cuts, start with the pieces that need more time, like bone-in thighs, and then add the quicker-cooking cuts (like boneless breasts) later to ensure everything cooks at the same rate.
How to Cook Pan-Seared Chicken Thighs in a Glass Pan
Pan-searing chicken before finishing it in the oven is one of my favorite techniques. It gives the chicken a crispy, golden skin, and the oven ensures the meat cooks through perfectly. Here’s how I do it with chicken thighs in a glass pan:
Steps for Pan-Seared Chicken Thighs:
- Step 1: Heat some oil in a skillet over medium-high heat. You want the oil hot but not smoking. I use olive oil for a mild flavor, but sometimes I’ll switch it up with a little butter for richness.
- Step 2: Sear the chicken thighs for 3-4 minutes on each side until they’re nice and golden. This gives them that crispy skin and juicy interior.
- Step 3: Transfer the chicken thighs to a preheated glass pan and bake at 375°F (190°C) for about 15-20 minutes, depending on the size of the thighs.
Pro Tip:
For even more flavor, I’ll sometimes drizzle a little honey or balsamic vinegar on the chicken thighs right before they go in the oven. It creates a sweet and savory glaze that makes the dish stand out.
How to Avoid Dry Chicken When Cooking in a Glass Pan
It can be easy to accidentally overcook chicken, but I’ve found that with a few simple tricks, you can avoid the dreaded dry chicken that no one wants to eat. Here are some things I’ve learned over the years:
1. Don’t Overcook the Chicken
Overcooked chicken is the worst. It becomes dry, rubbery, and unappetizing. The key is to use a meat thermometer. For boneless, skinless chicken breasts, I check at 20 minutes and remove them when they reach 165°F (74°C). For bone-in chicken, I make sure the internal temperature is the same before pulling it out.
2. Use Moisture-Rich Ingredients
When I want to guarantee juicy chicken, I add moisture-rich ingredients to the glass pan. You can add a few tablespoons of chicken broth or a drizzle of olive oil to the pan. This helps retain moisture while the chicken cooks.
3. Let the Chicken Rest
Once the chicken is out of the oven, I let it rest for 5-10 minutes. This helps redistribute the juices, so when I cut into the chicken, all that flavorful moisture stays inside the meat.
How to Cook a Whole Chicken in a Glass Pan: Roasting Like a Pro
Roasting a whole chicken in a glass pan is one of my favorite ways to cook. There’s something so comforting about a perfectly roasted chicken, and the glass pan helps create even heat, resulting in juicy meat and crispy skin.
Steps for Roasting a Whole Chicken in Glass:
- Step 1: Preheat your oven to 375°F (190°C). This is the magic number for roasting a chicken evenly.
- Step 2: Prepare the chicken by rubbing it with olive oil and seasoning it generously with salt, pepper, garlic powder, and rosemary. If I’m feeling fancy, I stuff the cavity with garlic cloves, lemon wedges, and fresh herbs like thyme or rosemary.
- Step 3: Place the chicken in a glass pan, breast-side up. Make sure it’s not crowded in the pan so the hot air can circulate around it.
- Step 4: Roast for about 1 to 1.5 hours, depending on the size of the chicken. I usually check the internal temperature at the thickest part of the thigh and make sure it reaches 165°F (74°C).
Pro Tip:
I love to baste the chicken every 30 minutes with its own juices. This helps keep the skin golden and flavorful, while preventing the meat from drying out. I even throw a couple of lemon slices around the chicken while it cooks—this adds a subtle citrusy flavor that’s a real crowd-pleaser.
How to Roast Chicken Breasts in a Glass Pan
Chicken breasts are one of my go-to proteins for quick, easy meals. While they can dry out easily, I’ve figured out the best way to bake them in a glass pan without losing that juicy tenderness.
Steps for Perfect Chicken Breasts in Glass:
- Step 1: Preheat the oven to 375°F (190°C).
- Step 2: Season the chicken breasts with salt, pepper, and your favorite spices. I like to keep it simple with garlic powder, paprika, and a squeeze of lemon juice.
- Step 3: Place the chicken breasts in a glass pan and drizzle with a little olive oil. The oil helps lock in moisture while creating a crisp exterior.
- Step 4: Bake for 20-25 minutes, depending on the thickness of the chicken. If you’re unsure, use a meat thermometer to check for 165°F (74°C).
Pro Tip:
For an extra juicy chicken breast, I cover the pan with foil during the first 15 minutes of cooking. This helps trap steam and keeps the chicken moist. I remove the foil during the last few minutes of baking to let the chicken brown.
Why I Keep Coming Back to My Glass Pan
After cooking chicken in various pans and methods, I always find myself going back to my glass pan. It’s the tool that gives me the most consistent, juicy results every time. Whether it’s a weeknight meal or a family gathering, the glass pan does it all.
- Versatile and Easy to Use: I can cook anything from chicken breasts to whole roasts in the glass pan, and the results are always fantastic.
- Quick Cleanup: The smooth surface of the glass makes it super easy to clean. A little soap and water, and it’s good as new.
How to Cook Pan-Seared Chicken in a Glass Pan: The Best of Both Worlds
Pan-searing chicken before finishing it in the oven is one of my favorite techniques, especially when I’m craving that crispy skin and juicy interior. The glass pan really helps seal in the moisture while giving you the crispiness you’re after. Here’s how I do it:
Steps for Pan-Seared Chicken Finished in a Glass Pan:
- Step 1: Heat a little oil in a skillet over medium-high heat. I use olive oil for its mild flavor, but you can also use butter for richness. The oil should be hot but not smoking before you add the chicken.
- Step 2: Sear the chicken for 3-4 minutes on each side. The goal here is to get a beautiful golden-brown crust, but you don’t need to cook it through. Just a quick sear on both sides works wonders for that crispy texture.
- Step 3: Transfer the chicken to a preheated glass pan. The beauty of the glass pan is that it keeps the heat evenly distributed, so the chicken will finish cooking without drying out.
- Step 4: Pop it into a 375°F (190°C) oven for 10-15 minutes, depending on the thickness of the chicken. I always check the internal temperature to make sure it’s reached 165°F (74°C).
Pro Tip:
If you want an even crispier finish, you can turn on the broiler for the last 2-3 minutes of cooking. Just make sure to keep a close eye on it so it doesn’t burn.
How to Cook Chicken Thighs in a Glass Pan: Tender and Juicy Every Time
Chicken thighs are my go-to for rich, flavorful meat, and they cook wonderfully in a glass pan. The beauty of using glass is that it keeps the meat juicy while giving the skin a nice, crispy texture.
Steps for Perfect Chicken Thighs in Glass:
- Step 1: Preheat your oven to 375°F (190°C). The even heat distribution of the glass pan ensures the chicken thighs cook perfectly.
- Step 2: Season the chicken thighs with your favorite spices. I tend to go for garlic, rosemary, thyme, and a bit of paprika for color.
- Step 3: Place the thighs in the glass pan, skin-side up. I make sure they’re not overcrowded, so the heat can circulate and crisp up the skin.
- Step 4: Roast for 30-35 minutes, flipping halfway through. You want the skin crispy and the internal temperature to reach 165°F (74°C).
Pro Tip:
If you prefer extra-crispy skin, you can turn the broiler on for the last 5 minutes of cooking. Just be sure to check the chicken often to avoid burning.
How to Cook Chicken Wings in a Glass Pan
Chicken wings are one of my favorite comfort foods, and they bake so beautifully in a glass pan. The glass pan helps the wings get nice and crispy while keeping them juicy on the inside. Here’s how I cook mine:
Steps for Perfect Chicken Wings in Glass:
- Step 1: Preheat the oven to 375°F (190°C).
- Step 2: Season the chicken wings with your favorite spices. I love a combination of garlic powder, onion powder, and a little bit of cayenne for heat.
- Step 3: Arrange the wings in a single layer in the glass pan. They should have a little bit of space between them for the heat to circulate properly.
- Step 4: Bake for 25-30 minutes, flipping halfway through. You want the wings crispy on the outside and cooked through on the inside.
Pro Tip:
For extra crispy wings, finish them off under the broiler for the last 2-3 minutes of cooking. It gives them that perfect golden-brown, crunchy exterior.
How to Cook Chicken Drumsticks in a Glass Pan
Drumsticks are so easy to cook in a glass pan, and they come out with the perfect balance of crispy skin and juicy meat. I love cooking drumsticks for family dinners or meal prep because they’re affordable and everyone loves them.
Steps for Cooking Chicken Drumsticks in Glass:
- Step 1: Preheat your oven to 375°F (190°C).
- Step 2: Season the drumsticks with your favorite herbs and spices. I use a simple mix of olive oil, salt, pepper, and smoked paprika for extra flavor.
- Step 3: Arrange the drumsticks in a single layer in the glass pan. This is crucial for even cooking—if they’re stacked or too close together, they won’t cook properly.
- Step 4: Roast for 30-35 minutes, flipping halfway through to ensure even cooking. You want the skin crispy and the meat juicy.
Pro Tip:
For extra flavor, I sometimes drizzle a little honey over the drumsticks during the last 10 minutes of baking. It caramelizes and creates a slightly sweet, savory glaze that’s absolutely delicious.
How to Cook Chicken in a Glass Pan Without Overcooking
One of the most common mistakes I see people make is overcooking chicken, especially when using a glass pan. Overcooked chicken can be dry and tough, but I’ve learned a few tricks to keep it tender and juicy:
1. Use a Meat Thermometer
The key to perfectly cooked chicken is ensuring that it reaches the right internal temperature. I always aim for 165°F (74°C) for safe consumption. A meat thermometer is a small investment that makes a huge difference in ensuring your chicken is perfectly cooked without being dry.
2. Let the Chicken Rest
After removing the chicken from the oven, I always let it rest for about 5-10 minutes before cutting into it. This allows the juices to redistribute throughout the meat, keeping it moist and tender.
3. Don’t Overcrowd the Pan
As I mentioned before, overcrowding the glass pan can result in uneven cooking. The chicken steams rather than roasts, leading to soggy skin and unevenly cooked meat. I always make sure there’s enough space for the heat to circulate around each piece.
How to Bake Chicken for Meal Prep in a Glass Pan
Meal prepping is something I’ve come to rely on for busy weeks. Glass pans are great for cooking in bulk, and I can roast a whole bunch of chicken at once and use it for meals throughout the week.
Steps for Meal Prep Chicken in Glass:
- Step 1: Preheat the oven to 375°F (190°C).
- Step 2: Season the chicken with your favorite spices or marinades. I like to batch-make different marinades—one for lemon and herbs, another for barbecue.
- Step 3: Arrange the chicken in the glass pan, leaving space between the pieces.
- Step 4: Bake for 25-30 minutes for breasts, or 30-35 minutes for thighs and drumsticks. Check the internal temperature to ensure it reaches 165°F (74°C).
Pro Tip:
I always bake extra chicken when meal prepping so I have plenty for salads, wraps, or even chicken stir-fry later in the week. Glass pans keep the chicken moist, making it perfect for storing in the fridge and using in different dishes throughout the week.
Why I Trust Glass Pans for Baking Chicken
After trying every other cooking method and pan out there, I always come back to my trusty glass pan for baking chicken. Whether I’m roasting a whole chicken for Sunday dinner, cooking chicken breasts for a quick weeknight meal, or prepping chicken for the week, glass pans provide consistent, reliable results every time.
Transparency: I can easily monitor the cooking process without opening the oven door and letting heat escape.
Consistent Heat Distribution: Glass pans heat evenly, ensuring that my chicken cooks to perfection.
Non-Reactive Surface: I can use acidic marinades without worrying about a metallic aftertaste.
How to Store and Reheat Chicken Cooked in a Glass Pan
After cooking a delicious meal, I’m always looking for ways to make the most of my leftovers, and storing and reheating chicken properly is key to maintaining that juicy texture. The good news is that chicken cooked in a glass pan holds up incredibly well when stored and reheated. Here’s how I do it:
Storing Leftover Chicken
- Step 1: Allow the chicken to cool completely. I usually let it rest for about 15 minutes after it comes out of the oven to let the juices settle.
- Step 2: Store the chicken in an airtight container. I prefer glass containers for leftovers as they prevent the chicken from drying out and keep it fresh.
- Step 3: Store it in the fridge for up to 4 days, or freeze it if I need it to last longer.
Reheating Chicken
- Step 1: If reheating in the oven, preheat it to 350°F (175°C). I like to cover the chicken loosely with foil to prevent it from drying out.
- Step 2: Reheat for 10-15 minutes, depending on the size of the chicken pieces, until it reaches the proper internal temperature of 165°F (74°C).
Pro Tip:
If you’re in a rush, I’ve also used the microwave to reheat chicken. Just cover it with a damp paper towel to retain moisture, and heat in 30-second intervals. I’ve found this method works great for small portions like chicken breasts or thighs.
How to Cook Chicken in a Glass Pan for Low and Slow Roasting
Sometimes, I want to roast chicken slowly to really deepen the flavor and tenderness. Glass pans work beautifully for low and slow roasting, especially when I have time to let the chicken cook at a lower temperature.
Steps for Low and Slow Roasting:
- Step 1: Preheat the oven to 300°F (150°C). This lower temperature helps break down the connective tissues in the chicken, making it incredibly tender.
- Step 2: Season your chicken with a mix of your favorite herbs, olive oil, salt, and pepper. If I have time, I’ll even stuff the chicken with fresh garlic, rosemary, and lemon slices for a burst of flavor.
- Step 3: Roast the chicken for 1.5 to 2 hours, depending on the size of the chicken. Make sure to check the internal temperature in the thickest part of the thigh—it should read 165°F (74°C).
Pro Tip:
Slow roasting the chicken in a glass pan locks in all the moisture, leaving you with juicy, tender meat and crispy skin. If you’re planning to make a chicken stock with the leftovers, don’t throw away the bones and skin—they add incredible flavor to homemade broth.
Troubleshooting: Why Your Chicken Might Not Be Turning Out Perfectly
Even with all my experience cooking chicken in a glass pan, there are times when things don’t go exactly as planned. Here’s a quick troubleshooting guide to help you out:
1. Chicken Skin Isn’t Crispy
- Possible Issue: The oven temperature might be too low, or the chicken wasn’t placed in a single layer.
- Solution: Increase the oven temperature to 400°F (200°C) for the last few minutes, or broil the chicken for 2-3 minutes at the end of cooking to crisp up the skin.
2. Dry Chicken
- Possible Issue: The chicken was overcooked or cooked at too high a temperature.
- Solution: Use a meat thermometer and ensure the chicken reaches 165°F (74°C). If you’re worried about dry chicken, try basting it halfway through cooking or covering the pan with foil for part of the cooking time.
3. Chicken Sticking to the Glass Pan
- Possible Issue: Not enough oil or butter to coat the chicken and the pan.
- Solution: Always lightly coat the bottom of the pan with olive oil or butter. You can also line the pan with parchment paper for extra protection.
The Versatility of Glass Pans for Chicken and Beyond
Glass pans aren’t just great for chicken—they’re a staple in my kitchen for a variety of other dishes too. From baking casseroles to roasting vegetables, I find myself using the glass pan for everything. Here’s why I love it:
- Easy Cleanup: One of the biggest perks of using glass is how easy it is to clean. No scrubbing away stuck-on food or grease—just a quick soak and rinse, and it’s good to go.
- Multi-Purpose Use: Glass pans work for everything from chicken to desserts. I’ve even baked cakes in mine when I’ve forgotten to pull out my cake pans!
- Reliable Performance: Over the years, my glass pans have proven to be durable and reliable. They hold up well to high temperatures and are resistant to stains.
Final Thoughts: Why I Trust Glass Pans for Baking Chicken
At this point, it’s safe to say that my glass pan is a kitchen essential. Whether I’m roasting a whole chicken, baking chicken breasts, or pan-searing chicken thighs, it’s the tool I reach for every time. The even heat distribution, the ability to check on the food without opening the oven, and the easy cleanup make it perfect for my busy lifestyle.
Using a glass pan for chicken has not only simplified my cooking routine but also given me consistent, delicious results. And as a U.S.-based home cook, I appreciate how reliable and versatile this tool is for cooking in the diverse climates and kitchens we all have. Whether I’m in a cramped apartment or a larger kitchen, the glass pan always delivers.
FAQs
What is the best oven temp for How to Bake Chicken in a Glass Pan?
For How to Bake Chicken in a Glass Pan, set the oven to 375°F to 400°F. Glass holds heat well, so steady temp helps. Always check that the chicken hits 165°F inside.
How long does it take to bake chicken in a glass dish?
When learning How to Bake Chicken in a Glass Pan, cook boneless breasts for 25 to 35 minutes at 375°F. Thick cuts may need more time. Use a meat thermometer for safe doneness.
Does chicken cook faster in a glass pan or metal pan?
Chicken may brown a bit faster in glass bakeware since it keeps heat longer. When you bake chicken in a glass pan, lower the temp by 25°F if needed to avoid dry edges.
Should I cover chicken when baking in a glass pan?
If you want moist meat, cover the glass dish with foil for part of the cook time. For a crisp top, remove the foil near the end. This works well for baked chicken breasts.
Can I bake frozen chicken in a glass pan?
Yes, but add more cook time and keep the oven at 375°F. When you bake frozen chicken in a glass pan, make sure it reaches 165°F inside before you serve it.