Hey, I’m Mossaraof — a professional cook and food blogger.
If your week feels rushed and dinner turns into takeout again, I get it. How to Cook Chicken for Meal Prep in the Oven changed that for me. I learned this the hard way in a tiny Chicago apartment with one rack and a loud oven fan. Once I mastered oven baked chicken for meal prep, my fridge stayed full, my budget stayed safe, and my stress dropped fast.
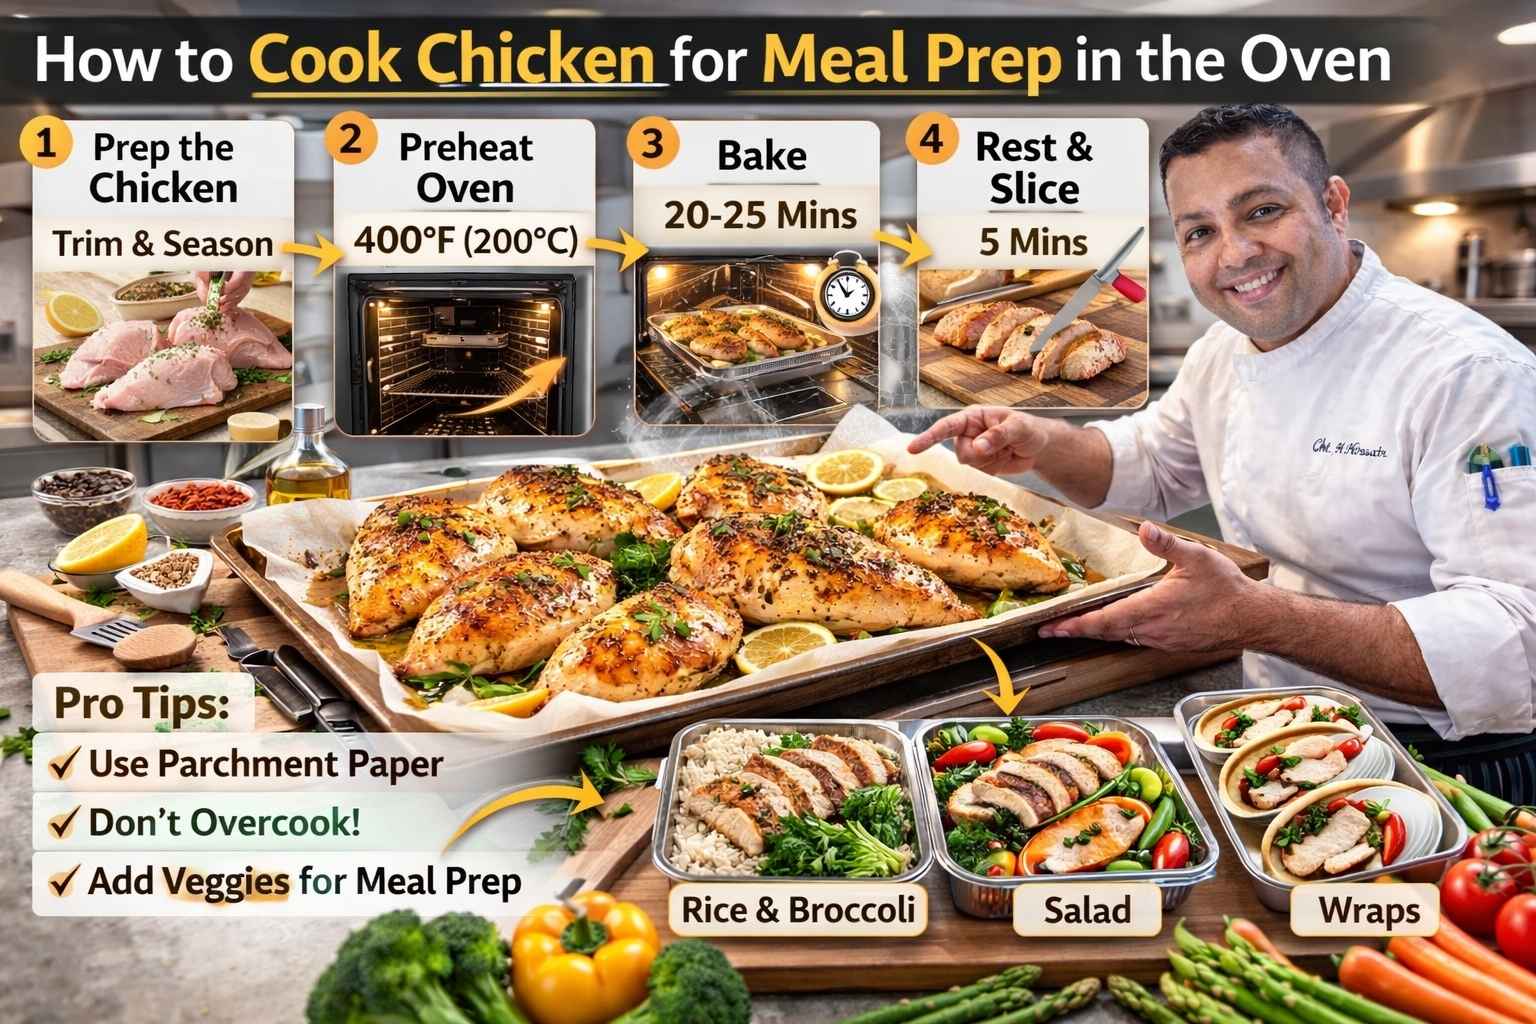
In this guide, I will show you how to meal prep chicken in the oven so it stays juicy, safe, and full of flavor. We will cover bake time, temp, storage, and how to reheat without dry meat. If you are new to oven basics, start with The Complete Guide to Using an Oven at Home and then come back here. Let’s turn simple baked chicken for the week into your quiet kitchen win.
Why the Oven is Perfect for Meal Prep
If you’re anything like me, you might be skeptical about whether the oven is really the best tool for meal prep. I used to cook my chicken in the skillet or on the grill, but let’s face it—those methods take up way too much of my time. The oven, though? It’s a total game-changer.
Cooking Multiple Servings at Once
One of the things I love most about using the oven for chicken meal prep is how easy it is to cook a bunch of servings all at once. I don’t have to stand over a hot stove flipping chicken breasts every few minutes. Instead, I can just pop a few trays in the oven, set the timer, and walk away.
If you’ve ever prepped chicken in the oven, you know how much of a time-saver it is. It’s especially handy on Sundays, when I’m scrambling to get everything done before the workweek starts.
Even Cooking
The oven ensures that every piece of chicken gets cooked evenly. Whether you’re baking chicken breasts, thighs, or wings, you can count on consistent heat to make sure everything comes out perfectly juicy and tender.
How to Meal Prep Chicken in the Oven: The Basics
I know there’s a ton of different ways to cook chicken, but when it comes to meal prepping, I stick to a few key methods that I know will save me time and effort. Here’s how I approach it:
Choosing the Right Chicken
You don’t need a fancy cut of chicken for meal prep. I usually go with boneless, skinless chicken breasts or thighs, because they’re easy to cook and easy to store. But let’s not forget chicken wings or a whole chicken—they’re perfect for variety, too.
- Boneless, skinless chicken breasts: These are my go-to for meal prep. They cook quickly and can be used in a variety of dishes throughout the week.
- Chicken thighs: Thighs are my secret weapon when I want a juicier cut. They’re a bit more forgiving when it comes to cooking time, which makes them perfect for meal prep.
- Whole chicken: Sometimes, I like to roast a whole chicken in the oven. It’s a great option for batch cooking if I want to make soup, salads, or sandwiches during the week.
Preparing the Chicken
Before I even think about popping the chicken in the oven, I make sure to season it properly. I’ve learned the hard way that flavor makes all the difference in meal prep. The last thing I want is to eat bland chicken for a whole week!
- Basic seasoning: Olive oil, salt, pepper, garlic powder, and lemon juice. It’s simple, but it always works.
- Marinades: Sometimes, I’ll go the extra mile and marinate the chicken in a bit of soy sauce, honey, and ginger to give it a sweet and savory flavor. I let it sit for a few hours in the fridge, and trust me, it’s worth the wait.
Prepping the Oven
Now, here’s the thing. The oven temperature is super important when meal prepping chicken. I’ve had my fair share of overcooked, dry chicken breasts, and after some trial and error, I finally figured out the perfect cooking times and temperatures.
- For chicken breasts: I cook them at 375°F for about 25-30 minutes. I always check with a meat thermometer to make sure they hit 165°F internally.
- For chicken thighs: Thighs are a little more forgiving. I’ll roast them at 400°F for about 35-40 minutes.
- For chicken wings: If I want crispy skin (which I almost always do), I bake them at 425°F for around 30-35 minutes, flipping halfway through.
By the way, I know some people swear by convection ovens, and if you’ve got one, you’re in luck. I’ve used Whirlpool’s convection oven before, and it really speeds things up. You’ll get a nice crisp on your chicken without having to crank up the temperature too high.
Meal Prep Chicken: What You’ll Need
Before you start, it’s helpful to have the right tools. I’ve made my fair share of chicken disasters before realizing I needed the essentials. Here’s what you’ll need for the perfect meal prep:
- Baking sheets: I use Nordic Ware baking sheets for most of my chicken prep. They’re durable, and they make cleanup a breeze.
- Meat thermometer: This little gadget has saved me so many times from dry chicken. I check the internal temperature to make sure it’s perfectly cooked.
- Parchment paper: For easy cleanup, I line my baking sheets with parchment paper. Plus, it helps prevent the chicken from sticking.
How to Cook Chicken Breast in the Oven for Meal Prep
Cooking chicken breast in the oven is a simple, foolproof method for meal prep that I’ve come to rely on over the years. It’s quick, easy, and ensures I have a protein-packed base for all my meals throughout the week. Here’s how I cook it and why it’s my go-to for prepping chicken.
The Secret to Tender, Juicy Chicken Breasts
One of the things I’ve learned over time is that chicken breasts can easily become dry if not cooked properly. Trust me, I’ve had my fair share of dry, chewy chicken, and it’s not fun. But I’ve discovered a few tricks that have helped me cook perfect chicken breasts every time.
- Moisture is key: First, I make sure to coat the chicken breasts in a thin layer of olive oil. This helps to lock in moisture, especially when the chicken is in the oven for a while. It also adds a bit of flavor.
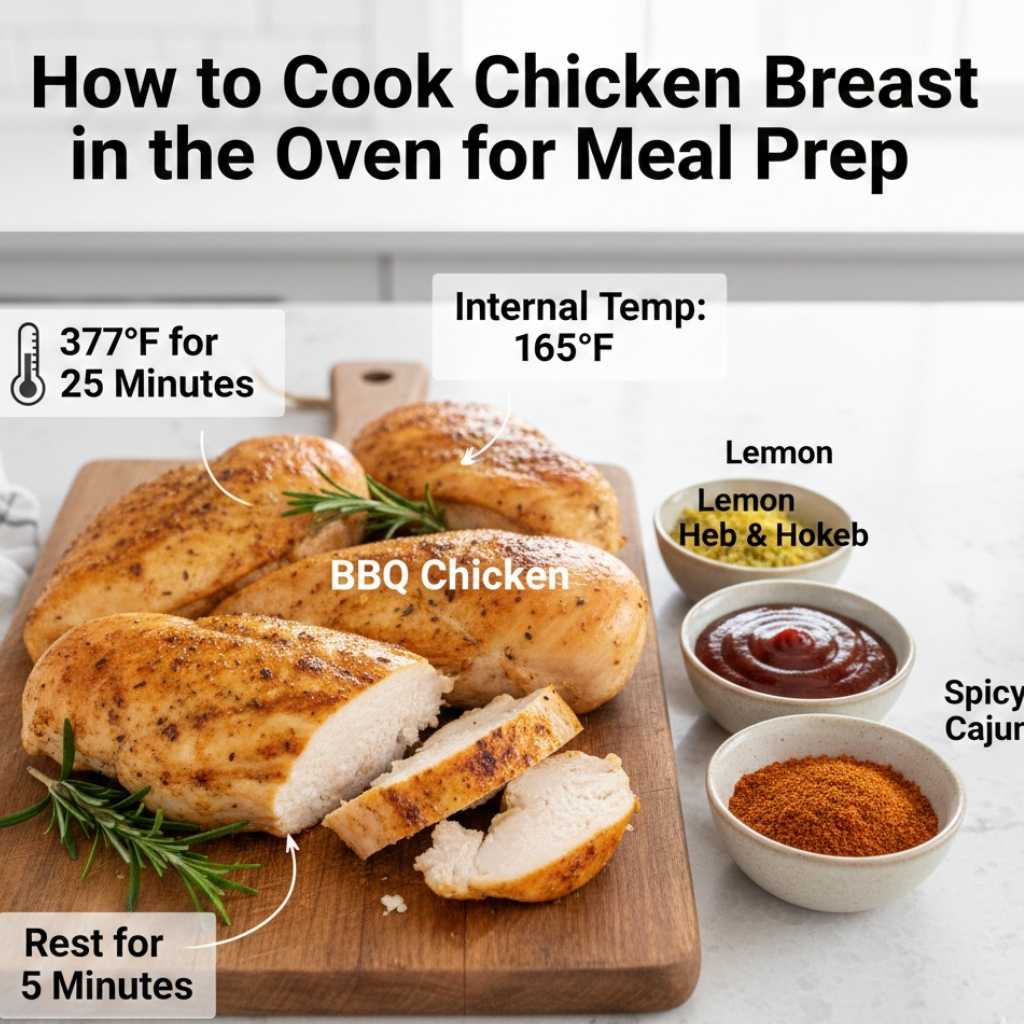
- Don’t overcook: The biggest mistake I see people make is overcooking chicken breasts. It’s tempting to leave them in the oven for longer, but I’ve learned that even an extra five minutes can turn tender chicken into something that feels like cardboard. I set my timer for 25 minutes at 375°F and check the internal temperature. It should reach 165°F at the thickest part.
- Rest your chicken: After I take the chicken out of the oven, I always let it rest for about 5 minutes before slicing. This allows the juices to redistribute, so I don’t lose all that flavor when I cut into it.
Flavor Variations for Meal Prep Chicken Breasts
Since I cook chicken for the entire week, I like to change up the flavor so I don’t get bored. But instead of going all out with complicated marinades, I keep it simple. Some of my favorite go-to flavorings include:
- Lemon & Herb: I mix olive oil, lemon zest, garlic powder, and a pinch of thyme or rosemary. It’s light and refreshing.
- BBQ Chicken: Sometimes, I’ll slather the chicken in my favorite BBQ sauce and bake it for the last 10 minutes of cooking. It gives the chicken a tangy, caramelized finish that’s perfect for lunch salads or wraps.
- Spicy Cajun: When I want a little kick, I rub the chicken with a mixture of Cajun seasoning, paprika, and garlic powder. It’s simple but packs a punch.
I’ve found that these flavors pair well with a variety of side dishes, like roasted veggies or a simple quinoa salad, making meal prep a breeze.
How to Cook Chicken Thighs in the Oven for Meal Prep
If you’ve never tried cooking chicken thighs for meal prep, you’re missing out. They’re one of my favorite cuts of chicken for meal prepping because they’re naturally juicier and more forgiving than breasts. Here’s how I do it:
Cooking Chicken Thighs to Perfection
The beauty of chicken thighs is that they’re hard to mess up. I always go for bone-in, skin-on thighs because the skin crisps up beautifully in the oven, adding extra flavor.
- Season well: I rub the thighs with olive oil, then sprinkle them generously with salt, pepper, garlic powder, and smoked paprika. This gives them a smoky, savory flavor that makes each bite delicious.
- Roast at 400°F: I’ve found that roasting chicken thighs at 400°F gives them a nice crispy skin while keeping the meat juicy. I cook them for 35-40 minutes, depending on their size. The internal temperature should reach 165°F.
- Crisp the skin: One of the best parts about cooking chicken thighs in the oven is getting that crispy skin. I always put them skin-side up, and if I want extra crispiness, I’ll turn on the broiler for the last 2-3 minutes of cooking. Just be careful not to burn them!
Why I Love Chicken Thighs for Meal Prep
Chicken thighs hold up so much better throughout the week compared to breasts. They stay tender and juicy even after being reheated, which is a huge win for meal prep. Plus, they’re super versatile. You can pair them with just about anything—rice, roasted potatoes, a salad—and they’re always satisfying.
How to Make the Best BBQ Chicken for Meal Prep
BBQ chicken is a classic, and I’ve perfected this method for meal prep. Whether it’s for sandwiches, wraps, or just a hearty protein on top of a salad, oven-baked BBQ chicken is always a crowd-pleaser.
Tips for Perfect BBQ Chicken in the Oven
- Use a high-quality BBQ sauce: I’m a huge fan of Sweet Baby Ray’s or any other local brand that offers a rich, smoky flavor. I coat the chicken in the sauce about 10 minutes before it’s done cooking to let it caramelize.
- Cook at 375°F: Just like with regular chicken breasts, I cook the chicken at 375°F for 25-30 minutes. Once the chicken reaches 165°F, I brush on the BBQ sauce and return it to the oven for an additional 10 minutes. This gives the sauce a chance to thicken and create that perfect glaze.
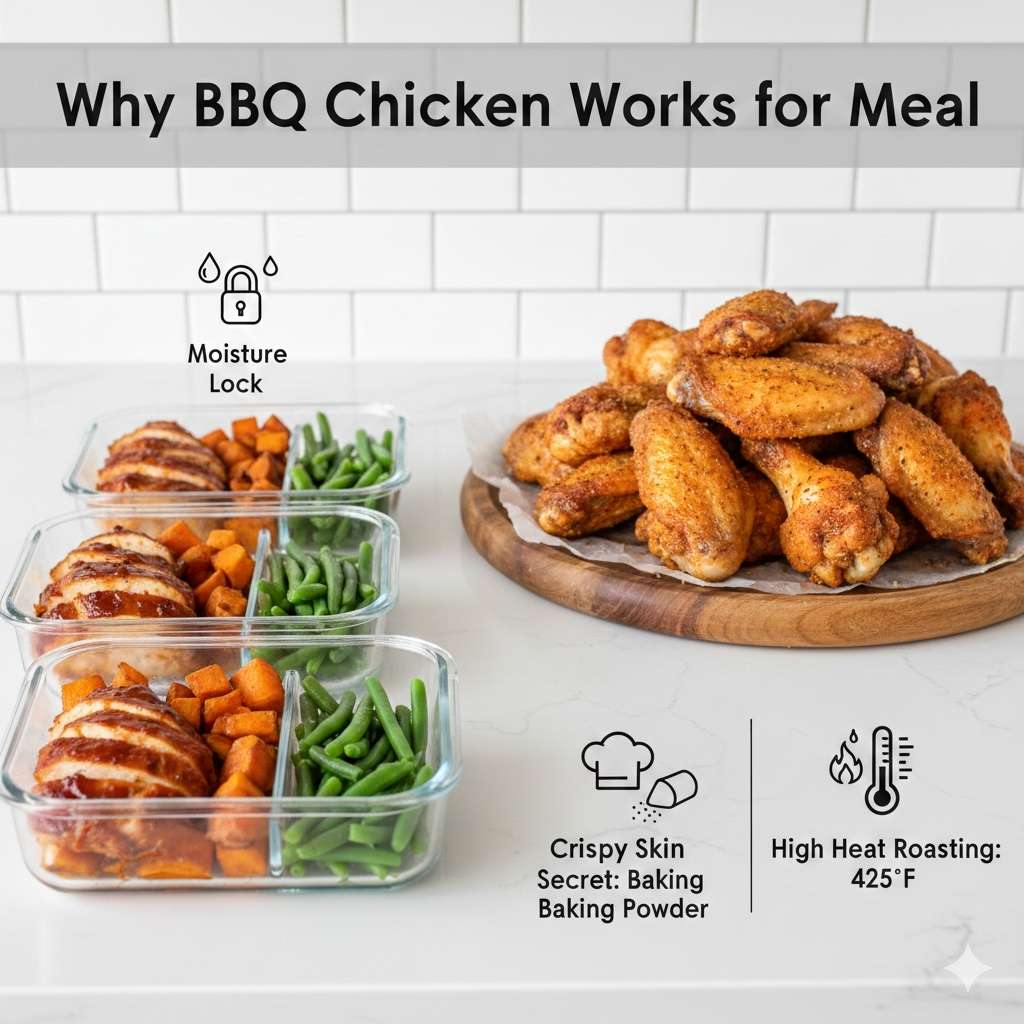
Why BBQ Chicken Works for Meal Prep
BBQ chicken is a great option because it stays flavorful, even after being stored in the fridge for a few days. The sauce helps keep the chicken moist, and it’s perfect for making quick, easy meals throughout the week.
How to Cook Chicken Wings in the Oven for Meal Prep
Chicken wings—who doesn’t love them? Whether they’re for game day, a quick dinner, or just a fun meal prep option, wings are one of my absolute favorites to cook in the oven. But here’s the thing: I’ve tried many methods over the years, and I’ve finally perfected how to get crispy, tender wings without the deep fryer. Let me share how I do it.
The Key to Crispy Oven-Baked Chicken Wings
One of the biggest challenges with oven-baked wings is getting that crispy skin. I’ve experimented with a few tricks, and I can confidently say this method works every time.
- Pat dry the wings: I learned early on that moisture is the enemy of crispy skin. So, after I rinse the wings, I make sure to pat them dry with paper towels. This removes excess moisture and helps them crisp up in the oven.
- Coat with baking powder: Here’s my secret weapon for crispy skin: a light coating of baking powder. It sounds strange, but it works. I sprinkle a little bit of baking powder onto the wings (not baking soda, it’s important to get this right) along with some salt, pepper, and garlic powder. The baking powder helps to dry out the skin and create a crispy exterior.
- Roast at 425°F: I bake the wings at a higher temperature, 425°F, for about 30-35 minutes. Halfway through, I flip them to make sure they get crispy on both sides. The high temperature helps render the fat, making them extra crispy.
- Broil for extra crisp: If I’m craving extra crispiness, I’ll turn on the broiler for the last 2-3 minutes. Just make sure to watch them closely so they don’t burn.
Why Chicken Wings Are Perfect for Meal Prep
Chicken wings are perfect for meal prep because they can be eaten in so many ways. I like to make a big batch at the beginning of the week and use them in salads, wraps, or simply paired with some roasted veggies or a rice bowl. They hold up well in the fridge and even taste great cold.
I also love that you can flavor them any way you want. One day, I might make buffalo wings with a tangy sauce, and the next, I’ll go with a sweet and savory glaze. The options are endless.
How to Cook Trader Joe’s Chicken Shawarma in the Oven for Meal Prep
If you’re a fan of quick, flavorful meals, then Trader Joe’s Chicken Shawarma is a must-try. It’s one of my favorite items to stock up on, and when I’m in a pinch, I turn to this pre-marinated chicken. But even if you’re not using pre-marinated chicken, you can still create a delicious shawarma-style meal at home with this method.
Cooking Trader Joe’s Chicken Shawarma in the Oven
I always have a few bags of Trader Joe’s Chicken Shawarma in the freezer, and it’s a lifesaver when I want a fast and tasty meal prep option. Here’s how I cook it:
- Preheat the oven to 400°F: For frozen chicken shawarma, I preheat my oven to 400°F.
- Arrange on a baking sheet: I line a baking sheet with parchment paper and spread the chicken evenly on it. I try not to overcrowd the pieces to ensure they cook evenly.
- Cook for 25-30 minutes: I bake the chicken for about 25 minutes, then flip it and bake for another 5-10 minutes. This ensures it’s golden brown and cooked through. I always check the internal temperature with a meat thermometer to make sure it hits 165°F.
Why Trader Joe’s Chicken Shawarma is Ideal for Meal Prep
One of the best things about Trader Joe’s Chicken Shawarma is that it’s already marinated, which means it’s packed with flavor. I don’t have to waste any time on prep, and I get a delicious, restaurant-style chicken right from my oven. It’s perfect for meal prep because it pairs so well with rice, salads, and roasted vegetables. I often serve it with a side of tzatziki sauce and some pita for a quick Mediterranean-inspired meal.
How to Cook Trader Joe’s Chicken Sausage in the Oven for Meal Prep
Another one of my favorite meal prep options is Trader Joe’s Chicken Sausage. These sausages are packed with flavor, and they’re a great low-fat option when I want a break from chicken breasts or thighs. Cooking them in the oven is super simple, and they hold up really well for meal prep throughout the week.
Cooking Trader Joe’s Chicken Sausage
Here’s how I cook these sausages to perfection in the oven:
- Preheat to 375°F: I preheat the oven to 375°F. It’s a nice middle ground where the sausages get golden brown without drying out.
- Arrange on a baking sheet: I place the sausages on a parchment-lined baking sheet. Make sure to space them out so they cook evenly.
- Bake for 20-25 minutes: I bake the sausages for about 20 minutes, flipping them halfway through to ensure they’re evenly browned on both sides. I also check the internal temperature, which should be at least 165°F.
Why Chicken Sausage is Great for Meal Prep
Trader Joe’s Chicken Sausage is great for meal prep because it’s versatile and easy to work with. I can slice it up and toss it into pasta, pair it with roasted vegetables, or add it to salads. Since they’re fully cooked, I just heat them up, and they’re ready to go. I love that they come in so many flavors—garlic, spinach, and even spicy varieties, making it easy to switch up the meals.
How to Cook a Whole Chicken for Meal Prep in the Oven
If you’ve never cooked a whole chicken for meal prep, let me tell you—it’s one of the best ways to get a lot of meals out of one bird. Roasting a whole chicken in the oven has been a game-changer for me when I need a filling, flavorful option that can last through the week.
Roasting a Whole Chicken: Step-by-Step
Roasting a whole chicken in the oven might seem intimidating at first, but trust me, it’s way easier than you think. Here’s how I do it:
- Prep the Chicken: I start by removing the giblets (if they’re inside) and patting the chicken dry with paper towels. Drying it off helps get that beautiful crispy skin we all love.
- Seasoning: I drizzle the chicken with olive oil, then sprinkle salt, pepper, garlic powder, paprika, and a touch of lemon juice. I stuff the cavity with a lemon (cut in half) and a few garlic cloves for extra flavor. This simple seasoning makes a huge difference.
- Roast at 425°F: I preheat the oven to 425°F and place the chicken breast-side up on a roasting pan. I cook it for about 1 hour and 20 minutes, or until the internal temperature reaches 165°F. If you want to make sure the skin gets extra crispy, you can turn on the broiler for the last 5-10 minutes.
- Rest Before Carving: Once the chicken is done, I let it rest for 10 minutes before carving. This helps the juices redistribute throughout the meat, making it nice and moist.
Why I Love Cooking Whole Chicken for Meal Prep
The beauty of cooking a whole chicken is that it can be used in so many different ways. You can eat it as is, shred it for tacos, use it in soups, or add it to salads. I usually break it down into smaller pieces once it cools down, then store it in airtight containers in the fridge. It holds up so well throughout the week, and I can mix up my meals without having to cook every day.
Plus, there’s something incredibly satisfying about roasting a whole chicken. It feels like a Sunday dinner kind of meal, but it’s actually perfect for meal prepping.
How Long to Cook Chicken in a Convection Oven for Meal Prep
If you’ve got a convection oven, you’re in for a treat. I’ve been using convection for a while now, and I can’t tell you how much time it saves. Convection ovens circulate air to cook food faster and more evenly, which is perfect for meal prep.
What is Convection Cooking?
In case you’re new to convection cooking, it’s a method where hot air circulates around the food, which helps it cook more quickly and evenly. It’s great for cooking multiple items at once, which makes it ideal for meal prepping. I use my GE Profile Convection Oven all the time for chicken, and it’s a real time-saver.
Cooking Chicken in a Convection Oven
When I use the convection oven, I adjust the cooking temperature and time a little bit. Here’s the breakdown:
- For chicken breasts: I cook them at 350°F in the convection oven for about 20-25 minutes, checking the internal temperature at 165°F.
- For chicken thighs: Since thighs are a little more forgiving, I can cook them at 375°F for about 30-35 minutes in the convection oven.
- For wings: If you want crispy wings (and who doesn’t?), I bake them at 400°F for 25-30 minutes. The convection oven makes them super crispy without having to deep fry.
Why I Recommend a Convection Oven for Meal Prep
Using a convection oven makes meal prepping so much easier. I can cook chicken faster, which is perfect for busy weeks when I’m trying to get a bunch of meals prepped in a short amount of time. The even heat distribution also ensures that everything cooks evenly, so I don’t have to worry about hot spots or undercooked pieces.
I’ve found that using convection also helps lock in the moisture, so my chicken stays juicy, even after it’s reheated.
How to Store and Reheat Meal Prep Chicken
Meal prep isn’t just about cooking the food; it’s about storing and reheating it in a way that keeps the flavor and texture intact. Over the years, I’ve learned a few tricks for storing and reheating chicken that will make your meal prep game even stronger.
Storing Chicken for Meal Prep
- Airtight Containers: I use Glasslock containers because they’re airtight and keep the chicken fresh for longer. They’re also microwave-safe, which makes reheating super easy.
- Freezing: If I’ve made a large batch of chicken, I’ll portion some of it out into freezer-safe bags and store it in the freezer. That way, I always have cooked chicken on hand for busy days when I don’t feel like cooking.
Reheating Chicken
- Oven Reheating: If I’ve got the time, I’ll pop my chicken back into the oven for a few minutes to get it nice and crispy again. I’ll set the oven to 375°F and heat the chicken for about 10-12 minutes, depending on the size of the pieces.
- Microwave: If I’m in a rush, I’ll use the microwave. I cover the chicken with a damp paper towel to keep it moist, and I heat it for about 1-2 minutes at a time, checking it until it’s heated through.
- Air Fryer: Lately, I’ve been using my air fryer to reheat chicken. It’s perfect for getting that crispy skin back, especially with wings or chicken thighs. I cook them at 375°F for about 3-5 minutes.
How to Use Leftover Chicken for Meal Prep
One of the best parts about meal prepping with chicken is the leftovers. Instead of just reheating the same meal over and over, I like to get creative and repurpose the chicken into different dishes.
- Chicken Salads: I toss leftover chicken with some mixed greens, avocado, and a simple vinaigrette. It’s a quick and healthy meal.
- Chicken Tacos: I’ll shred the leftover chicken and use it in tacos with some fresh salsa and a squeeze of lime. It’s the perfect way to switch up the meal prep routine.
- Chicken Soup: If I’ve got some leftover chicken breast or thighs, I throw it in a pot with some broth, veggies, and spices for a quick chicken soup.
How to Prep Chicken Wings for Meal Prep in the Oven
Chicken wings are one of my all-time favorite meal prep options. They’re perfect for snacking, salads, wraps, or as a main dish, and they’re surprisingly easy to prep in the oven. After some trial and error, I’ve nailed down the best way to cook them for meal prep. Let me walk you through how I do it.
Getting Crispy Chicken Wings Without the Fryer
I used to think the only way to get crispy chicken wings was to deep-fry them. But after some experimentation, I found that I could get just as crispy wings in the oven with a few simple tricks.
- Pat dry the wings: The key to crispy skin is getting rid of as much moisture as possible. After I rinse the wings, I lay them on a tray and pat them dry with paper towels. This step is crucial!
- Baking powder trick: A little secret I learned from a fellow chef is that baking powder helps create crispy skin. I toss the wings in a mixture of baking powder, salt, pepper, and any seasonings I like. The baking powder helps dry out the skin, leading to a crispy texture.
- Cook at a high temperature: I bake the wings at 425°F for about 30-35 minutes. The high heat ensures that the skin crisps up, while the meat stays juicy. Halfway through, I flip the wings to ensure they cook evenly.
- Broil for extra crispiness: If I’m craving ultra-crispy wings, I’ll turn on the broiler for the last 2-3 minutes of cooking. Just make sure to keep an eye on them so they don’t burn.
Why Chicken Wings Are Perfect for Meal Prep
Wings are perfect for meal prep because they’re super versatile and easy to store. I often make a large batch of wings at the start of the week and keep them in the fridge. They reheat well and stay crispy, which is a bonus. Plus, they’re great for mixing up your meal prep routine. One day I’ll have wings with a side of veggies, and the next, I might toss them in a salad.
Another thing I love about wings is the flavor options. From classic buffalo to teriyaki, you can change the flavor of your wings depending on what you’re in the mood for. If you’re not into spicy buffalo sauce, try sweet chili sauce or a garlic parmesan coating. The options are endless!
How to Prep Chicken for Meal Prep: Tips and Tricks
Now that we’ve covered the main chicken cuts, here are a few of my personal tips and tricks for making meal prep even easier:
Meal Prep for the Week Ahead
When I’m planning my meals for the week, I like to set aside a chunk of time on Sunday to prep everything. For chicken, I usually cook it all at once in the oven. Here’s how I organize it:
- Batch cooking: I typically prep a few different cuts of chicken, like breasts, thighs, and wings. I’ll season them differently to keep things interesting.
- Divide into portions: After cooking, I portion out the chicken into meal-sized containers. I always have a few ready-to-go containers in the fridge for quick meals during the week.
Freezing Chicken for Later
One of my favorite tricks for meal prep is cooking extra chicken and freezing it. I’ll make a double batch and freeze half of it for later use. Here’s how I do it:
- Cool it down: I let the chicken cool completely before freezing it. This prevents it from getting soggy when reheated.
- Store in freezer-safe containers: I divide the chicken into freezer-safe bags or containers, then label them with the date. It’s so convenient to have pre-cooked chicken on hand for a busy week.
Keep Your Chicken Fresh and Flavorful
- Use marinades: Marinating your chicken not only boosts the flavor but also helps keep it moist during cooking. I like to marinate chicken breasts for at least an hour before baking.
- Spice it up: Don’t be afraid to experiment with different spices and herbs. One week, I might use a smoky BBQ rub, and the next, a zesty lemon herb seasoning. It keeps things fresh and exciting.
How to Meal Prep Chicken Thighs for the Week
Chicken thighs are my go-to for juicy, flavorful meal prep. While chicken breasts are leaner, thighs have more fat and tend to stay moist even after being stored in the fridge. Here’s how I prep them:
Cooking Chicken Thighs in the Oven
- Seasoning: I always season my chicken thighs generously with olive oil, salt, pepper, garlic, and a bit of paprika for color. Sometimes I throw in a little rosemary or thyme if I’m feeling fancy.
- Roast at 400°F: I cook my chicken thighs at 400°F for about 35-40 minutes. The high heat gives them a nice crispy exterior while keeping the inside juicy.
- Rest before slicing: Like with any cooked chicken, I let the thighs rest for 5-10 minutes before slicing. This ensures they retain their juices and stay tender.
Why Chicken Thighs Are Ideal for Meal Prep
Chicken thighs are perfect for meal prep because they hold up so well throughout the week. Unlike chicken breasts, they won’t dry out as easily when reheated, which is a big plus when you’re eating the same thing for several days. I love using chicken thighs in a variety of meals, from rice bowls to salads, tacos, and even soups. They’re incredibly versatile, which makes them an ideal meal prep choice.
How to Make Meal Prep Chicken Work for Your Busy Week
We all have those weeks where cooking just isn’t at the top of the to-do list. But having prepped chicken on hand makes it so much easier to throw together a quick meal. Whether it’s tossing it into a salad, wrapping it in a tortilla for a quick lunch, or serving it with roasted vegetables, having cooked chicken in the fridge makes my week so much smoother.
Reheat and Serve
- Reheating: When it comes to reheating chicken, I’ve found the oven or air fryer works best. I’ll pop my chicken in at 375°F for 10-15 minutes, depending on the size of the pieces, and it comes out tasting just as good as the first time.
- Use leftovers creatively: Leftover chicken doesn’t have to be boring. I’ll often shred it and throw it on top of a salad, mix it into pasta, or make a quick chicken stir-fry. It’s a great way to add protein to meals without doing much extra work.
How to Cook Chicken for Meal Prep in the Oven: Flavor Variations
When it comes to meal prep, one of the best parts about cooking chicken in the oven is how easy it is to switch up the flavors. As much as I love the basics, sometimes I need a little variety to keep things interesting. Here are a few of my favorite flavor variations that make meal prep feel like a new experience each time.
Classic Lemon and Herb Chicken
There’s something about lemon and herbs that makes chicken feel fresh and light, but still flavorful. I use this method whenever I want a simple, yet delicious, chicken that pairs well with just about any side.
- Seasoning: I drizzle chicken breasts or thighs with olive oil, then squeeze fresh lemon juice over them. I sprinkle on a mixture of garlic powder, salt, black pepper, thyme, and rosemary. It’s simple, but the combination of lemon and herbs makes the chicken taste like something you’d get at a fancy restaurant.
- Cook at 375°F: I bake the chicken at 375°F for 25-30 minutes. The lemon juice helps tenderize the chicken, while the herbs give it a nice, aromatic flavor.
- Why it’s great for meal prep: The lemon and herb chicken works perfectly for meal prep because it stays light and doesn’t dry out after being stored. I often pair it with quinoa or roasted veggies, making it a versatile base for a variety of meals.
Spicy Cajun Chicken for Bold Flavor
If you’re a fan of bold flavors and a little heat, Cajun-seasoned chicken is a go-to for me. The spice levels are easily adjustable, and I love how the seasoning gives the chicken a deep, smoky flavor. This one’s a crowd-pleaser!
- Seasoning: I mix Cajun seasoning, paprika, garlic powder, and a pinch of cayenne pepper. I coat the chicken with olive oil first, then rub the seasoning mixture all over the chicken.
- Cook at 400°F: I bake the chicken at 400°F for 30-35 minutes, depending on the size of the pieces. The higher heat helps to caramelize the spices and gives the chicken a beautiful, flavorful crust.
- Why it’s great for meal prep: Spicy Cajun chicken is great for meal prep because it pairs well with rice, roasted sweet potatoes, or even a simple salad. The flavor holds up wonderfully after being stored in the fridge, so you’re not stuck eating bland meals all week.
Sweet and Tangy BBQ Chicken
I’ll be honest—I can’t resist a good BBQ chicken. It’s one of those flavors that just feels like comfort food. I use this recipe for meal prep when I want a little sweetness and tang to balance out the savory meals.
- Seasoning and BBQ Sauce: I use a high-quality BBQ sauce (my go-to is Sweet Baby Ray’s or any local, thick sauce with a good balance of sweet and tangy). I season the chicken with salt, pepper, and a touch of garlic powder, then coat it in BBQ sauce during the last 10 minutes of baking.
- Cook at 375°F: I bake the chicken at 375°F for 25 minutes, then brush on the BBQ sauce and return it to the oven for another 10 minutes. This gives the sauce time to caramelize and create a sticky, flavorful glaze on the chicken.
- Why it’s great for meal prep: BBQ chicken holds up well when stored in the fridge and is perfect for meal prepping. I use it in wraps, salads, or even toss it into a quick sandwich. If you’re looking for something hearty and filling, this is the one.
Garlic Parmesan Chicken for a Comforting Twist
Garlic and parmesan are a classic combo, and when paired with chicken, they create a comforting, satisfying meal prep option. This is one of my favorites when I want something that feels indulgent, but still healthy.
- Seasoning: I coat the chicken with olive oil, then sprinkle garlic powder, onion powder, salt, and pepper. I top it with a generous amount of parmesan cheese and bake until golden brown.
- Cook at 375°F: I cook the chicken at 375°F for about 25-30 minutes, depending on the thickness of the pieces. The cheese melts beautifully, creating a flavorful crust.
- Why it’s great for meal prep: Garlic parmesan chicken stays juicy, even after being reheated, and the rich flavor makes every bite satisfying. I usually serve it with steamed veggies or roasted potatoes for a filling, balanced meal prep.
How to Use Chicken for Meal Prep in Different Cuisines
One of the great things about chicken is its versatility—it can be used in so many different cuisines. If I want to change things up, I’ll tweak my chicken recipe to suit whatever cuisine I’m in the mood for. Here are a few international-inspired options I love for meal prep.
Mediterranean-Inspired Chicken
This is one of my favorite meal prep options because it’s light, fresh, and packed with flavor. It’s easy to make, and the ingredients are simple.
- Seasoning: I season the chicken with olive oil, lemon juice, garlic, oregano, and a pinch of salt. You can add olives or feta if you want to take it to the next level.
- Cook at 375°F: I bake the chicken at 375°F for about 25 minutes, until it’s cooked through.
- Why it’s great for meal prep: Mediterranean chicken pairs wonderfully with couscous, quinoa, or a Greek salad. The fresh, zesty flavors hold up well when stored and are great for mixing up the flavors throughout the week.
Asian-Inspired Teriyaki Chicken
If you’re craving something with a sweet and savory punch, teriyaki chicken is an awesome option for meal prep. The flavors are rich and perfect for adding to rice bowls or salads.
- Seasoning and Sauce: I marinate the chicken in a simple teriyaki sauce made from soy sauce, honey, ginger, and garlic. You can use store-bought teriyaki sauce for convenience.
- Cook at 400°F: I bake the chicken at 400°F for 30 minutes, basting with the teriyaki sauce halfway through.
- Why it’s great for meal prep: The sweet, umami flavor of teriyaki chicken works perfectly with stir-fried veggies or on top of a bowl of rice. I love making extra sauce so I can drizzle it over the chicken after reheating.
Meal Prep Chicken for Salads, Wraps, and Bowls
One of my go-to meal prep ideas is to use my cooked chicken as a base for salads, wraps, and grain bowls. It makes for a quick and easy lunch or dinner, and it’s easy to switch up the flavors.
Chicken for Salads
I love tossing some grilled or roasted chicken into a salad for a protein boost. Whether it’s a simple Caesar or a Mediterranean salad, the chicken adds heartiness to the meal.
Chicken Wraps
Chicken wraps are another meal prep winner. I’ll take my cooked chicken, add some fresh veggies, a drizzle of dressing, and wrap it all up in a whole-wheat or spinach tortilla. It’s portable and easy to eat on the go.
Grain Bowls with Chicken
Grain bowls are an easy, customizable meal prep option. I use a base of quinoa, rice, or farro, then top it with chicken, veggies, and a flavorful sauce (like tahini or tzatziki). It’s simple, filling, and super tasty.
Storing and Reheating Meal Prep Chicken: Tips for Keeping It Fresh
After spending time in the kitchen prepping all this delicious chicken, the last thing I want is for it to go bad before the week is over. Over the years, I’ve learned a few things about storing and reheating chicken that help keep it fresh and flavorful for meal prep. Here are my tips.
How to Store Meal Prep Chicken for the Week
- Use Airtight Containers: The key to keeping chicken fresh is to use airtight containers. I always store my cooked chicken in Glasslock or Pyrex containers, which are perfect for meal prep. These containers keep the chicken sealed, preventing it from drying out or absorbing any odors from other foods in the fridge.
- Label and Date: Since I often cook multiple batches of chicken for the week, I make sure to label the containers with the date I cooked them. This ensures that I use the oldest chicken first. I typically aim to eat the chicken within 4-5 days, although it can last up to 7 days in the fridge if stored properly.
- Portion It Out: I like to divide the chicken into individual meal-sized portions so I can just grab and go when I’m in a hurry. This way, I don’t have to waste time trying to figure out how much chicken I should eat for lunch or dinner.
Freezing Meal Prep Chicken for Long-Term Storage
Sometimes, I cook a bit more than I can eat in a week, and that’s when freezing comes in handy. Freezing chicken ensures I always have a healthy meal option on hand.
- Cool the Chicken First: After cooking, I let the chicken cool completely before freezing it. This prevents condensation inside the storage bag or container, which can lead to freezer burn.
- Use Freezer-Safe Bags or Containers: I use Ziploc freezer bags or freezer-safe containers to store the chicken. I make sure to squeeze out as much air as possible to prevent freezer burn.
- Portion the Chicken: Just like with refrigeration, I portion out the chicken into individual servings before freezing. This makes it easy to grab exactly what I need without having to defrost the whole batch.
- Label with the Date: I label the bags or containers with the date so I can keep track of how long it’s been in the freezer. I try to use the chicken within 3 months for the best taste and texture, though it can be kept for up to 6 months.
How to Thaw Frozen Chicken Safely
- In the Fridge: The best way to thaw frozen chicken is by placing it in the fridge overnight. This method ensures that the chicken stays at a safe temperature while it defrosts.
- Quick Thawing in the Microwave: If I’m in a rush, I’ll use the microwave’s defrost function. I keep an eye on it to make sure it doesn’t start cooking in the microwave.
- Cook Immediately: After thawing chicken, I always cook it right away to avoid any bacterial growth. I never refreeze chicken once it’s been thawed, as it can compromise both taste and safety.
Reheating Meal Prep Chicken to Keep It Moist and Flavorful
No one wants dry, tough chicken, especially when they’ve taken the time to cook it to perfection. Here’s how I reheat my meal prep chicken to keep it as juicy and flavorful as possible.
Reheating Chicken in the Oven
- Low and Slow: When I’m reheating a larger portion of chicken (like a whole chicken or chicken thighs), I like to pop it in the oven at 350°F for about 10-15 minutes. I cover it with aluminum foil to trap in moisture, which helps keep it tender.
- For Crispy Chicken: If I’m reheating chicken wings or thighs and want them to stay crispy, I place them on a baking sheet and bake them at 400°F for 10-12 minutes. This method ensures the skin stays crispy and the chicken stays juicy inside.
Using the Microwave for Quick Reheating
- Cover with a Damp Paper Towel: When I’m in a hurry and don’t have time to use the oven, the microwave is my go-to. I place the chicken on a microwave-safe plate and cover it with a damp paper towel to keep it from drying out.
- Reheat in Short Bursts: I reheat the chicken in 30-second intervals, checking after each burst to avoid overheating. This helps me avoid rubbery, dry chicken.
Using an Air Fryer for Reheating
- Reheat at 375°F: If I’m reheating chicken wings, thighs, or even chicken breast and want that crispy texture back, I use my air fryer. I set it to 375°F and reheat for about 3-5 minutes, flipping halfway through. The air fryer is great for restoring that crispy skin without drying out the meat.
Tips for Avoiding Dry Chicken During Reheating
- Add Moisture: If I’m reheating chicken that seems a bit dry, I’ll add a small drizzle of chicken broth or olive oil before reheating. This adds moisture back into the chicken and helps keep it tender.
- Check Temperature: I always use a meat thermometer to check that the chicken has reached 165°F before serving. This ensures it’s fully heated through without overcooking it.
Repurposing Leftover Chicken for New Meals
One of the best parts about meal prepping chicken is that the leftovers can be used in all kinds of creative ways. I’ve learned to repurpose my leftover chicken into new meals that feel fresh and exciting. Here are a few ideas I often turn to:
Chicken Salad
If I’ve got leftover chicken breast or thighs, I’ll chop it up and toss it into a salad. Sometimes I add a bit of mayonnaise or Greek yogurt for creaminess, along with some mustard, pickles, and celery for crunch. It’s an easy, satisfying lunch.
Chicken Tacos
Shredded leftover chicken is perfect for tacos. I’ll add a little taco seasoning and warm it up in a pan with some diced onions and bell peppers. Then, I serve it with tortillas, salsa, and avocado for a quick dinner.
Chicken Stir-Fry
I often take leftover chicken and turn it into a stir-fry by tossing it with some sautéed veggies and a simple stir-fry sauce made from soy sauce, garlic, and ginger. It’s a great way to use up any leftover vegetables in the fridge and create a delicious, balanced meal.
How to Organize Your Chicken Meal Prep for the Week
When it comes to meal prepping, organization is key. I’ve found that the more organized I am, the easier it is to stick to my plan and stay on track throughout the week. I’ve tried a few different methods for organizing my meal prep, and here’s what works best for me.
Create a Meal Prep Schedule
One of the first things I do is set aside a block of time for meal prep. I’ve learned the hard way that if I don’t schedule it, it won’t happen. I usually reserve Sunday afternoons for prepping my chicken and other meals for the week. Here’s what I do:
- Set aside 2-3 hours: I block off a few hours to cook, prep, and portion everything out. This gives me enough time to cook the chicken in the oven, prep veggies, and organize everything into containers.
- Plan for the week: Before I even start cooking, I look at my calendar to see how many meals I’ll need for the week. I break my meals down into lunch, dinner, and snacks. This way, I know exactly how much chicken I need to cook.
- Use a meal prep app: I’ve started using a meal prep app (like Mealime or PrepDish) to help organize my meals for the week. These apps help me plan and stick to a shopping list, which takes the guesswork out of meal prep.
Portion Out the Chicken
Once the chicken is cooked, I divide it into individual portions that are easy to grab when I’m hungry. I usually do this right after cooking while everything is still warm. Here’s how I portion it:
- Use meal prep containers: I use Glasslock or Pyrex containers to store my portions. These containers are durable, microwave-safe, and help keep the chicken fresh throughout the week.
- Portion according to your needs: I generally aim for about 4-6 ounces of chicken per meal, depending on whether it’s for lunch or dinner. If I have a lighter dinner planned, I’ll go with a smaller portion.
- Label the containers: I like to label my containers with the date I cooked them. This helps me keep track of how fresh they are, so I use the oldest meals first.
Keep Your Meals Balanced
Meal prep isn’t just about cooking chicken; it’s about creating balanced meals. I’ve learned that it’s best to pair the chicken with a variety of veggies, healthy carbs, and a source of healthy fats to keep my meals satisfying and nutritious. Here’s how I balance my meals:
- Veggies: I always roast or steam a variety of vegetables—like broccoli, carrots, and bell peppers—to go along with my chicken. I’ll usually cook a big batch of veggies and portion them out into containers with the chicken.
- Healthy Carbs: I love adding quinoa, brown rice, or sweet potatoes to my meal prep. These are great, filling options that go well with any type of chicken and add a nice texture to the meal.
- Healthy Fats: I always make sure to include a healthy fat source, like avocado, olive oil, or nuts. A little bit of fat not only makes the meal taste better but also helps keep me full longer.
Organize Your Meal Prep for the Week
Now that everything is cooked and portioned, I make sure to organize my meals so they’re easy to grab during the week. I use a few strategies to make it even more convenient:
- Store meals by day: I organize my meals by day of the week. For example, I’ll have Monday’s lunch and dinner together in the same container, Tuesday’s in another, and so on. This makes it super easy to grab and go.
- Keep snacks separate: I like to keep snacks like hard-boiled eggs, fruit, or yogurt in separate containers so I can grab them quickly throughout the day. I’ll also prep some extra chicken or veggies if I need an afternoon snack.
- Use a dedicated fridge shelf: I keep my meal prep containers on one shelf in the fridge so they’re all in one place. This way, I’m not digging through the fridge looking for lunch when I’m running late.
How to Make Meal Prep Chicken Work for Your Busy Week
We all know that sometimes, even the best meal prep plans can go awry. Life happens, and suddenly you’re too busy to make it to the gym or sit down for a healthy meal. But with meal prep chicken ready to go, it’s much easier to stay on track, even during those hectic days.
Make Your Meal Prep Chicken Work for Different Meals
One of the best things about meal prepping chicken is how versatile it is. I can use the same chicken in several different ways throughout the week without getting bored. Here are a few ways I repurpose my chicken:
- Wraps and sandwiches: I love using my meal prep chicken in wraps or sandwiches. A quick drizzle of hot sauce, some lettuce, and a few slices of avocado make for a quick, satisfying lunch.
- Chicken bowls: Sometimes I’ll throw my chicken on top of a grain bowl with quinoa or rice, some roasted veggies, and a drizzle of dressing or sauce. It’s an easy, customizable meal that’s perfect for lunch or dinner.
- Toss it in a salad: I’ll add my chicken to a salad for a quick, healthy meal. Whether it’s a Caesar salad, Greek salad, or just a simple green salad, the chicken adds the perfect amount of protein.
Reheat the Chicken Without Losing Its Flavor
Meal prep chicken can get dry if you’re not careful when reheating it. To keep the chicken moist and flavorful, I’ve learned a few tricks:
- Use the oven or air fryer: The best way to reheat chicken is by using the oven or air fryer. Both methods help keep the skin crispy, especially for wings or thighs. I heat the chicken at 375°F for 10-15 minutes until it’s heated through.
- Microwave tips: If you’re short on time, the microwave works in a pinch. I always cover the chicken with a damp paper towel to keep it from drying out. I heat it in 30-second intervals until it’s warm.
- Add sauce or broth: Sometimes I’ll add a little bit of broth or sauce when reheating chicken. This adds moisture and makes the chicken taste just as fresh as when I first cooked it.
Conclusion: Meal Prep Chicken Makes Life Easier
Meal prepping chicken in the oven has seriously made my life easier. With just a little bit of planning, I can ensure that I have healthy, flavorful meals ready to go all week long. Whether I’m cooking chicken breasts, thighs, wings, or even a whole chicken, the oven is my trusted tool for creating delicious, meal-prep-friendly dishes. By organizing, seasoning, and storing my chicken properly, I can stay on track with my nutrition goals, even during the busiest of weeks.
If you’ve been hesitant about meal prepping, I hope this guide gives you the confidence to dive in. I promise, once you start cooking chicken in the oven for meal prep, you’ll wonder how you ever lived without it!
FAQs
How to Cook Chicken for Meal Prep in the Oven without drying it out?
To master How to Cook Chicken for Meal Prep in the Oven, bake at 400°F and pull at 165°F. Let it rest 5 minutes. This keeps the meat juicy and ready for the week.
What is the best temperature to bake chicken for weekly meal prep?
When learning How to Cook Chicken for Meal Prep in the Oven, 375°F to 400°F works best. It cooks fast and keeps flavor locked in for salads, bowls, or wraps.
How long should I bake chicken breast for meal prep?
For How to Cook Chicken for Meal Prep in the Oven, bake boneless breasts 20 to 25 minutes at 400°F. Thick cuts may need a few more minutes. Always check for 165°F.
Can I cook vegetables with chicken for oven meal prep?
Yes. While practicing How to Cook Chicken for Meal Prep in the Oven, roast veggies on the same sheet pan. Use even cuts so all food cooks at the same rate.
How do I store baked chicken for meal prep safely?
After using How to Cook Chicken for Meal Prep in the Oven, cool the chicken fast and store in airtight containers. Keep in the fridge up to 4 days for easy meals.